1. Basics
This documentation contains all available information about the MusicCenter V9 software. It does not cover many hardware details. The manual does not cover all the features available in the software, but tries to cover the most important areas.
1.1. Other resources
If you like to learn more about trivum and our products and solutions, you will find it here:
-
Each of our products is shipped with a quick installation guide
-
Send an eMail with your questions to service@trivum.com
-
Call us - +49 (0)711 6456071-0
2. Functions
2.1. Multiple zones
Our Music Systems are Multiroom systems. Most of them have more than one audio output, so more than one zone/room can be handled. Multiple trivum Music Systems can be combined using a master/slave configuration. This means that one device is defined as master and the others as slaves. The system is then configured via the master - and all devices together behave as one powerful Music System with many outputs.
2.2. Multiple sources
Besides supporting multiple zones, nearly every trivum MusicSystem has more than one audio source. It is therefore possible to switch the sources in these zones. It is possible that more than one zone listens to a source. And it is possible that all zones listen to different sources at the same time. It just depends on the type of trivum MusicSystem used. For example, if you use the SC344, you have 4 zones with 12 sources. Each zone has its own streaming client, its own FM tuner and has also access to one of 4 analog stereo inputs.
If zones are grouped they behave like one zone and listen to the same source.
|
Please refer to Grouping for more information |
2.3. Streaming
Streaming means to play back digital audio content, normally read from a network source.
2.3.1. Internet Radio
trivum can play web radio streams provided via the TuneIn catalog of web radio stations.
2.3.2. Music Library
these are music files stored on a NAS (Network Attached Storage) in format .mp3, .flac and .m4a.
2.3.3. Audio Services
trivum can play music provided by streaming services like, for example, Deezer, Qobuz and TIDAL.
2.3.4. AirPlay audio
A music stream can be received and played in the local network via AirPlay from Apple devices.
2.4. FM/DAB+ Tuner
Depending on the Model, the hardware contains one or more RDS capable FM tuner(s)
with tuning and 30 station memories for quick and easy access.
In devices of the latest generation (RP341v2, RP321, RP311v2, SC344m, SC311m),
the tuners are also DAB+ capable.
2.5. Analog inputs
To play back analogue Audio from an external device like CD Player, iPad or mp3 Player you may connect this with an analogue input.
2.6. Network inputs
The trivum InStreamer adds another audio source to your trivum multiroom system. An external audio source, like a CD- or record player, can be connected via analog RCA or digital TOSLINK cable to the InStreamer. On the other side the InStreamer is connected via Cat-5 Ethernet cable to your LAN and then integrated into your trivum system.
2.7. DSP
Adjust the sound playback to your desires and the individually environment, with the parametric 5-band equalizer.
2.8. Favorites
No matter from what source your music originates, with the trivum favorites you will quickly have access to them.
2.9. Timers
2.9.1. Alarm clock
Every zone supports two Alarm clocks, on selectable week days.
An alarm clock can play:
-
an (uploadable) ringtone
-
any streaming favorite, like a NAS album, a playlist, or a web radio
-
FM/DAB+ radio
-
analogue input.
Alarm clocks are configured directly in a visualization like the Web Visu or a Touchpad.
Alarm clock display
-
If an alarm clock is configured, a bell symbol is shown in the zone.
-
If there will be an alarm within 24 hours, it’s time is shown as well.
-
If an alarm is configured but it will not run within 24 hours, which is often the case with a weekday alarm at Friday, then it’s time is not shown.
alarm clock behaviour
1) if the zone is off, alarm will switch it on, play alarm content, then switch off.
2) if the zone is playing, the alarm may or may not play content, depending on current volume and pause status. but it is considered inactive, and it will not switch off the zone later.
This can be disabled by the global option:
V9: System / Setup / Advanced / Force alarm (play and off) in active playing zones
V10: Customize / zones / general settings / Force alarm (play and off) in active playing zones
3) if alarm is playing, but the user switches the zone off then on, or the user selects a different music content, the alarm is deactivated, and will not switch off the zone later. This behaviour cannot be deactivated, as such user interaction means the user has taken over control manually. If the "Force alarm" option mentioned above is used, it will kick in again on the next day, as soon as the alarm start time is reached again.
Whenever the alarm clock behaves unexpected you may look for details under:
Support / Logs&Warnings / Show event log
Support / Logs&Warnings / Show warnings
Alarm clock extensions
If you strictly need an automated Zone Off every day, do not just rely on Alarm, as it can be deactivated by user interaction. Also configure a Night Quiet Time event as described below.
Alarm clock in a group
If you have an alarm clock configured in a zone, and the zone is master of a group, i.e. the group name is the same as of the zone, the alarm music will play in the whole group.
To configure the alarm volume used per zone
-
ungroup everything
-
go into every zone of the group, and therein, configure the alarm volume in the alarm menu. (Although there is no individual alarm active in all zones except the master zone, the alarm volume setting will be used.)
-
then reactivate the group.
2.9.2. Advanced Timers
Every zone allows configuration of two special time ranges,
-
the Afternoon Quiet Time (AQT)
-
and Nightly Quiet Time (NQT).
During these times music can be turned off, or the volume can be limited. AQT/NQT are set in the web configuration only.
For example, to force a Zone Off at 23:00, set NQT Starttime and Stoptime to 23:00, with action "turn off once".
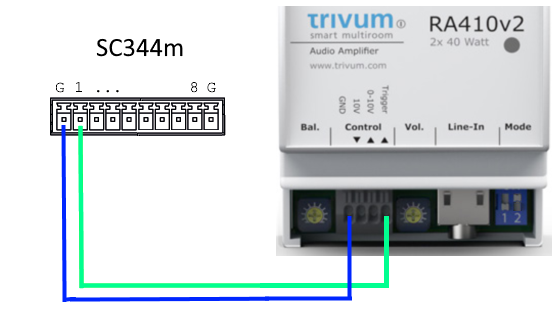
2.10. Trigger outputs
2.10.1. Signal output with SC344m
With the SC344m, the line-out outputs 1 to 8 have a trigger port. With this, external amplifiers, like our RA410, can be automatically turned on by selecting a source.
Trigger output technical details:
-
output voltage 12V, max. 50mA.
-
left- and rightmost pin are common ground.
-
pins between them are outputs 1-8.
Example how to connect output 1 triggering to an RA410v2 amplifier.
Connect G with GND, 1 to 8 with Trigger, set Mode:1 to Off, Mode:2 to On.
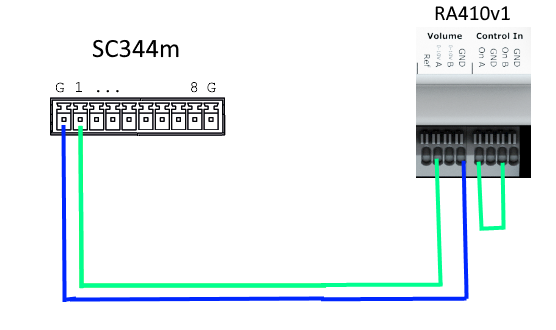
Example how to connect output 1 triggering to an old RA410v1 amplifier, in stereo mode.
Note that On A and On B on amplifier side are short-circuited, to tell the amplifier
it should run in stereo mode. This way only 2 control wires are needed from the SC to the amp.
2.10.2. Signal input with SC344m
With the SC344m, some or all trigger outputs can be reconfigured as an input. For example, you can respond to the ringing at the front door by pausing the music playback. Or activate the paging feature to make an announcement.
If line outputs are connected to amplifier(s) in stereo mode, output triggers are activated as pairs. If you use only the first pin of such a pair to trigger an amplifier, you can still configure the second pin as an input for other functions.
Trigger input technical details:
-
Input voltage for logic '1': 5V .. 24V
-
plug: AKL 169-10, 10 pins, Pitch 3.5mm
2.10.3. Signal output with SC344V2
With the SC344V2, the line-out outputs 1 to 4 have a trigger port. With this, external amplifiers, like our RA410 or P319, can be automatically turned on by selecting a source.
Trigger output technical details:
-
output voltage 12V, max. 50mA.
-
pins at left are common ground.
-
pins right to them are outputs 1-4.
Here is an example how to connect output 1 triggering to an RA amplifier, in stereo mode.
Note that On A and On B on amplifier side are short-circuited, to tell the amplifier
it should run in stereo mode. This way only 2 control wires are needed from the SC to the amp.

2.10.4. Signal output with SC044
With the SC044, the line-out outputs 1 to 4 have a trigger port. With this, external amplifiers, like our RA410 or P319, can be automatically turned on by selecting a source.
Trigger output technical details:
-
output voltage 12V, max. 50mA.
-
use plug: WAGO 713-1104, Mini HD Series, 2x4 Pins, Pitch 3.5mm.
-
pins at top are outputs 1-4, below are common ground.
With an adapter cable RJ45 to Cinch + Trigger (Part No. 500034) a P319 amplifier can be connected to a SC044. In addition to the audio lines, the trigger connection (jack socket) must be connected to the trigger output of the SC044, either directly by removing the jack socket or with a cable with a jack plug. The tip of the jack plug is the switching input, the shield the ground.
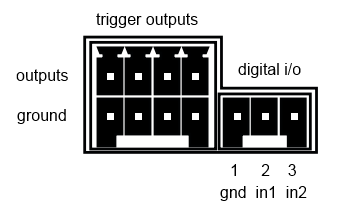
2.10.5. Signal input with SC044
The SC044 has two digital I/O ports, so it can be operated with simple buttons. For example, you can respond to the ringing at the front door by pausing the music playback. Or activate the paging feature to make an announcement.
Trigger input technical details:
-
Input voltage for logic '1': 5V .. 24V
-
plug: RIAcon type 169, Order number 31169103, 3 pins, Pitch 3.5mm
-
pins: 1 - common mass, 2 - input 1, 3 - input 2
For configuration see setupPlayer
2.11. Grouping
The trivum multiroom system allows you to easily group rooms with the TouchPad, iPhone/iPad, or our web visualization. After grouping, this group then behaves like a single room - that is, in all areas of the group the music changes when you select a new song. Of course, the volume of the Group adjusts together, however, rooms can be adjusted or muted individually within the group.
Technically, it makes a difference if zones are combined within the same device, e.g. the same SC344, or across multiple devices.
If groups are created across several SC/RP/AudioBox devices, please note:
-
with stream playback, high network traffic may occur, and your network switches may require a correct IGMP Snooping configuration. Find details under: https://www.trivum-shop.de/support/docs/en/trivum-troubleshooting.html#groupplay
-
with DAB/FM tuner playback, all participating devices need to have a builtin DAB/FM tuner connected to the same antenna. there is no network pass-through of audio data from the tuner.
-
with Line Input play, all participating devices need to be connected to the same analog source in parallel, by Y splitter cable. there is no network pass-through of audio data from the Line Input.
With SC344m and SC311m devices, Line Input or Tuner sound can be passed from device to device by using USB-C cables and software V10. Find more details under:
How to configure a 20 zone system with 12 global matrix sources
2.12. Paging
Pagings allow to switch selected zones temporarily to a predefined source like Line Input or a stream, and to play a music file, like a ringtone.
2.12.1. Paging Settings in WebSetup
2.12.2. Configuration of a Ringtone Paging
2.13. KNX
trivum can be controlled by KNX messages sent from a KNX IP router or interface.
-
for general informations see trivum KNX support
-
for configuration see setupKNX
2.14. RTI
trivum can be controlled by the programmable RTI remote control.
-
for configuration see setupRTI
3. Products
3.1. FLEX SCxxx
Each of the FLEX products supports 4 zones. Multiple FLEX products can be combined to support installations with more than 4 zones. Every zone accesses its own streaming source and tuner (SC344) - or one of up to 4 external analog sources (SC344). More on the website.
3.2. REG RPxxx
The trivum network players allow you to stream your music in different rooms. All players can be configured via web browser. Common protocols like KNXnet/IP, HTTP, XML are supported. There are a lot of possibilities to control the player: via KNX, iOSX app, trivum TouchPad and many more. All players support the formats WMA, MP3, AAC, ALAC and Flac with a resolution up to 24/96 kHz. More on the website.
3.3. SC311m
Streaming from the Internet, from AirPlay devices or from any NAS. Listen to FM/DAB+ radio and connect external devices to the analog or digital input - this all is possible with our SC311m from the DESIGN product line. It can be used as a stand-alone music system, however, only connected with components the SC311m shows its complete Multiroom functionality. With an output of 2x 30 watts it is ideal to provide sound for any room. When required, a subwoofer can be connected to the line output. The SC311m has an analog and digital (S/PDIF) input as well as an FM/DAB+ antenna connector.
3.4. TouchPad
Allows music selection and KNX control in a very appealing wall mounted design.
Especially in commercial environments the Touchpad is essential.
Without opening a mobile app everytime, you can run actions by a single touch:
-
control or mute the volume level
-
start a paging (announcement)
-
select a different music favorite
-
switch KNX lights, shutter or air conditioning
A PIN page can also be configured, to protect against unallowed use in public areas.
Compared to WLAN based tablets mounted in a wall, the Touchpad also features a more reliable network communication, as it is connected by LAN cable.
Read more on the website.
3.5. Accessories
In-wall boxes for Touchpads are available via the trivum web shop.
4. Getting started
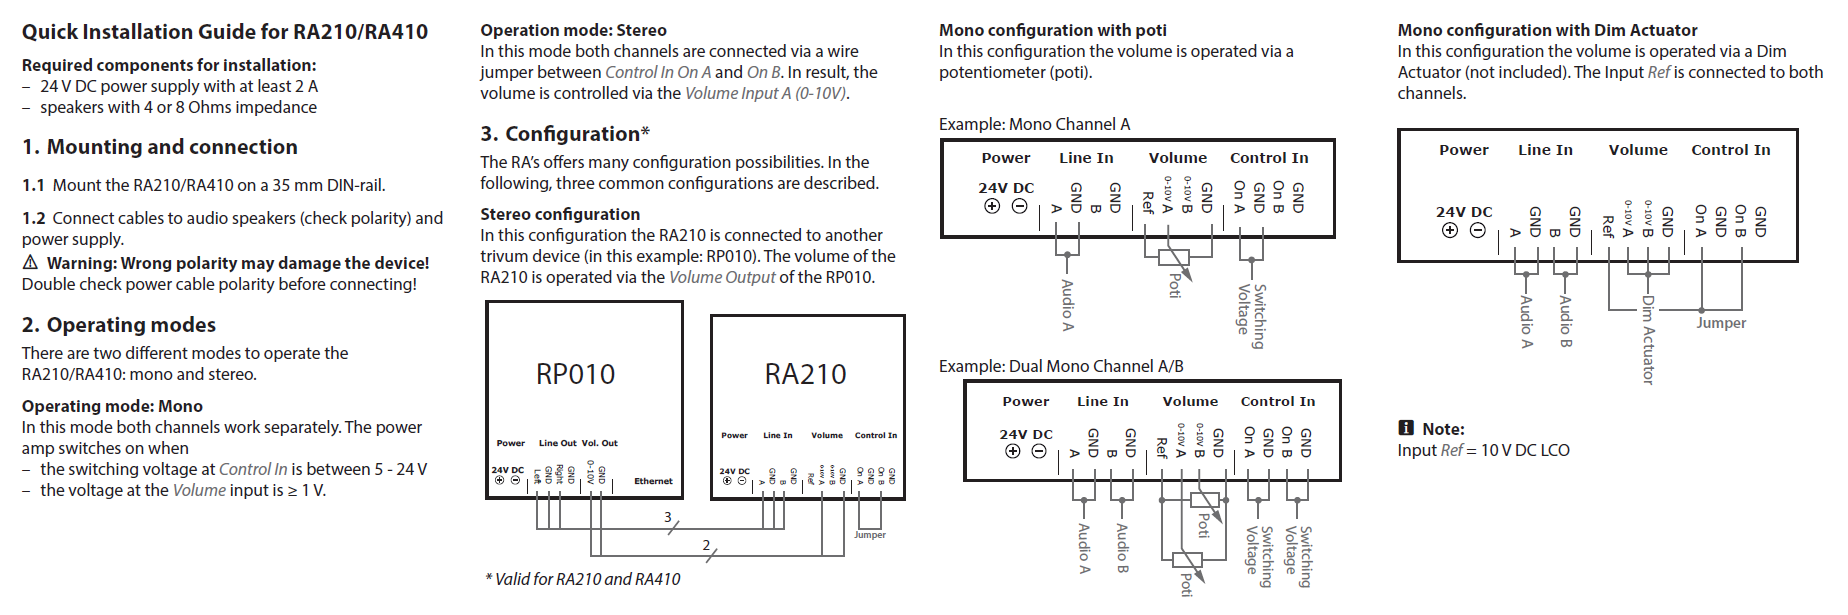
4.1. Quick start
Please check carefully the quick installation instructions provided with your device, as they may contain important model specific details.
4.1.1. Quick Installation Guide for SC344
4.1.2. Mounting and connection
-
Mount the SC344 using 4 screws depending on the surface.
Alternatively, you can use the rackmount kit for mounting within a 19" server rack. -
Connect cables to Line-In, audio speakers, ethernet network and power supply.
4.1.3. Connecting RP010/RP341v1 and RA210 or RA410v1 amplifiers
This is described in the Quick Installation Guide, supplied with the amplifier. The connection scheme is also available here:
Important: after any jumper changes, restart the amplifier by disconnecting it from power, otherwise it will not detect the changed configuration!
When done, also go into the web configuration of the RP actuator, into
Devices / Setup (or Players) / line out settings for output 5
and activate
use 0-10 V line
(do not select "use control out" as this wire is not needed in this setup)
If the amp detects an active output (zone switched on with music playing) the green led at the amp will blink.
If it is passive the green led shows a permanent light.
4.1.4. Connecting RP311v1 and RA410v2 amplifiers
The recommended wiring ist:
-
connect RP311v1 LineOut Left/Right/GND by adapter cable to RA410v2 audio input
-
connect RP311v1 ControlOut On/Off to RA410v2 Control Trigger
-
connect RP311v1 ControlOut GND to RA410v2 Control GND
-
select Mode at RA410v2: 1=Off 2=On (to use trigger for on/off)
-
at RP311v1 configure: do not use 0-10 V line.
the RP311v1 summary should read:
-
The LineOut sends a variable strength signal depending on zone volume
-
the 0-10 V line is not used
-
the On/Off line sends 24V when on, with max. 100 mA
do not use: (these are optional)
-
RP311v1 ControlOut 0-10V Vol
-
RA410v2 0-10V
Other configurations are possible, but this way you use a minimum amount of wires.
4.1.5. About Symmetric Line Input (SYM IN) with RP341v1
This input allows to send external analogue sound into the RP341v1, by shielded Cat5 cable, using the original trivum Analog Input Adapter which is available here:
Warning: please do not use Cat5 Adapters by any other manufacturer. The pins are not standartized, so they will not be compatible, and may even cause damage to external connected devices, due to 24V voltage on some pins supplied by the trivum SYM IN connector.
4.1.6. Connecting a subwoofer with SC344m
The SC344m has both speaker and line outputs.
By default, audio of one zone goes to a stereo speaker output (L and R connectors), and a cinch line output (L and R connectors) in parallel. Every output can be reconfigured, to run as mono instead of stereo, and to apply a lowpass filter, required for a subwoofer.
So for example, you have the main sound of the Living Room going to 2 speakers, then you can configure the line outs as mono, and connect one of them by cinch cable to an external amplifier with your sub woofer.
But you can also reconfigure another speaker output
-
to be part of the first zone as well (by output mapping)
-
to use monosound , with a lowpass filter
-
and then connect a passive sub woofer speaker there directly.
This way you need no external amp, but loose one amplified stereo zone in total.
4.1.7. How to configure a 20 zone system with 12 global matrix sources
Get five SC344m (with 4 zones each)
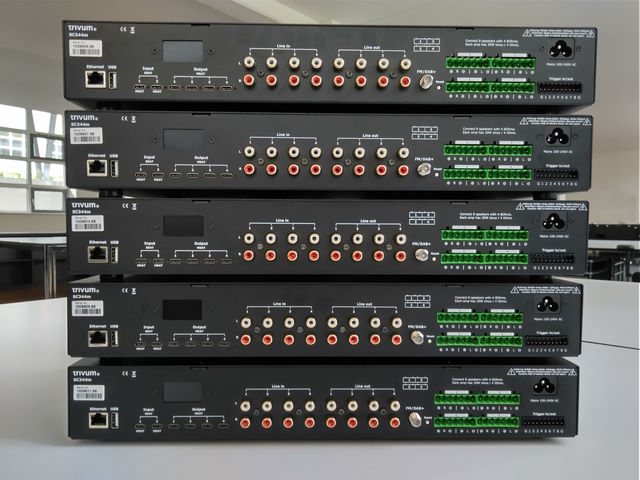
Select which device should be master, in this example the topmost. Change all other devices to slave mode:
-
in the master web configuration under trivumip/setup, select:
expand this system / add a new soundsystem.
the other devices will be listed under "list of trivum master devices".
enter the first of them, select "start webconfig". on the webconfig of a target device, select:
system / setup / master/slave configuration
and change the device to slave mode, then close the browser tab.
repeat this for all other devices that should be integrated as slaves. -
in the master setup, select again:
expand this system / add a new soundsystem.
the other devices should now be listed under "trivum sound systems ready to be used".
select the first slave, in this example 1009607.66, and thenuse this soundsystem.
repeat this for all other slaves in the correct order. -
Go into:
devices / players, and check that you have integrated all devices in the correct order.
Update to V10 for USBC support
If the system has V9.x software, update it to V10, as this is required to use USBC audio connections.
-
go to: system / software update
-
check: use V10 software. a software V10.x should be offered.
-
in the field "enter yes to start update", enter "yes".
USBC cabling connections for 20 zones
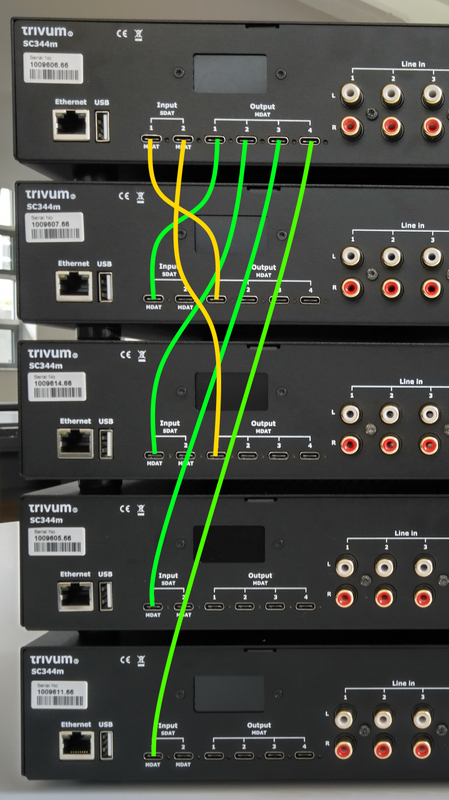
The recommended scheme for a 20 zone system is:
-
from master device to slaves:
-
connect a cable from master out1 to slave1 in1.
-
connect a cable from master out2 to slave2 in1.
-
connect a cable from master out3 to slave3 in1.
-
connect a cable from master out4 to slave4 in1.
every end of a cable connection should show a green light which is shortly interrupted once every 2-3 sec.
these connections will give access to master sources on all slaves.
-
-
from the first two slave devices to master:
-
connect a cable from slave1 out1 to master in1.
-
connect a cable from slave2 out1 to master in2.
these connections will give access to slave sources on the master, and via the master, also to all other slaves.
If a cable does not show a green light at the connectors, try to turn one plug by 180 degrees, then plug it in again. this may work around a partial defect in the cable.
-
USBC cabling configuration
-
basic connections:
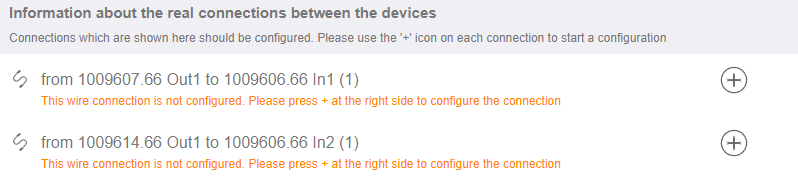
Go into the web configuration under "devices / players / usb wiring".
there will be many orange informations, as the system auto detects connected wires.
just scroll down to the page bottom, and click "+" where offered.
-
connection types:
By default, every cable connection has a type "Variable access for builtin zones".
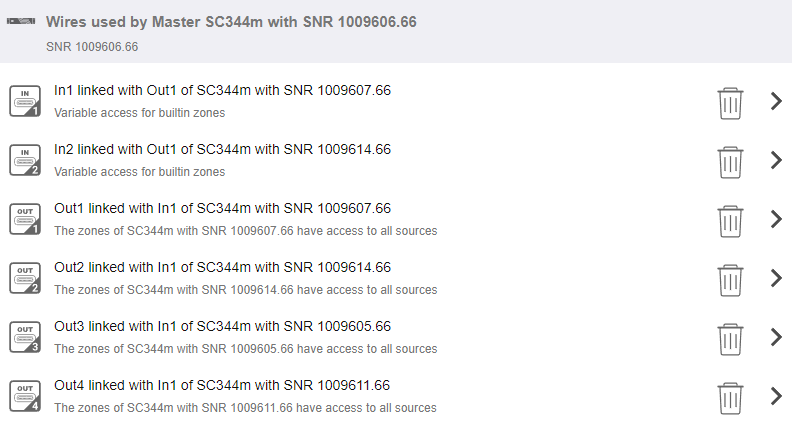
This is very flexible, as it allows access to line, stream and tuner sources directly at the sender device.
But there is one limit: if the master has variable access to sources of Slave1 and Slave2, these cannot be routed through to other devices, for technical reasons. In this case, we have to select fixed source access.
In the Master wire configuration as shown above, go into "In1" and change it like

to use only line inputs from Slave 1.
Then go into "In2" and change it to use only line inputs from Slave 2.
That’s it. Now, audio can flow from Slave1/2 via Master to Slave3/4.
Using the global line sources
12 line inputs are now available in every zone:
-
4 from the master
-
4 from Slave 1
-
4 from Slave 2
Open a WebUI, by typing the trivum ip address (without /setup) in a webbrowser.
Connect an audio cable to Slave2 LineIn 1.
We want to listen to that audio in the very last Zone 20 on Slave 4.
So go into Zone 20, and select
`main menu / aux inputs / 1. Analog input of ... SN 1009614.66`
You should now hear sound from Slave2 playing on a Slave4 speaker.
Possible applications
-
Group play:
no matter which of the 12 line inputs is playing,
if you create a group, you can be sure the sound is playing in every zone. -
Direct selection:
You can configure 12 global source buttons under "customize / actions / actions always available",
or 12 KNX events, with actions like "activate a source / line inputs / (select one of the global 12 line inputs)"
with individual naming, like CD1, CD2, Bluetooth1, TV1 etc., allowing access to these audio sources in every room.
Limitations
The Source Mixes or the Microphone Mixer cannot use variable access connections. If you want to use these features, it can be necessary to reconfigure connection types to fixed source access, which also limits the total number of sources which are available system wide.
4.2. Tools
Service tool downloads are available from:
https://www.trivum-shop.de/support/docs/en/tools-overview.html
To find the IP address your trivum device, download the trivum ServerAdmin tool for Windows.
http://service.trivum-shop.de/share/Tools/Install-ServerAdmin.exe
Alternatively,
-
install the "trivum app - V8 and V9 Systems" for iOS, which also lists available devices in the network.
https://apps.apple.com/app/trivum-app-v8-und-v9-systeme/id903372126 -
install the "trivum Control" app for Android.
https://play.google.com/store/apps/details?id=com.trivum.control -
or download the tlist command line tool, which is available both for Windows and Mac OS/X.
4.2.1. the Trace tool
Download the trivum trace tool, named trace.exe
Then open a Shell or Command Line Window (e.g. Windows: select Run then type CMD.exe) and go into the folder of the downloaded tools.
Use
-
on Windows, type:
trace device-ip -
on Mac, type
chmod 777 trace-mac, then./trace-mac device-ip
Now you should see something like:
Tracing: 192.168.1.133
trivum TraceMonitor V1.08 (Port=1222 Target=192.168.1.133, VMar 14 2013/11:11:41)
You may press:
-
press key
ifor information -
press key
tto toggle event tracing outputs
5. Configuring the system
5.1. Concept
trivum products are easy to configure, because you don’t have to install software for configuration. trivum recommends to use the Firefox (Windows/Linux) or Safari (Apple) browsers. Newer Internet Explorers can be used also.
Mobile web browsers for up-to-date iOS and Android systems are supported as well.
|
Nearly every settings is active immediately. Just network related settings need a restart of the device. |
5.1.1. Navigation
The WebConfig has a navigation bar at the top of the page.

-
The left area is used to go back one level.
-
The area in the middle shows the current name of the menu. By clicking on the name, the main menu is shown.
-
The right area shows a refresh icon, a tile icon and an empty square. By clicking on refresh, the screen is loaded again with the newest information. By clicking the tile icon, the top-level menu is shown. The empty square toggles wide or lean layout. Some pages, not all, also have a blue help icon. Help shows all relevant information about the current configuration page.
5.1.2. Special modes
'Beta' mode
trivum sometimes adds features to the software, which is not fully tested. These features can be activated and users can test the features.
|
By enabling the beta features, the system might be not as stable. trivum does not provide support of these beta features. |
http://<IP>/beta5.1.3. Combining multiple devices as Master/Slave
If you have more than one trivum device, you want to combine them as a single system. To do so,
-
define which is the master, and which devices should be the slave
-
go by web browser into the web configuration of the slave devices. this is done by typing slaveip/setup.
-
in the slave device configuration, select:
system / setup / master/slave configuration / change to slave mode
-
go the the master configuration, and select:
devices / expand your system
the slave devices should appear here. click into a line and select "use this system".
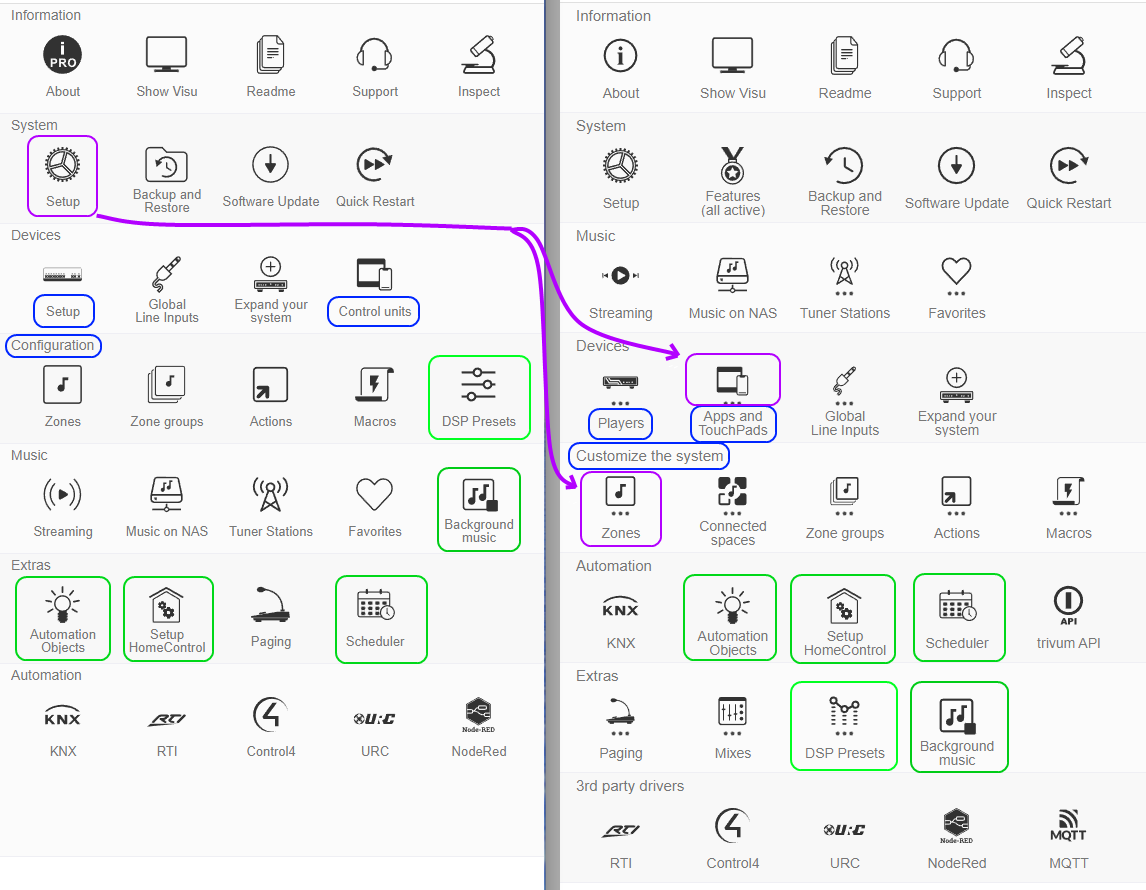
5.2. Configuration Changes from V9 to V10
With software version 10 the music center web configuration was fully reworked, reordering functions at the top level.
V9 |
V10 |
Devices / Setup |
renamed to Devices / Players |
Devices / Control units |
renamed to Devices / Apps and Touchpads |
Configuration / … |
renamed to Customize the system |
Configuration / DSP Presets |
moved to Extras |
Extras / Automation Objects, HomeControl, Scheduler |
moved to Automation |
Music / Background music |
moved to Extras |
System / Setup / User interface details |
moved to Devices / Apps and Touchpads / General settings |
System / Setup / Show Main menu and other 'Show' options |
moved to Devices / Apps and Touchpads / Show/hide menus |
System / Setup / Join timeout setting |
removed (join no longer times out) |
hide standard sources |
see Customize / Actions / General settings |
System / Setup / Advanced / Disable Refresh Music Index and System restart |
moved to Devices / Apps and Touchpads / Show/hide menus |
System / Setup / Advanced / Force alarm (play and off), Switch off muted/paused zones, Delay time for snooze |
moved to Customize / zones / general settings |
System / Setup / Advanced / Stop playback after so many errors |
option was removed (stops after 5 errors) |
System / Setup / Advanced / Use automatic system restart |
moved to System / Setup / Daily system restart |
Automation / RTI, Control4, URC, NodeRed, MQTT |
moved to 3rd party drivers |
5.3. System
Most important settings like network, software update and time.
5.3.1. setupBasic
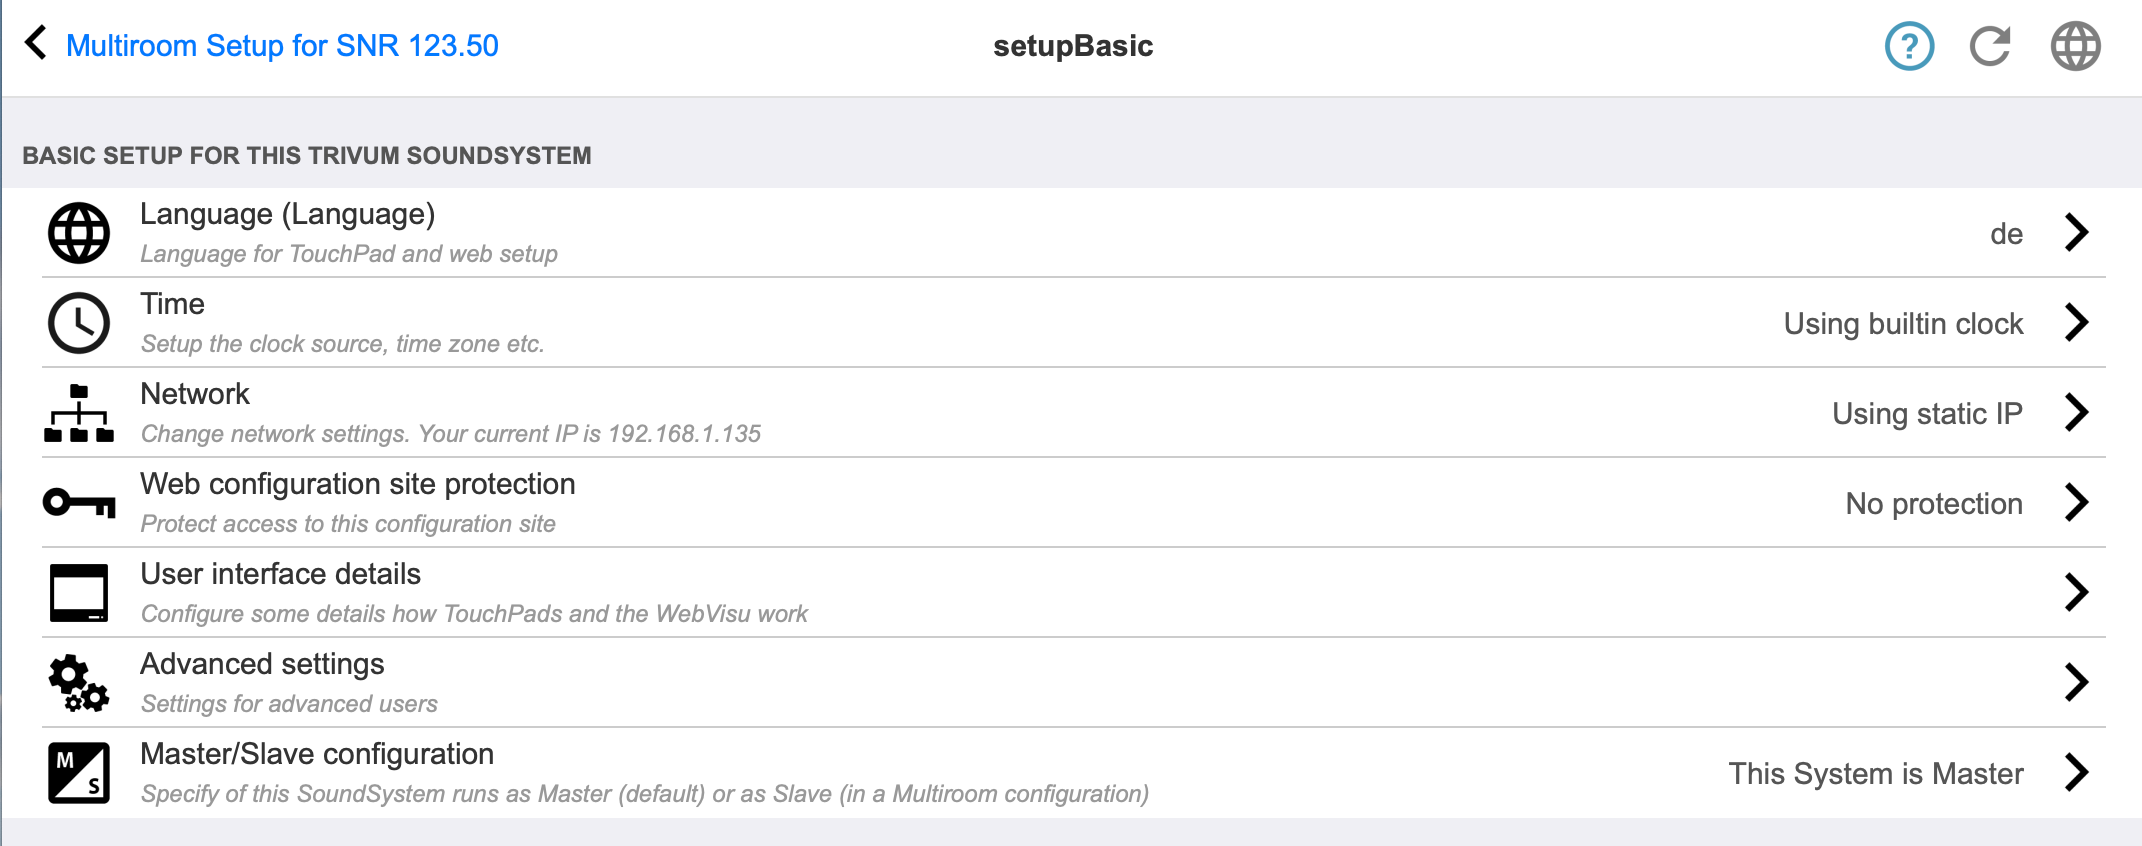
Basic
- Language
-
Your preferred system language.
- Enable trivum remote support
-
If this is checked, you will allow the trivum support team to get access to your trivum multiroom system.
- Protect this website
-
Here you may restrict access to the system configuration by a password.
- Show FM Tuner as source
-
If this is checked, FM tuner is displayed within the source selection on TouchPads and WebVisus
- Builtin Source Names
-
These names are displayed as the source names in the source selection on TouchPads and WebVisus
- TunerSource
-
Name of the FM tuner source. Default: FM tuner
- StreamingSource
-
Name of the Streaming source. Default: Stream
- Do play immediate
-
If this is checked, an audio track will play immediately without context menu for queue options (e.g. Play now, Play next, Add to list etc.).
- Include track titles in Library Search
-
Whenever you search something in your NAS Music Library this will also include track titles containing the word.
- Hide 'system setup' in WebTouch clients
-
If this is checked, the menu item System setup on the WebVisu General settings screen is disabled.
- Use +/- buttons in WebTouch clients for volume control
-
By default the WebTouch (WebVisu) displays a slider for volume control. If you prefer to use + or - fields instead with a display of the current volume value then enable this.
- Don’t show default sources in WebTouch clients
-
Normally default sources of a zone like "Stream" are offered in the right-side source selection of a WebTouch. This can be disabled here, to show only self-defined actions like a direct jump into the TuneIn menu.
- List active zones first in control units
-
By default, the zone selection of control units list the current active zone first. This means the first zone being listed may change from case to case. If you find this irritating uncheck this option, to have always the same zone list order.
- Delay time for snooze
-
Specifies the number of minutes the alarm is delayed.
- Advanced options string
-
Input field for advanced control commands, in most cases for support.
- Use automatic system restart
-
If this is checked, the trivum multiroom system will automatically restart at a specific time.
5.3.2. time configuration
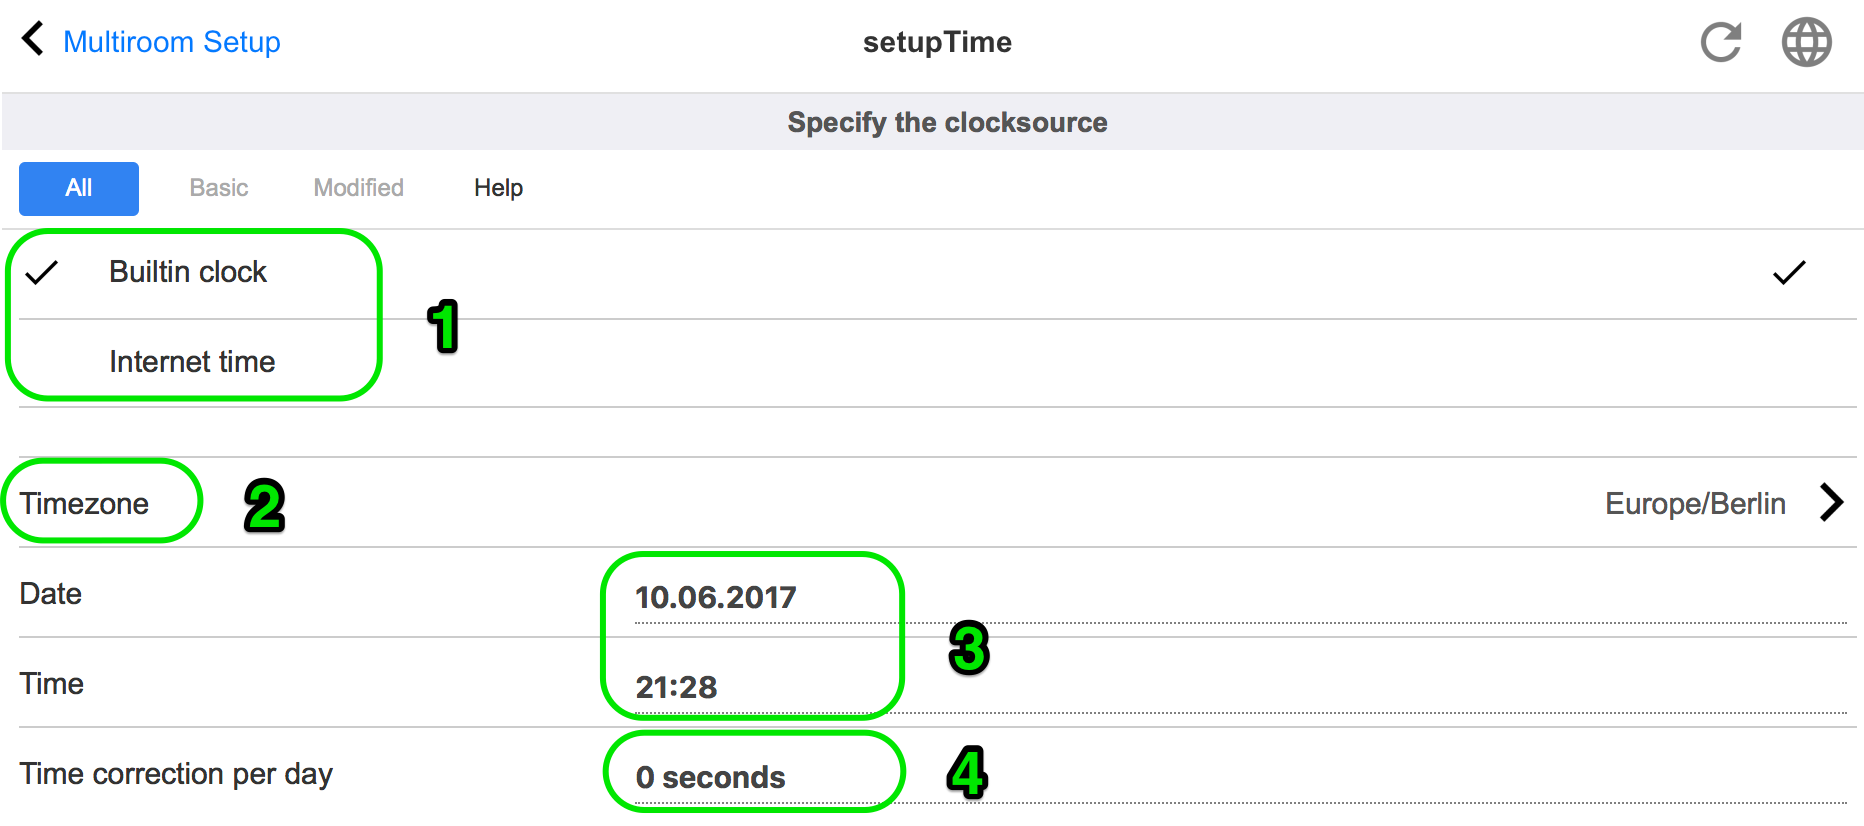
- Internet time
-
The default is to use internet time. If this is checked, the system clock is synchronized with a time server via NTP protocol. Only the time zone must be selected then (2).
- Builtin clock
-
If this is checked, the trivum-device will use the built-in clock as system clock.
Date and time must be entered manually (3).
A system clock that is too fast or too slow can be corrected via the correction value (4).
|
The built-in clock is not available on some old device models, like RP010 or Actuator1. |
5.3.3. network configuration
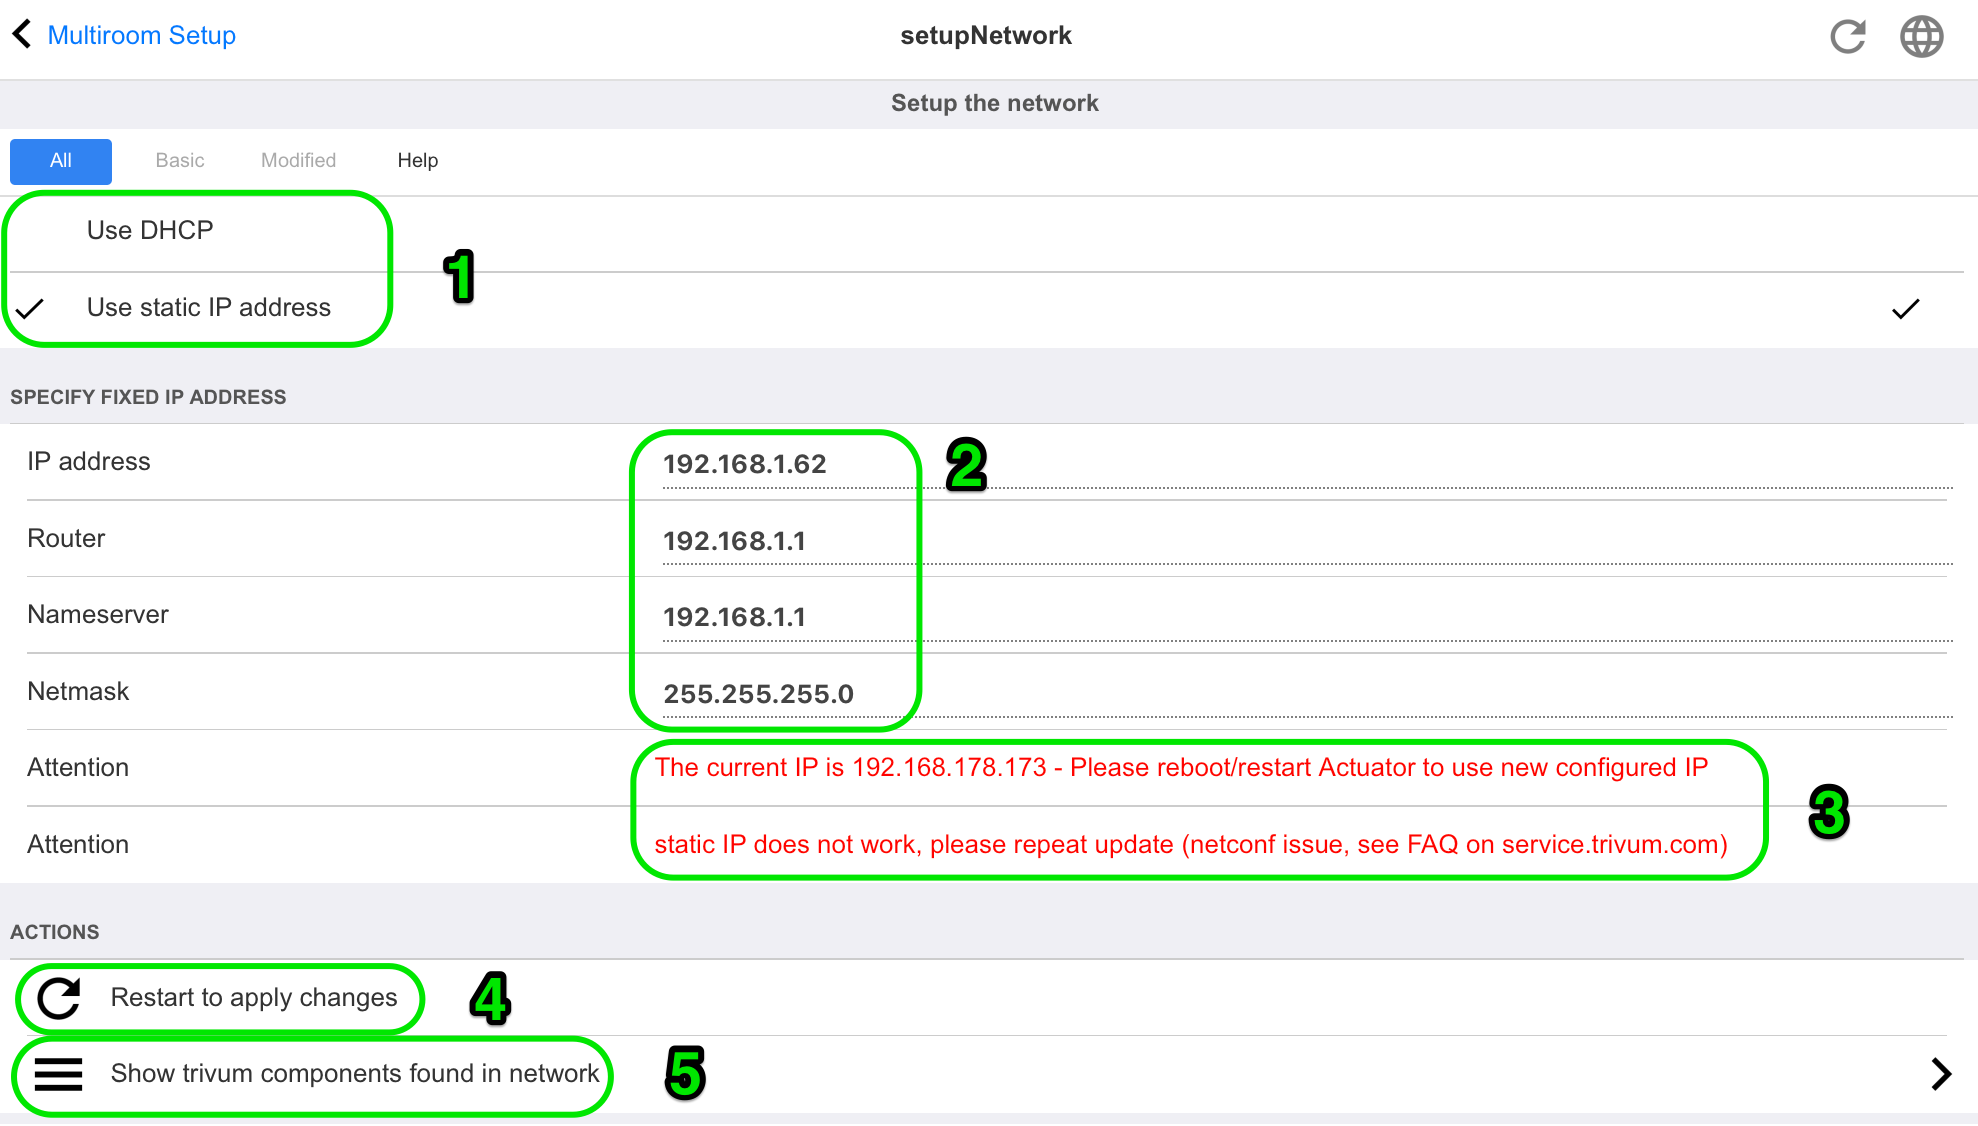
trivum multiroom devices support static and dynamic IPv4 IP addresses (over DHCP router). For smooth interaction between all trivum devices in your network, we recommend the use of DHCP.
|
To activate the changes of the network settings, you have to restart the device. |
|
All trivum multiroom devices use DHCP by default on delivery. |
- Use DHCP
-
If this is checked, the trivum multiroom device should automatically get an IP assigned by your DHCP server. No further settings are necessary.
- Use static IP address
-
This is used:
-
if no DHCP server is available.
-
if the router sends wrong DHCP data, like an invalid nameserver.
-
if a permanent, non changing IP of the trivum-device is required, to integrate it in external visualizations or automations, but configuring of a fixed IP on the router is not possible.
-
The following data are required (2):
-
IP address: IP address for this trivum multiroom device
-
Router: IP address of the router of your network. Home networks often use 192.168.178.1 or 192.168.1.1
-
Nameserver: IP address of the nameserver of your network, in most cases the same as router IP
-
Netmask: in most cases 255.255.255.0
(3) Under Attention you will find some information about the network settings you have made.
(4) If you have made any changes to the network settings, you must reboot the system to enable the changes.
(5) If the network settings are correct, you can use Show trivum components found in network to list all trivum devices in your network.
5.3.4. softwareUpdate
This screen allows you to update your trivum multiroom devices, including connected devices like Touchpads.
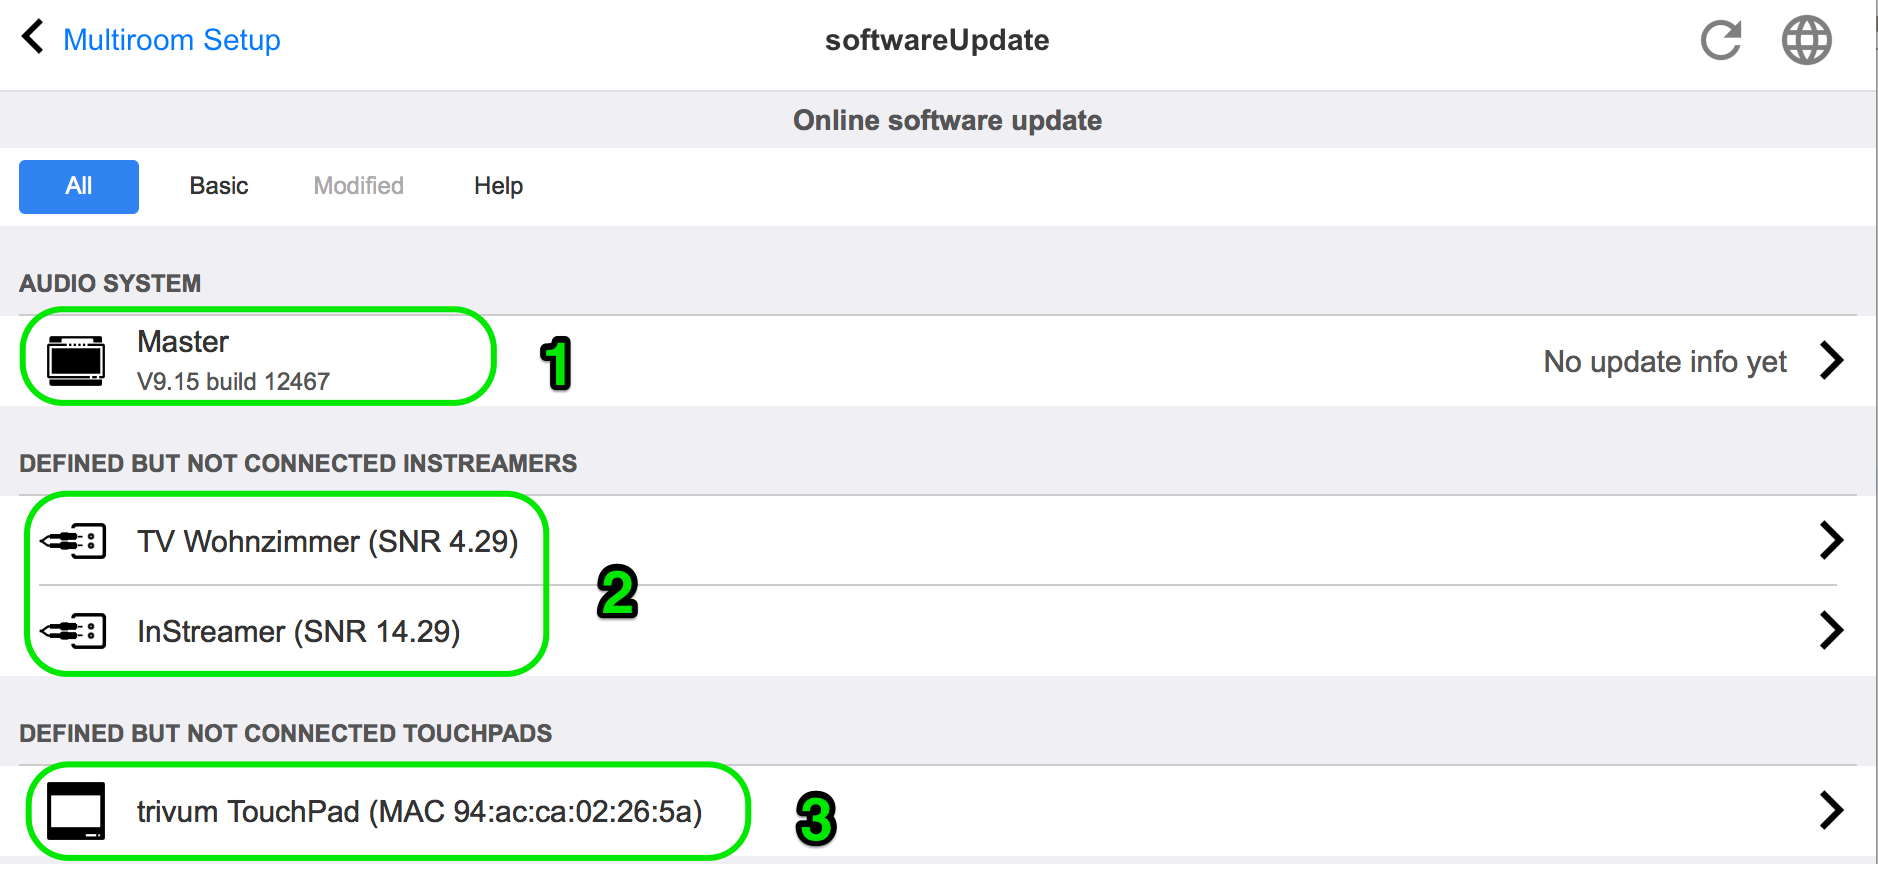
- Audio Systems
-
An overview of your trivum master and connected slave audio devices (1).
- Defined but not connected InStreamers
-
A list of all InStreamers that were once connected to your system but are not available at the moment (2).
- Defined but not connected TouchPads
-
A list of all TouchPads that were once connected to your system but are not available at the moment (3).
If a software update is available for a device, an Update available appears next to the device name.
Click on one of the devices to have more information and choices regarding a software update.
5.3.5. softwareUpdateMaster
This screen displays information about the installed and the latest available software version and allows you to trigger software updates.
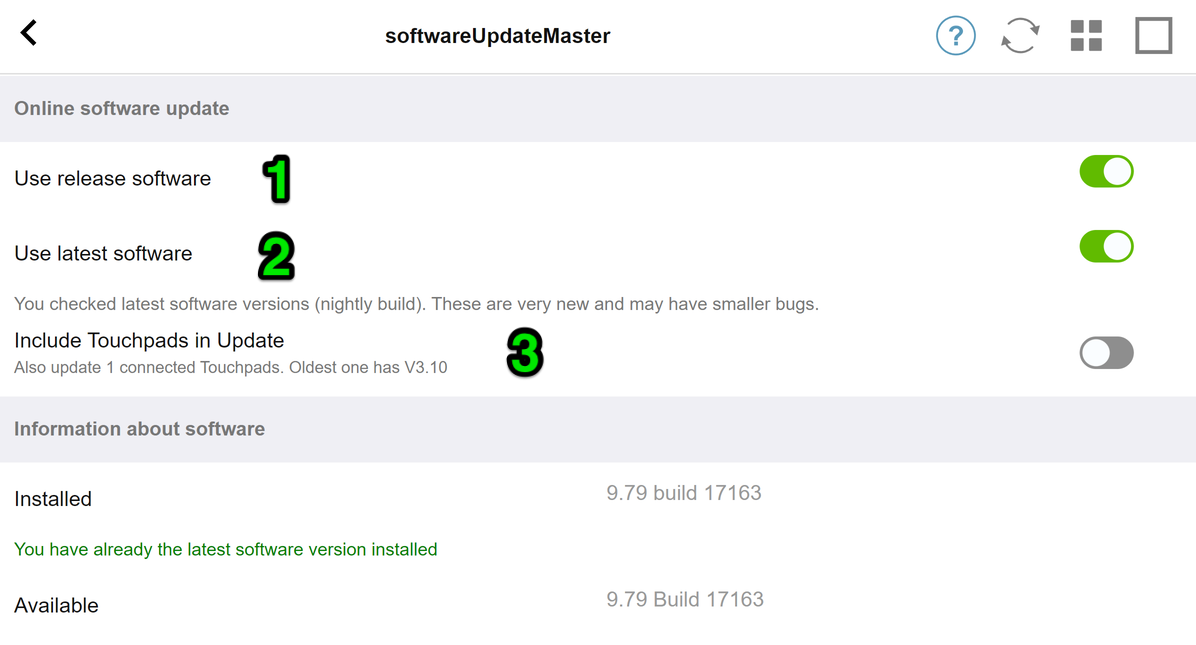
- Use Release software
-
If this (1) is checked, you get software which can be several weeks old. It is a compromise between having new features and using a stable, proven software.
- Use Latest software
-
If this (2) is checked, you get the very latest software. If you have an error on your system, use Latest software, as the error may be fixed already with that.
- Include TouchPads in Update (3)
-
Only displayed when TouchPads are currently connected to the Master.
If this is checked, all TouchPads are updated simultaneously with the update of the audio system.
Using Archive software
If you select neither "Latest software" nor "Release software", you update from the Archive channel. This software can be several months old. It is considered reliable, but it may not contain patches important for some customers or specific devices. Check the change list under:
Using Release software
Release software is normally several weeks old, comes with a basic reliability, and some up-to-date features.
Using Latest software
Latest software contains the latest changes and patches, but is not fully tested for stability. Use this if you find a bug fix or feature important for you that is not yet present in the Release software.
5.4. Zones and Controls
In this section
-
player devices are combined into one multiroom system
-
how to configure zones with their names
-
how to configure control units like WebUI and Touchpad
5.4.1. setupZonePlayers
- Combining multiple trivum Devices into a Multiroom System
-
A ZonePlayer is a trivum MusicServer device that can play music, either standalone, or combined with other ZonePlayers. If you have two or more ZonePlayers you can combine them into a single multiroom system by the following steps.
- 1 - Decide which device should be the master
-
In a multiroom system, only one device can be the master, all other ones are the so-called slaves. All user interaction is then done via the master, i.e. web visualizations or trivum touchpads connect only to the master device, not to any slave.
- 2 - Change the RunMode of the slave devices
-
-
For every slave device, type http://deviceip/setup in a web browser, to open it’s web configuration.
-
then select:
System / Setup / Master/Slave / Change to slave mode
-
Repeat this for all slave devices, then go back to the master’s web configuration.
|
Since software version 9.78 (or 10.03), this step is no longer required. You simply select other devices for integration, no matter if in master or slave mode, and they are changed to slave mode automatically. |
- 3 - Integrate Slave devices at the Master
-
-
in the master’s web configuration, under Devices, select: Expand this system.
-
you should get a list of the slaves devices which are not yet bound.
Click into one of the lines. Select: Use this SoundSystem. -
the list of Devices is shown again, with the master at the top, and all bound slave devices below.
-
if you see messages like "not found in network" of "device offline" click Refresh (circle arrow) at the right top. if the message persists, you may try "Run a network scan" for a deeper search for devices.
-
- 4 - Use the system via the master IP only
-
After integrating the slaves into the master, type the master IP into a web browser to get a web visualization. It will show zones for all devices.
- How to remove devices from a Multiroom System for standalone use
-
If you want to use a Slave device as a standalone Master again,
-
remove it at the master under:
Devices / select Device / Remove this -
go into the slave devices' web configuration by typing http://deviceip/setup in a web browser. then select: Setup / Master/Slave / Change to Master mode.
-
|
To use a device standalone again, both of the above steps must be done. Otherwise you get an error "wrong device mode" and music playback cannot work. |
5.4.2. setupZones
The screen to configure the zones looks like this.
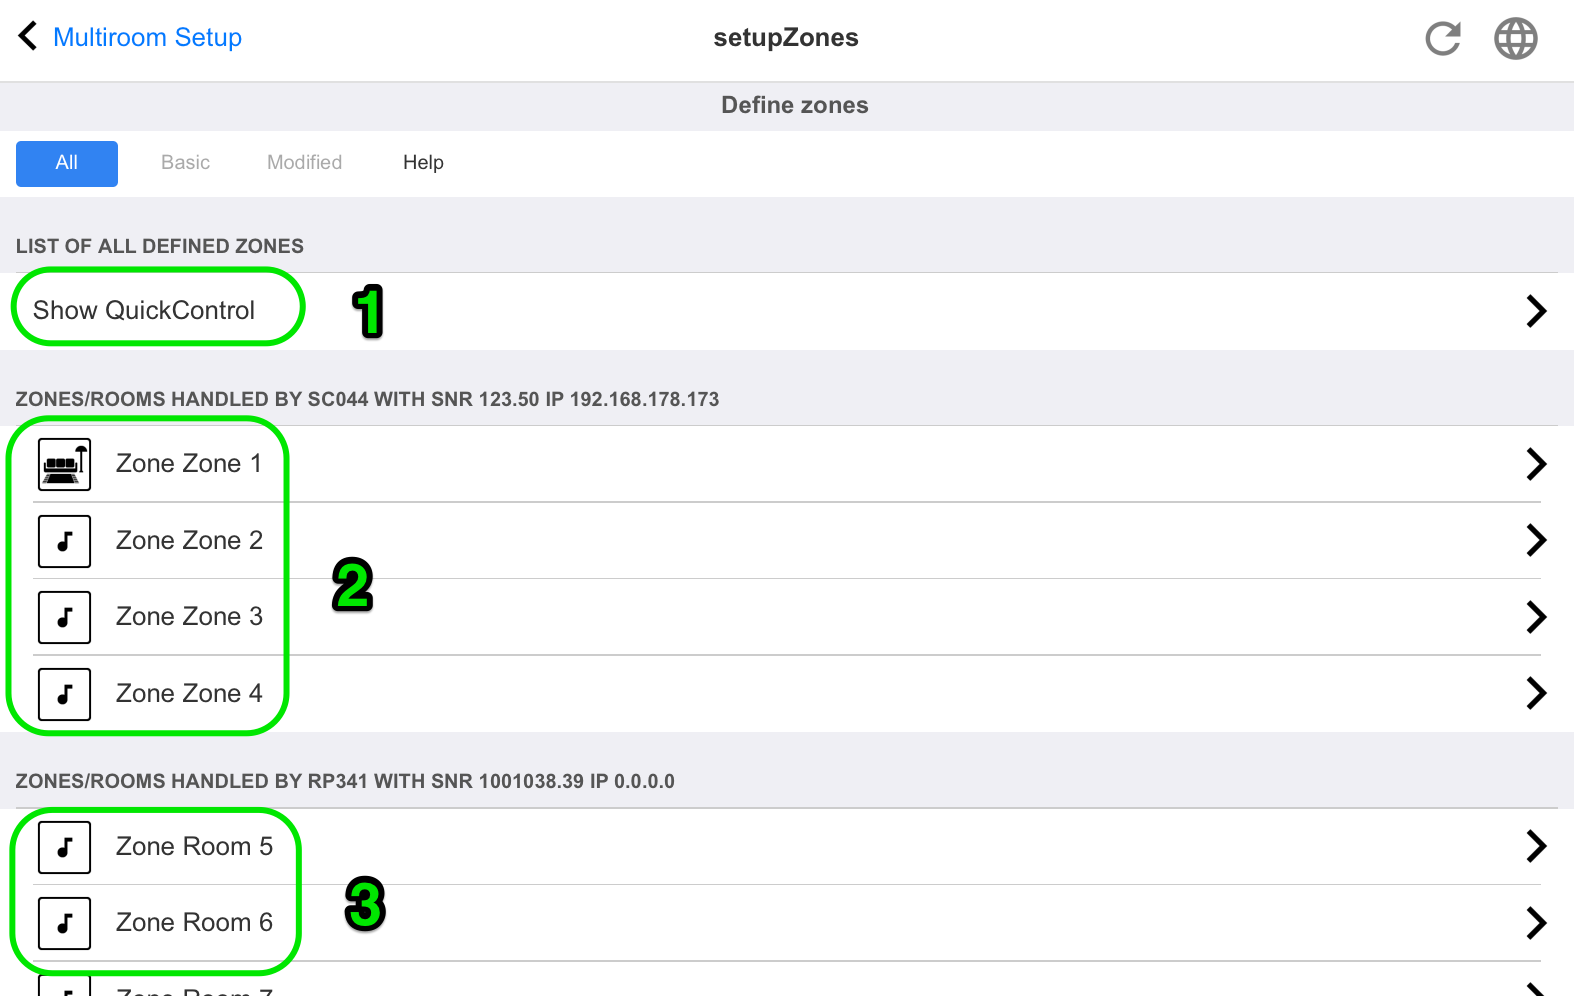
1 - QuickControl shows a special screen to quickly test basic playback in all zones.
2 - These are the zones of the master, or single, device.
3 - If additional slave devices were integrated, then their zones appear in such separate sections.
5.4.3. setupZone
The screen to configure a zone looks like this.
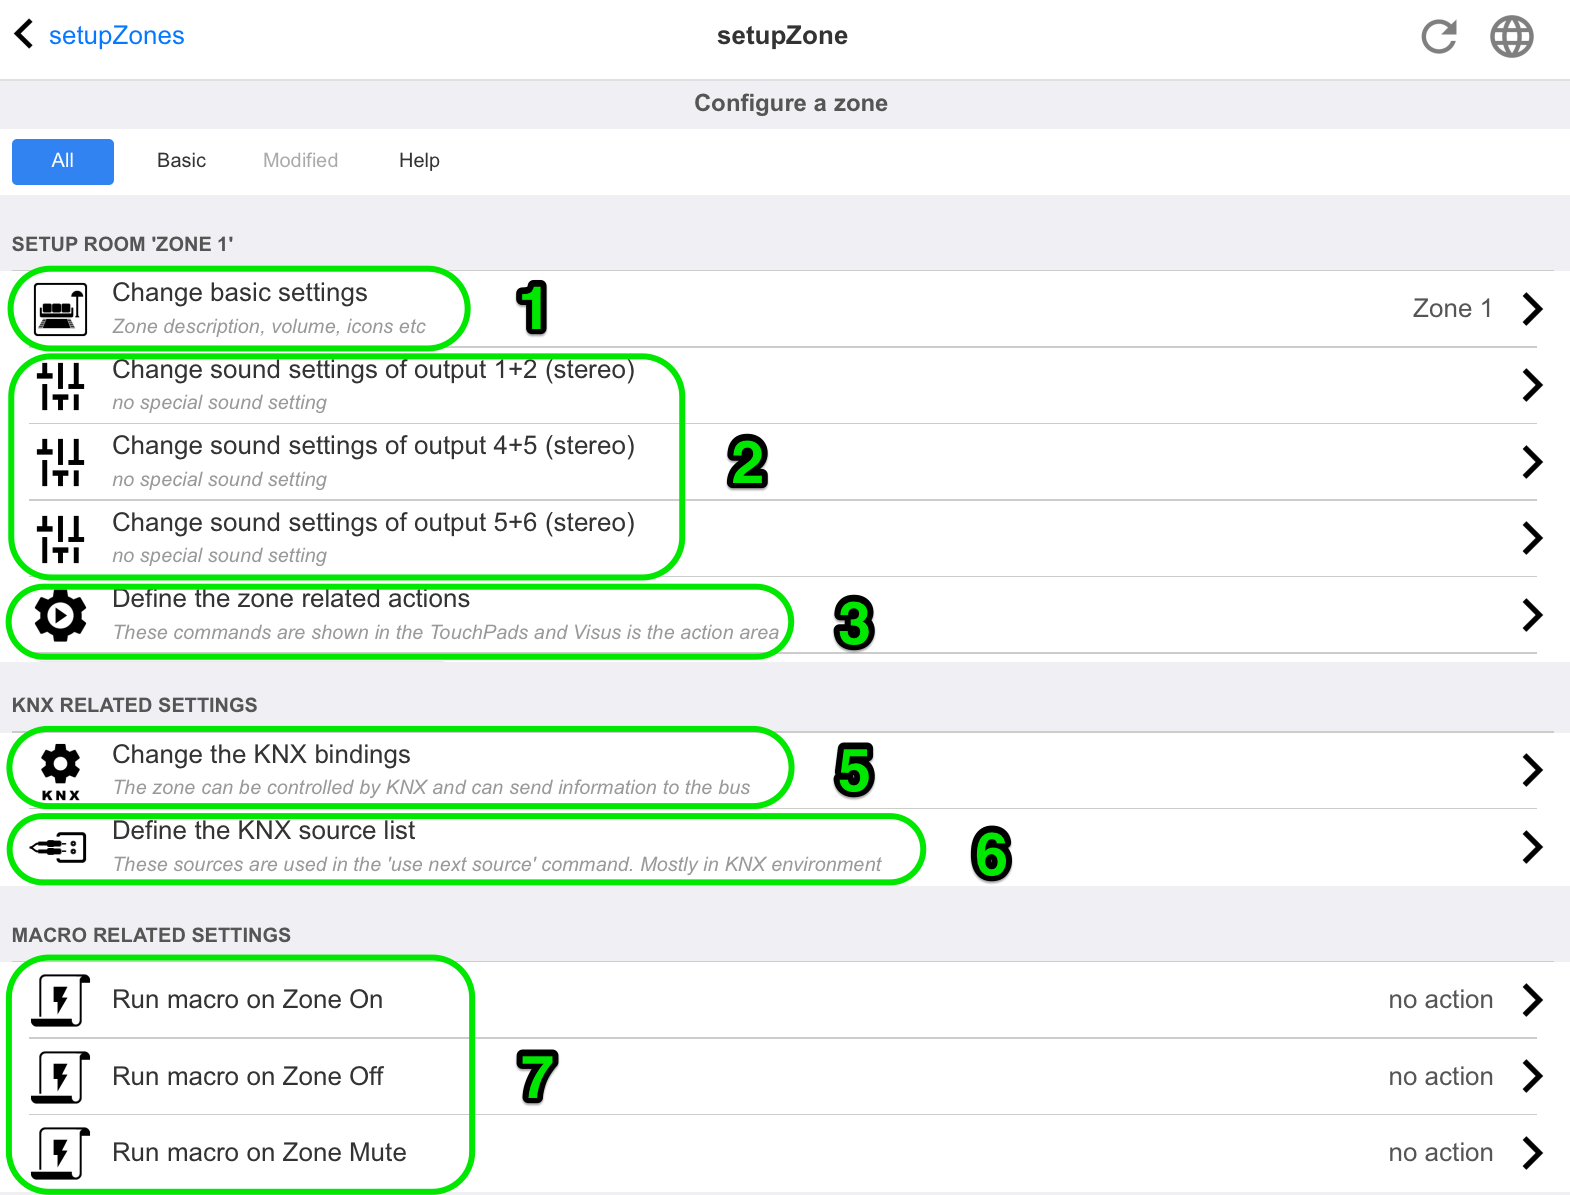
(1) Click here to adjust basic settings of the zone such as name, default sources, volume handling etc. See also: Zone basic settings.
(2) Click here to adjust the basic sound settings (treble, bass, balance), the advanced sound settings (low/high pass, bass level, fixed volume) and the equalizer parameters of the different outputs. See also Sound settings for outputs.
(3) Click here to define zone related actions for this zone. Zone related actions are shown in the TouchPads and WebVisus action area.
(5) Click here to adjust the KNX bindings to this zone.
(6) Click here to define up to eight sources for the "used next source" KNX command.
Zone basic settings
| With software V10, the basic settings are divided into several menu points. |
- Room Name
-
Name of the zone. Is displayed in overview lists and on the TouchPads/WebVisus in the upper left corner. You can also assign an icon to your zone.
- Default tuner
-
Defines which of the four fm tuner is the default for this zone.
- Default streamer
-
Defines which of the four streamersources is the default for this zone.
- Default audio line input
-
If the device has multiple line inputs, define here which of these should be the default for this zone.
- Zone max volume
-
The maximum volume is limited to this value.
- Use a fixed volume when zone gets on
-
Selected: The music playback (for any source) always starts with a defined volume. The volume level can be defined with the following slider Volume when zone gets on.
Not selected: The music playback (for any source) always starts with the last used volume, but not louder then defined with the slider Max. volume when zone gets on.
- Volume when zone is switched on
-
See above Use a fixed volume when zone gets on.
- Max. volume when zone is switched on
-
See above Use a fixed volume when zone gets on.
- AQT - use Afternoon Quiet Time
-
Defines a time frame for certain restrictions for music playback.
- Starttime for AQT
-
Time when the restriction for music playback starts.
- Stoptime for AQT
-
Time when the restriction for music playback stops.
- Action to perform while AQT
-
Restriction / action performed while AQT is active:
-
turn off once: After reaching the AQT starttime, the zone and the music playback are turned off. However, they can be started within th AQT again.
-
limit volume once: After reaching the AQT starttime, the volume level is reduced to the value of the slider Volume information for AQT. However, the volume can be changed within the AQT.
-
force one to be off: After reaching the AQT starttime, the zone and the music playback are turned off. They can only be started after the AQT stoptime again.
-
force reduced volume: After reaching the AQT starttime, the volume level is reduced to the value of the slider Volume information for AQT. The volume can only be changed after the AQT stoptime again.
-
- NQT - use Nightly Quiet Time
-
Defines a second time frame for certain restrictions for music playback. See above AQT - use Afternoon Quiet Time
- Zone is available in ZoneSelect menu
-
Defines if this zone is available in the Zone selection menu (TouchPads/WebVisus).
- Show AirPlay Audio Input
-
If you want to send music by AirPlay to trivum this must be checked to make network inputs appear on your iPhone or iPad.
- Control Zone
-
If your iPhone starts to send music to trivum, select here the zone to switch on automatically, to play the AirPlay stream. The network input will then show the zone’s name.
Sound settings for outputs
Depending on the device type, a zone can have more than one stereo output. For example, with a SC344, by default one zone has a stereo speaker output and a line output. The following values can be set individually per output.
- Treble, Bass, Balance
-
Slider for adjusting the treble, bass and balance for this zone.
- lowpass filter, highpass filter
-
Select one of these options if you want to use the Line-Out of the zone with a subwoofer (lowpass) or with invisible/satellite speakers (highpass). The filter frequency can be adjusted via the following setting.
- Change lowpass filter frequency, Change highpass filter frequency
-
Filter frequency for the low- respectively highpass.
- Bass enhance level
-
You can increase the bass level by up to 8 steps. There may be no audible difference with small test speakers, but the effect will be clearly audible with large speakers.
- Use fixed volume
-
- Selected
-
The playback volume of the zone is set to a fixed value. The volume can no longer be changed via a TouchPad or a WebVisu. The value is defined by the slider Fixed volume level.
- Not selected
-
The playback volume of the zone is limited to a maximum value. The value is defined by the slider Adjust volume.
- Adjust volume
-
Change the output volume of the audio output by a fixed factor, independent from the volume control on the user interface.
- Fixed volume
-
Set the output volume of the audio output to a fixed value, independent from the volume control on the user interface.
- Use DSP preset
-
Select one of the seven trivum DSP presets or one from your own.
- Start the visual DSP editor
-
Here you can create own DSP settings, for example, to adjust speakers to a specific room acoustic.
Zone related actions
Here you may define extra functions like changing to another source or playing specific music. They appear on the right side or bottom of a Web Visu or Touchpad whenever the zone is selected within the Visu.
5.4.4. setupPlayer
A ZonePlayer is a device with one or more outputs. One or more ZonePlayers are combined into one multiroom system.
By selecting: Hardware / Players / SNR … you can configure a single ZonePlayer.
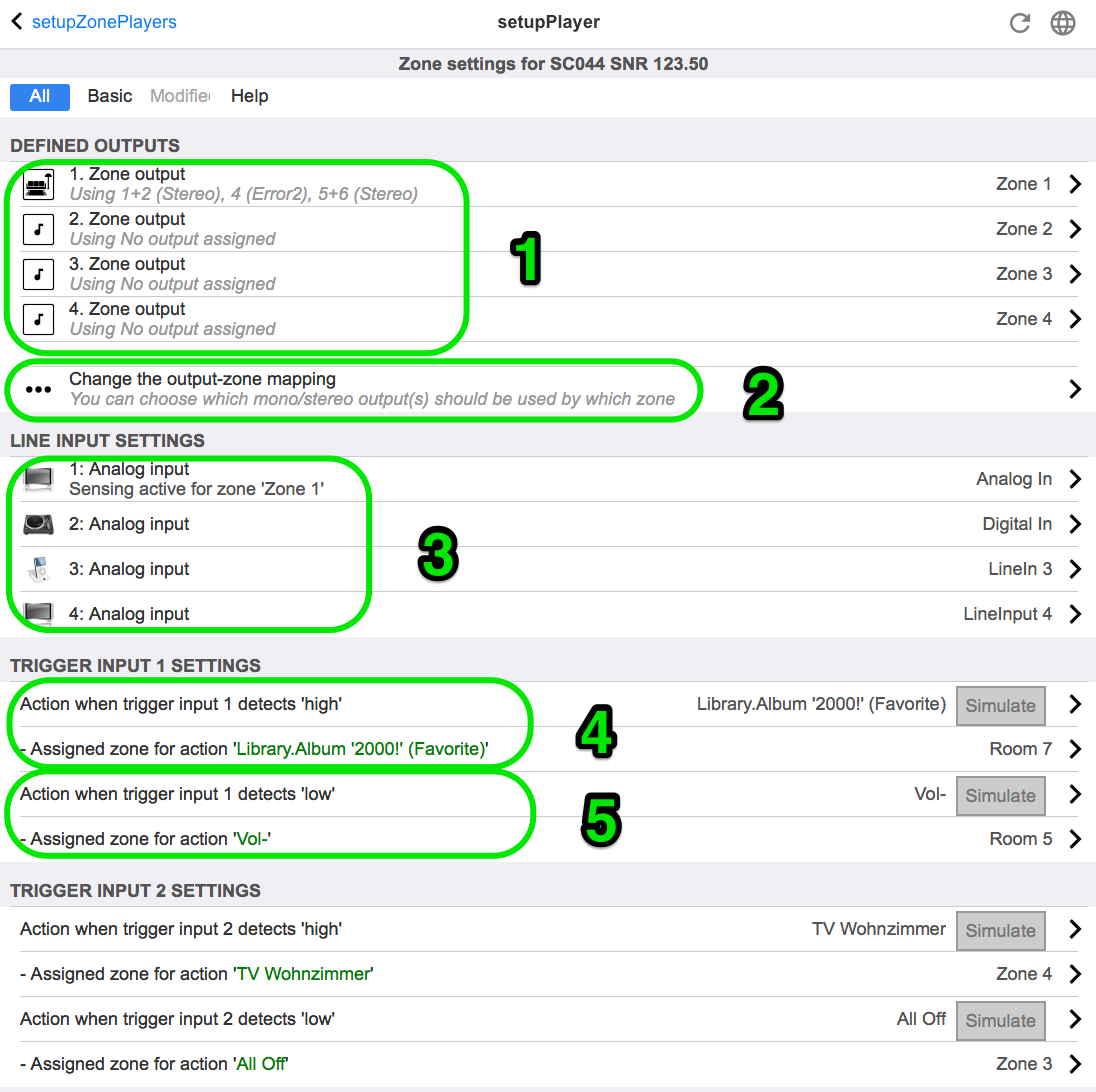
(1) A list of all zones that this player can play. Click on a ZoneOutput to go to the zone’s configuration screen. setupZone
(2) The audio outputs can be freely configured (mapped) and used in pairs as stereo outputs as well as individually as mono outputs, for example for subwoofer or satellite speakers. More under: Zone Mapping. (This function is not available with old V1 hardware, like RP010 or Actuator1, which are no longer sold.)
(3) A list of all analog Line-In inputs. Click here to adjust basic settings of Line-In input such as name, icon, level-adjustment and auto sensing options. See also Line-In setup.
(4+5) only with SC devices: click here to define which KNX action should be executed when a digital HIGH respectively LOW signal has been detected at one of the digital IO ports. See also Trigger input settings.
With the current V9 software, this function is under: Devices / Setup or Players / IO Trigger.
With the current V10 software, this function is under: Devices / Setup or Players / Configure triggers.
(This function is not available with old SC devices, like SC344v1, which are no longer sold.)
Zone Mapping
As long as not all available outputs are assigned to zones, you can do so in this menu. Normally an SC or RP341v2 device has 4 zones, but you may also define less zones with more outputs, or speakers, per zone.
Line-In setup
- Name
-
Name of the line audio input, which is displayed in overview lists and on the TouchPads/WebVisus in the Source selection.
- Linked icon
-
A selection of icons. The selected icon is displayed instead of an album cover on the TouchPads and WebVisus.
- Level-adjust
-
If input sound is too silent, increase. If it is loud and distorted (i.e. clipped), reduce.
- Use fixed start audio volume
-
It is possible to give the zone a predefined volume whenever this Line Input is activated.
- Start volume value
-
Select the volume amount here.
- Action if line input stops
-
Select here how volume should change when a Line Input is no longer used.
- Automatic signal detection
-
A zone can be switched on automatically as soon as sound is detected at the Line Input.
- Output which should be powered on when signal is detected
-
Select a zone here.
- Activation volume level
-
Carefully select the required signal level from extern that should trigger zone activation.
-
if this is set too low, the zone will often switch on unexpectedly.
-
if this is too high, the zone may not switch on at all.
-
while adjusting, look at the small text "Current signal volume" at the page bottom, while refreshing the page with the circle arrow button at the right top.
-
- Sensing timeout
-
If external sound stops, select here how many seconds to wait before the zone is switched off.
Trigger input settings
The SC044 provides 2 trigger inputs, to run actions like activating a source in a specific zone.
-
accepting 5 - 24 V DC or AC.
-
the left side pin is Ground (-), the right two pins are Input 1 and 2 (+)
-
when using DC, if + and - are swapped no input signal will be detected.
5.4.5. setupZoneGroups
Zone groups are predefined groupings of zones. With as simple KNX command you can enable or dissolve these groups.
Zones can be also grouped interactively, via the trivum WebUI or TouchPads. However, with this type of grouping, there is no possibility to control the grouping by KNX.
The screen to manage the zone groups looks like this.
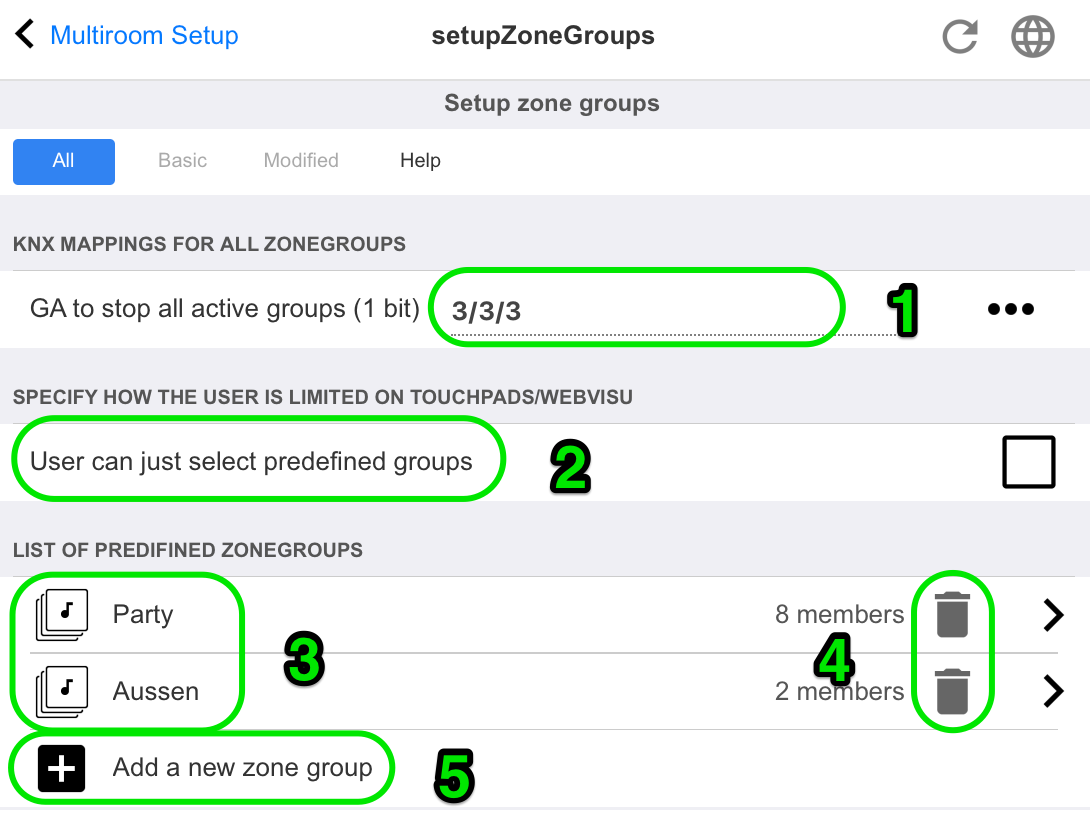
(1) All predefined zone groups can be deactivated (dissolved) simultaneously via a KNX command. Enter the KNX group address for this purpose.
(2) If this is checked, only the predefined zone groups can be selected on the Zone selection screen on TouchPads and WebVisus. If this is not checked, zones can also be grouped/ungrouped individually on the TouchPads/WebVisus.
(3) Click here to adjust the settings of a predefined zone group such as name, type, KNX group addresses to start/stop the group, included zones.
See also Zone group settings
(4) Click here to delete the predefined zone group.
(5) Click here to add a new predefined zone group.
Zone group settings
- Description
-
Name or description for the zone group, as it will be shown in the UI.
- Type of zonegroup
-
-
Set the volume of each zone to master volume when started
-
No special volume level handling
-
Set volume for each zone individually when started
-
- GA to start this group
-
KNX Group address for starting/activating this zone group.
Range of values: "0" or "1" (equal) - GA to stop this group
-
KNX Group address for stopping/deactivating this zone group
Range of values: "0" or "1" (equal) - Include zone …
-
A list of all available zones which can be selected as a part of this group.
5.4.6. setupControlUnits
The screen to manage the control units looks like this.
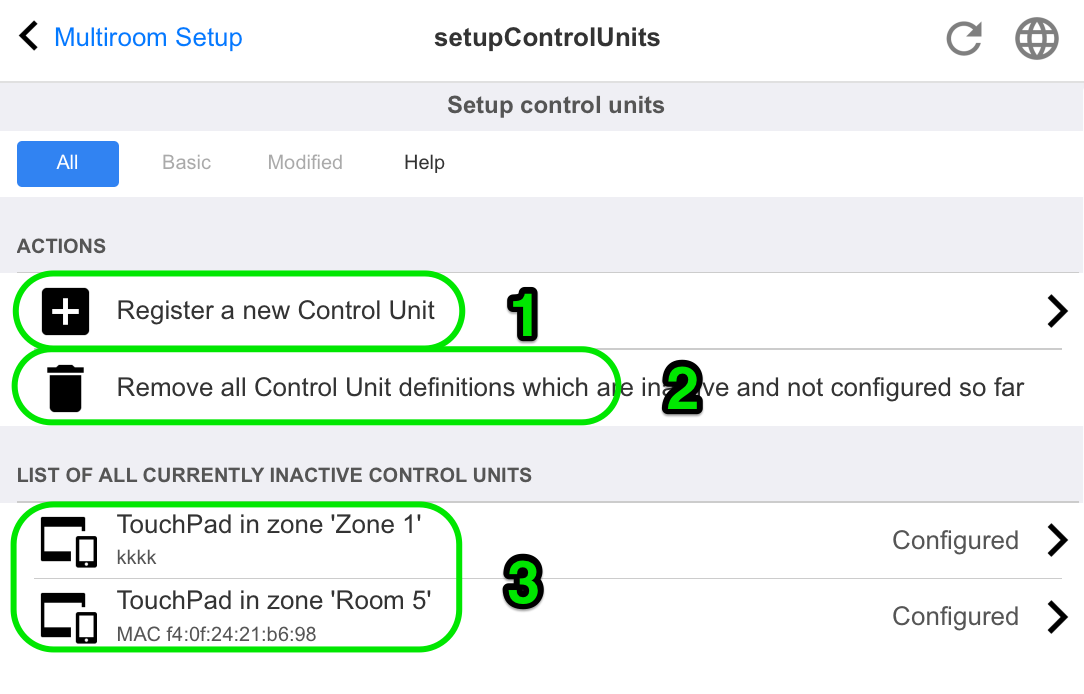
(1) Click here to add a new control unit.
(2) Whenever you connect to the trivum system with a Web Visu, for example from an iPhone or a tablet, a new Control Unit is created dynamically. As long as you do not configure special actions for this unit, it is shown as "not configured". If your list fills with many unconfigured control units over time you may clean them up with this function.
(3) Click here to adjust the settings of a control unit such as name, assigned zone, assigned trivum actions and other specific settings. See also setupControlUnit
5.4.7. setupControlUnit
The screen to configure a control unit looks like this.
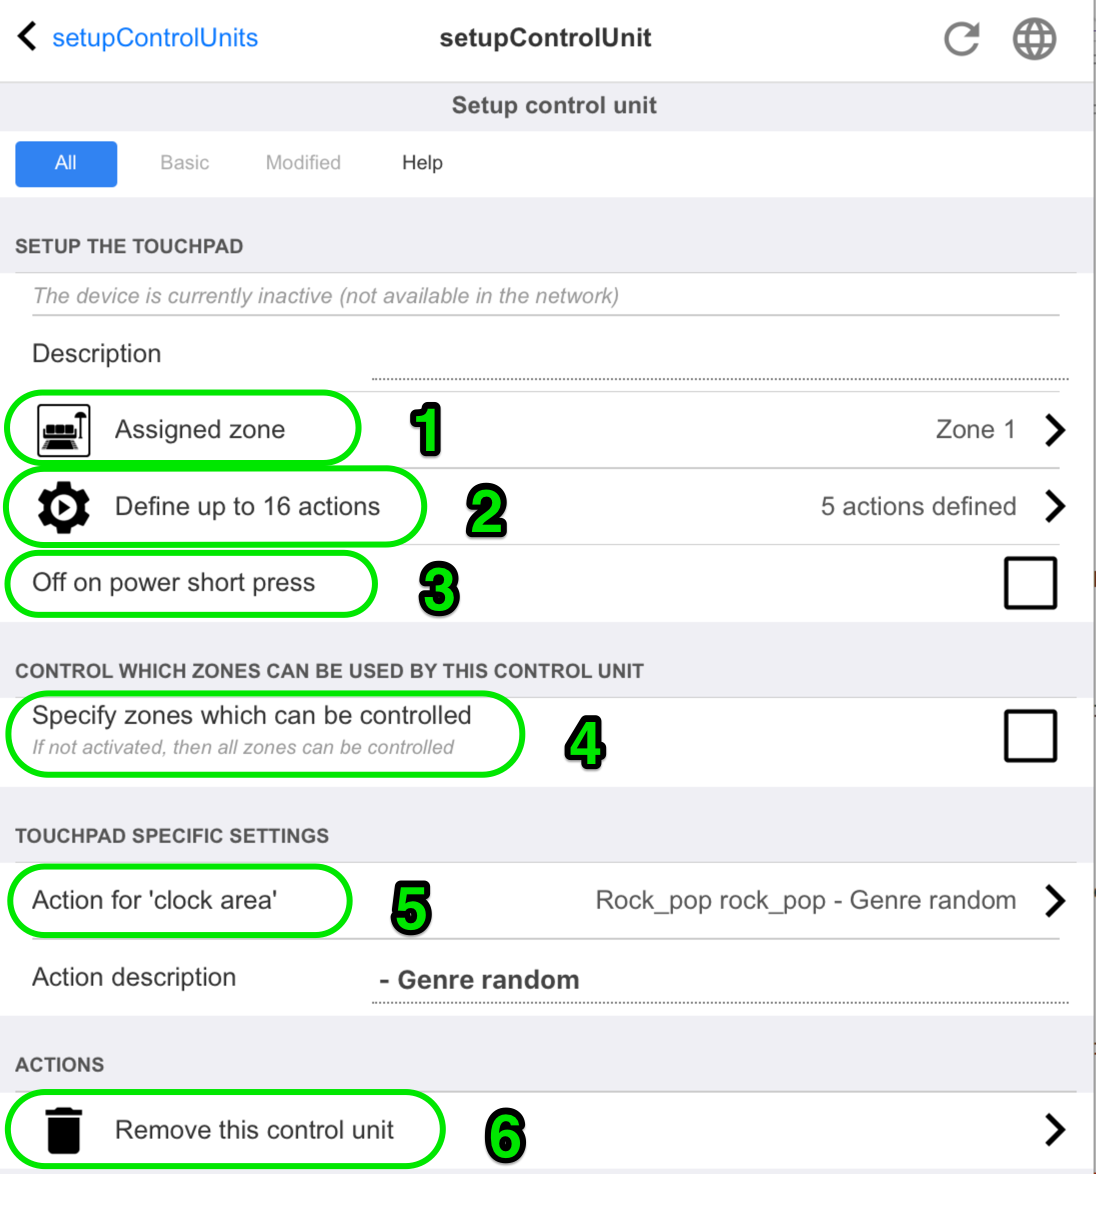
1 - The zone that the control unit currently uses. This may be changed anytime by the zone selection menu within this unit.
2 - Commands that can be assigned for this control unit only. They will appear at the right side of the visualization.
3 - Normally, clicking on the power button at the right bottom in a control unit will activate mute, and a long press will switch the zone off. If this setting is active any (short) press on the power button will switch the zone off. This can be relevant for touch panel PC’s that do not support a long press.
5.5. Streaming
Here you will find TuneIn, AirPlay and InStreamer configuration.
5.5.1. setupTuneIn
The screen to configure TuneIn looks like this.

1 - this should be filled in only if "Local Radio" within the TuneIn Menu lists radio stations that belong to a wrong region. In this case, find out the latitude, longitude of your city, by googling: "Cityname latitude". Then enter them here. For example, for Zurich type here: 47.3,8.5
Ort |
Breitengrad |
Längengrad |
Paris |
48.8 |
2.3 |
Berlin |
52.5 |
13.4 |
Barcelona |
41.4 |
2.2 |
Chicago |
41.9 |
-87.6 |
Tokyo |
35.7 |
139.7 |
Istanbul |
41.0 |
29.0 |
Rom |
41.9 |
12.5 |
Sydney |
-33.9 |
151.2 |
New York |
40.7 |
-74.0 |
2 - if you use the TuneIn menu often and in every zone you may check this option. It will show an action "TuneIn" at the right side of every visualization.
3 - as soon as you marked webradio stations as TuneIn favourites they will be listed here.
5.5.2. setupAirPlay
The screen to configure AirPlay looks like this:
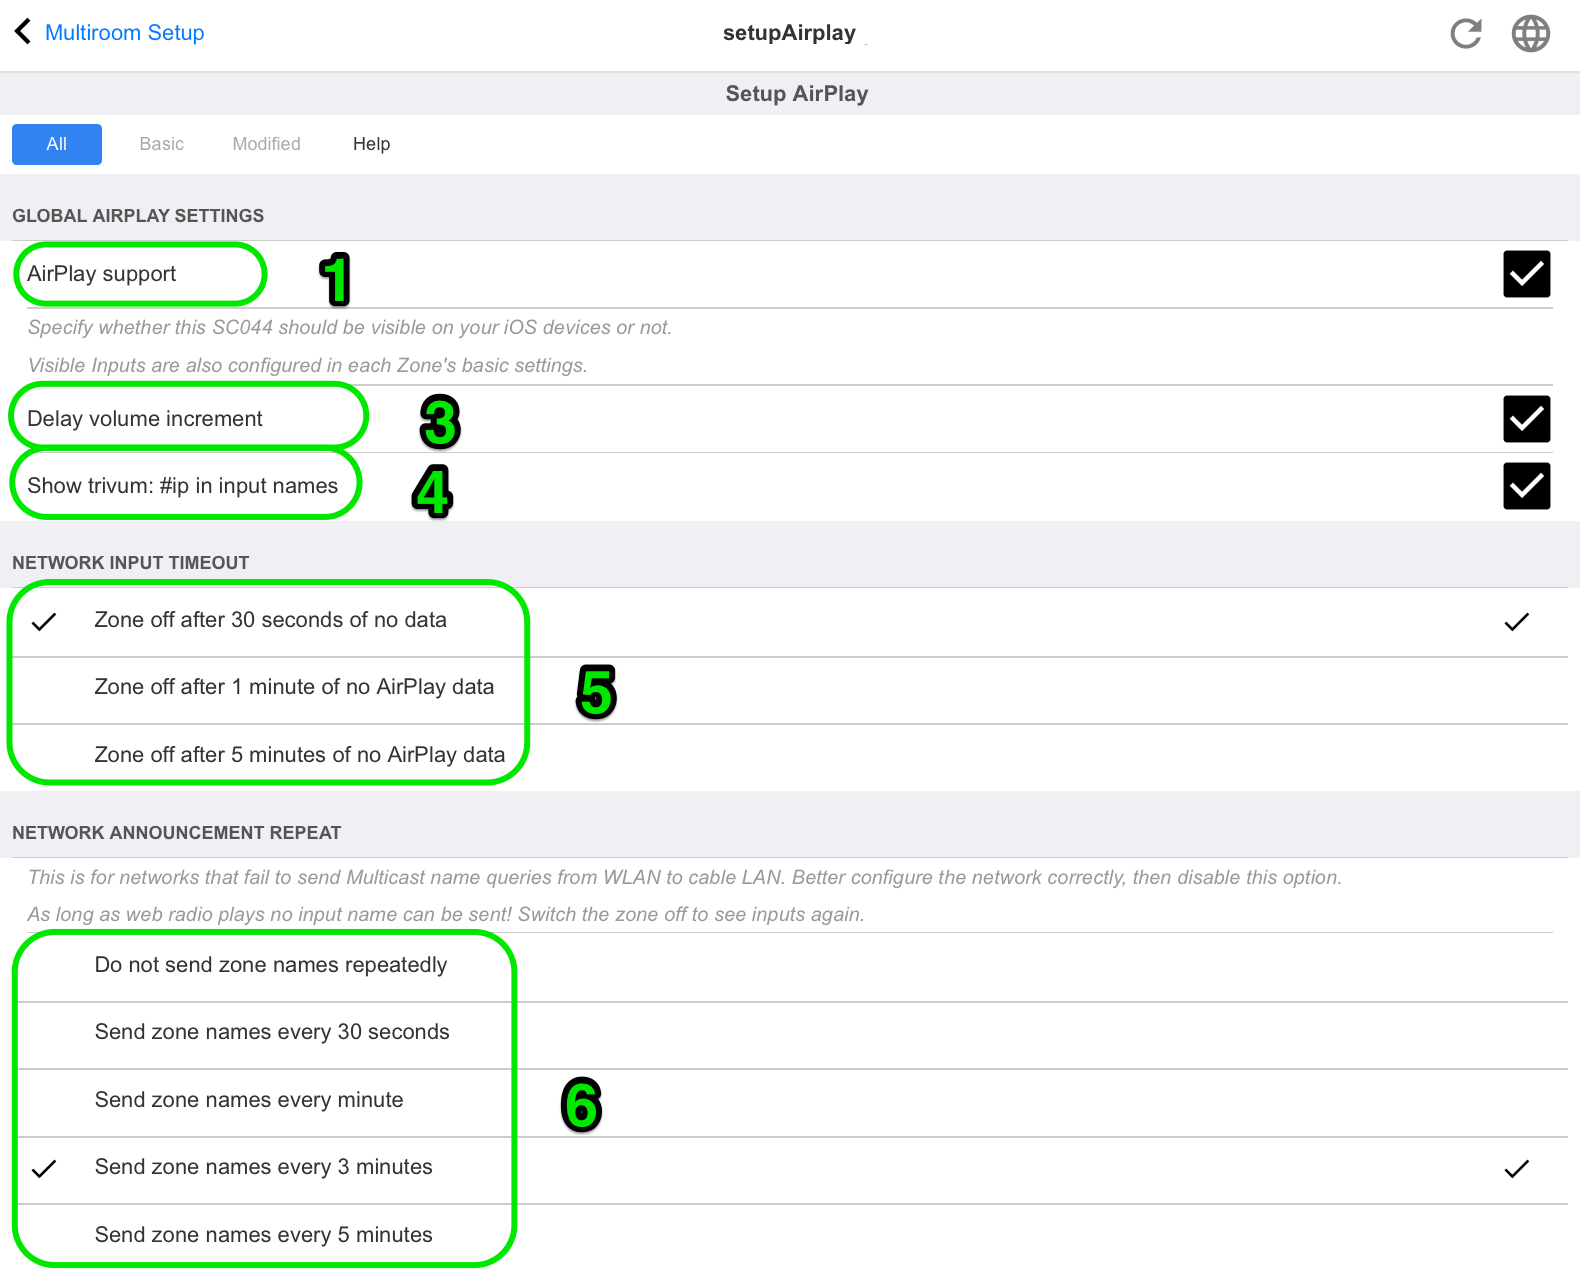
1 - enable or disable AirPlay in general.
3 - check this to avoid instant massive volume changes, e.g. because your iPhone currently uses a volume level 90 which is sent by AirPlay to trivum.
4 - if set, the trivum AirPlay network inputs look like "trivum #.100 name" with 100 being the last part of the trivum IP address. Default is to show only the zone names.
5 - if AirPlay stops sending audio, how long should trivum wait before a zone is switched off? Default is 30 seconds.
6 - in fully a transparent network, with no multicast filtering, this option is not required and should be set to: "Do not send zone names repeatedly". Some networks, however, do not pass trough AirPlay name queries sent by an iPhone, with the result that trivum AirPlay network inputs are not visible at the iPhone. For this case select an active repeated sending of AirPlay names here, normally every 1 to 3 minutes.
5.5.3. setupInStreamers
The trivum InStreamer adds another audio source to your trivum multiroom system. An external audio source, like a CD- or record player, can be connected via analog RCA or digital TOSLINK cable to the InStreamer.
The InStreamer itself is connected via Cat-5 Ethernet cable to your LAN, and will be automatically detected at a trivum device, allowing integration.
The screen to configure InStreamers looks like this.
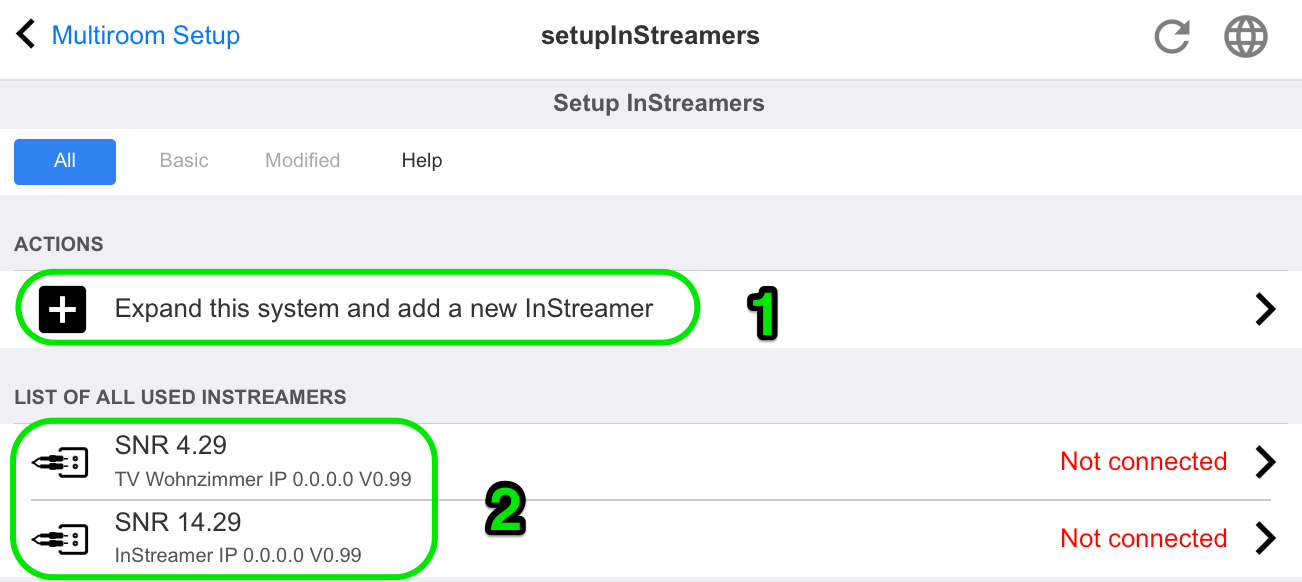
-
click here to add another InStreamer.
-
the list of currently integrated InStreamers.
"Not connected" means that already integrated InStreamers are currently not visible in the network. If the devices are switched on this may indicate multicast filtering by network switches.
5.5.4. setupInStreamer
The screen to configure an InStreamer looks like this.
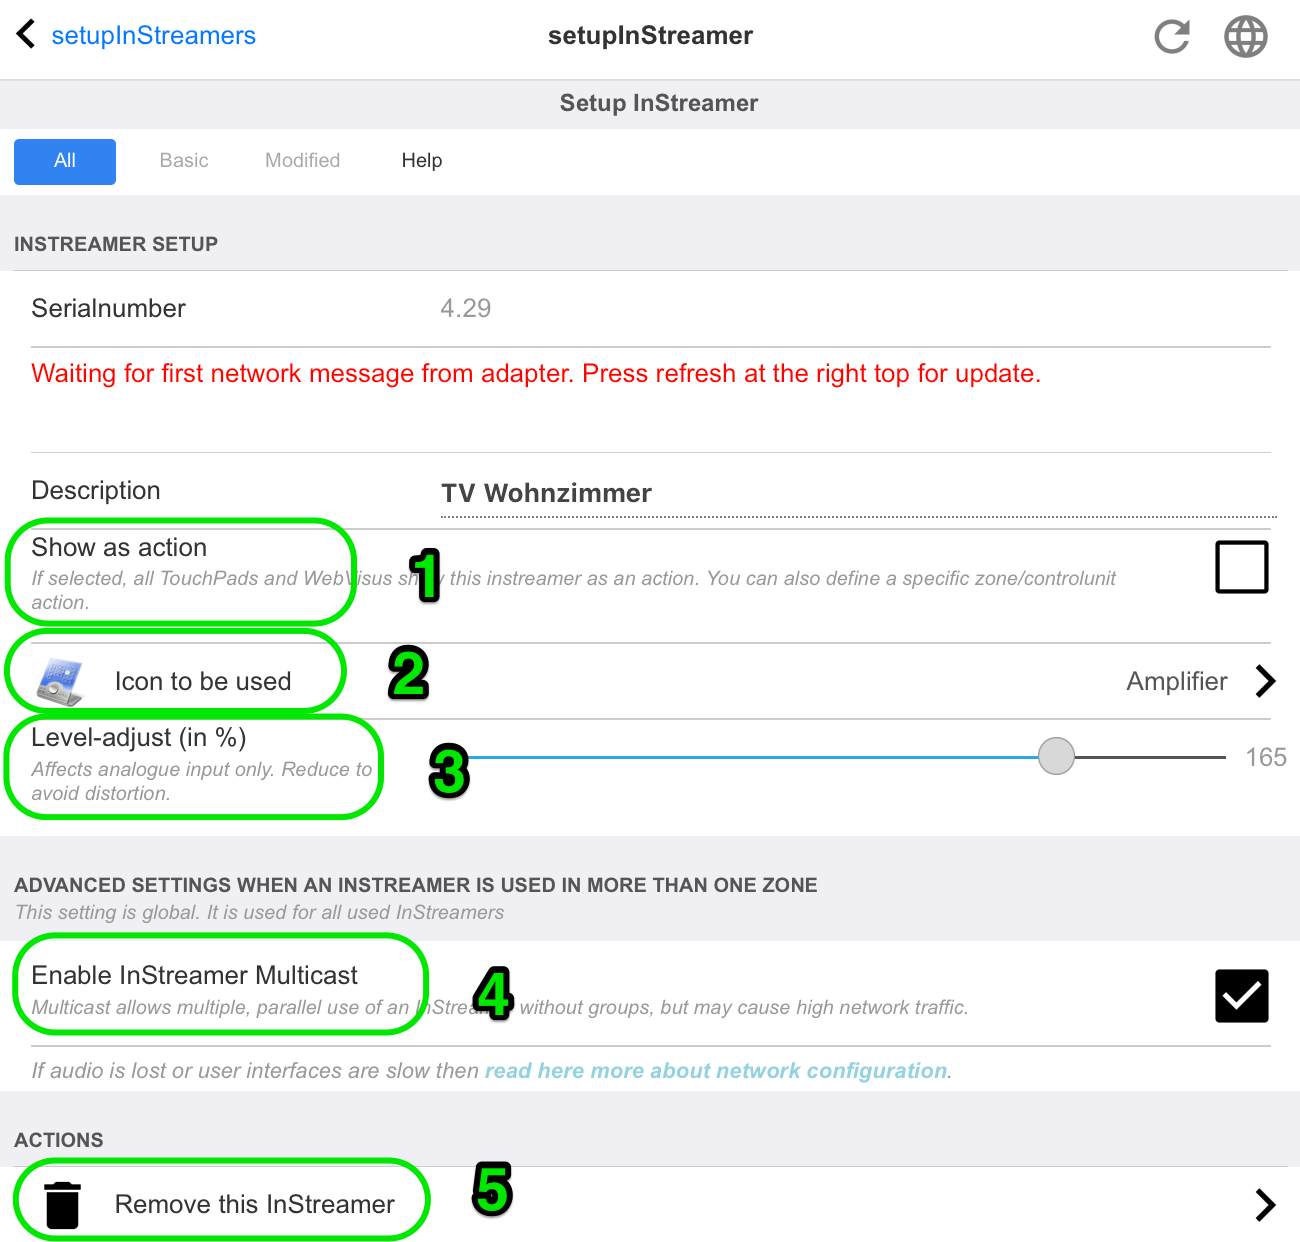
1 - check this to make the instreamer available as an action in all zones, in the right side of every visualization.
2 - while an InStreamer is used to play music, select the displayed icon here.
3 - if the sound is very silent select values above 100 (percent). If the sound is distorted select values below 100 percent.
4 - should not be checked as long as you use the InStreamer only in a single zone, or as a source for a group containing several zones. If, however, you want to play the InStreamer audio in different, ungrouped zones in parallel, especially with separate trivum devices, you have to enable multicast. Multicast however requires a proper configuration of your network switches, otherwise audio or your network may fail. Read all details in article: https://www.trivum-shop.de/support/docs/en/trivum-troubleshooting.html#groupplay
5.6. Music Services
trivum can play music provided by network streaming services. Their accounts are configured here.
5.6.1. add streaming service
The screen to add a new StreamingService looks like this.
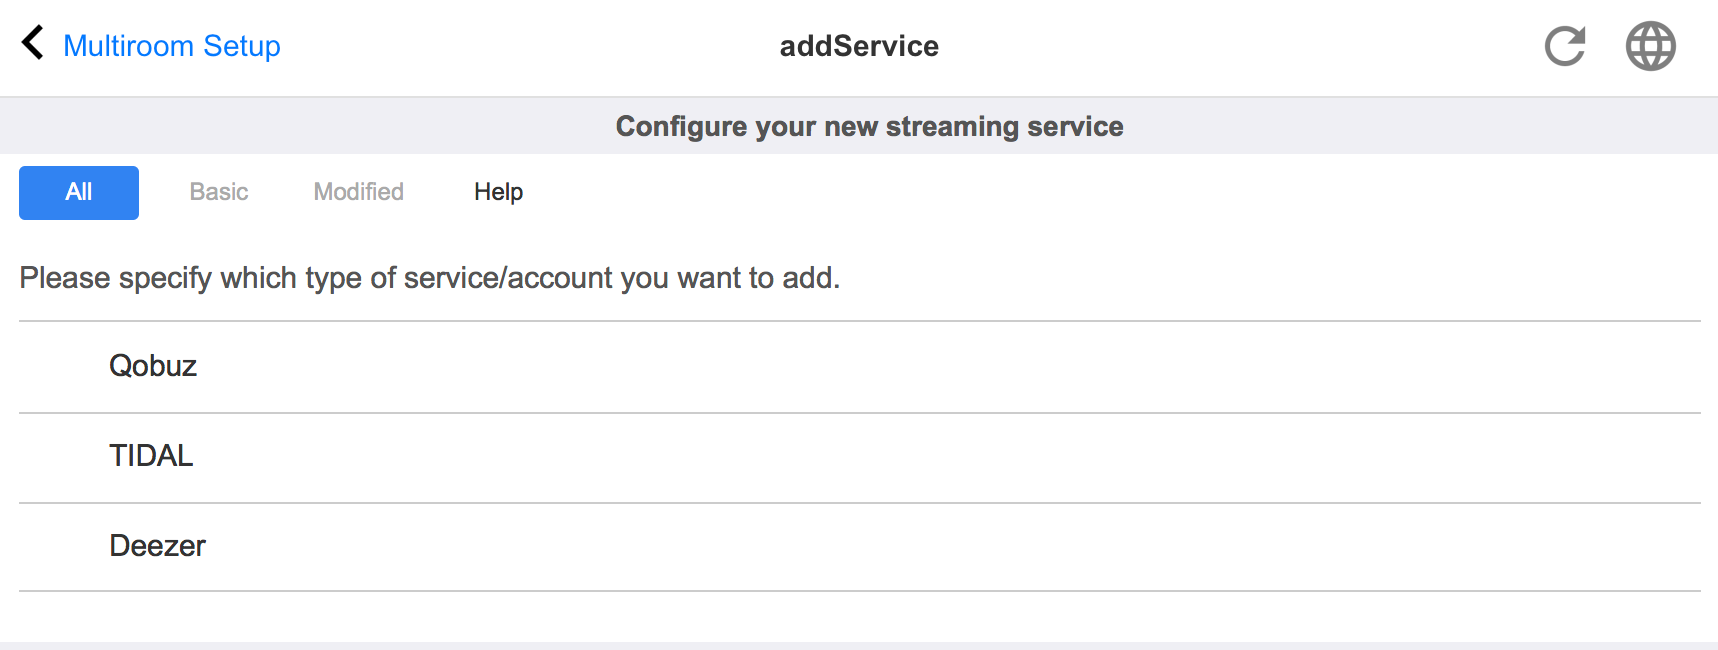
-
click on the service name where you own an account
-
in the following screen, fill in username and password, then click on "Create the streaming service given account".
-
if all data are correct you will then find the service in your Touchpad or Web Visualization under Music Services.
5.7. Database
The configuration is divided in several parts.
- Music on NAS
-
Integration of your personal music files by a NAS (Network attached storage).
- FM Stations
-
Stored presets of FM tuner, if available in your device.
- Favorites
-
The list of trivum favorites.
- DSP Presets
-
The list of presets to change the sound shape by a Digital Signal Processor. These presets can be by selected per zone under: Configuration / Zones / zone name / change sound settings / Use DSP preset.
5.7.1. setupNAS
| trivum multiroom systems supports music available on SMB (samba) network shares. No DLNA or UPnP support is provided. Music files stored on Apple servers running later than OSX 10.7 are not accessible because of incompatible Apple SMB support. |
NAS stands for Network-attached storage. Network-attached storages are special data storage, which can be connected directly to a network. They make your music library files accessible from all devices within the network, including trivum multiroom devices.
-
We recommend to use a static IP in the NAS instead of DHCP. Please enter the static IP of the NAS instead of a symbolic name. This solves problems with network name resolution.
-
Windows PC shared folders require a non empty username/password.
Windows 7: if your PC share has no password type a dummy, e.g. "user" and "pass".
Windows 10: Windows requires that the shares have a user with a non empty password configured for access. In the Windows Defender Firewall, you may have to enable access for the Registration Service ("Anmeldedienst") in the Firewall settings. If that doesn’t work deactivate the Firewall. -
NAS box setup: if you have a NAS box like Synology make sure that the SMB or "File Server" function is really active (and not just UPNP, FTP or some other unsupported protocol).
-
there are a few audio test files on each trivum multiroom device to allow a quick sound test. to make them accessible, create a share, enter
defaultas it’s path name, and run an index update.
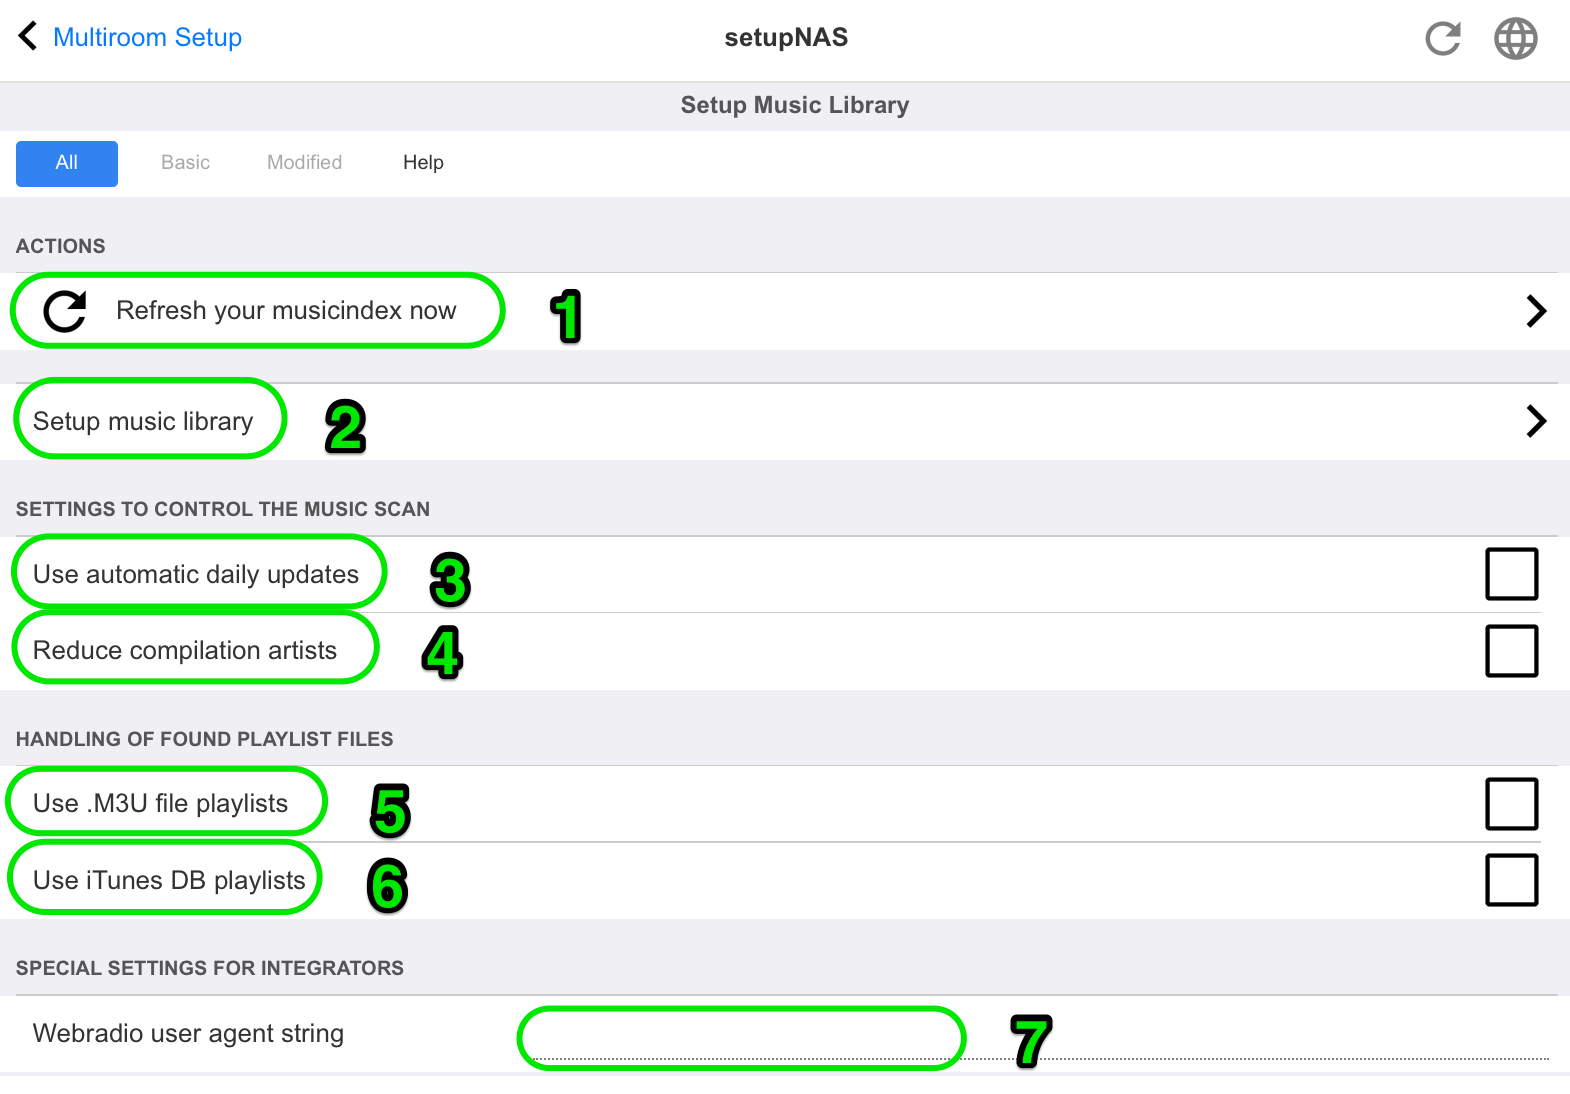
1 - click here to start another rescan of the NAS contents, if a NAS path was configured already.
2 - here you can configure a network path to access your music on a NAS.
3 - enable this to have an automatic NAS rescan done once per day.
4 - if you have mainly music from sampler albums, with many different artists, then trivum tries to detect such albums automatically, so you can still play them although artists are different. This however requires that the COMPILATION tag is set in all such music files. Read more below about this.
If tagging is not possible you may try the "Reduce compilation artists" option to replace all artist names by a text "Compilation". After changing the option a rescan is required.
5 - by default, trivum searches the NAS for .m3u files and includes these playlists in search results. You may not want to do so if all your playlists are already taken automatically from an iTunes database file, as configured under (6).
6 - if you use iTunes and have your NAS folders well configured, as described under
https://www.trivum-shop.de/support/docs/en/trivum-connect.html#nasitunes
then trivum will use playlists from this database automatically if this option is set.
7 - this is normally not used. Only if some very special web radio stations fail to play, because they expect a special user agent string, then this can be configured.
- Compilations or Sampler albums:
-
These are albums with many different artists, like "Greatest Hits of 2017". To keep the album as one unit, with all tracks selectable via this album, every file needs to be marked with a COMPILATION tag. This can be done:
-
by the mp3tag Windows tool from http://service.trivum-shop.de/share/Tools/mp3tagv253setup.exe
select a folder, then select one or more files, and: view / extended tags, add tag, with name: COMPILATION, set value 1. -
by iTunes: select one or more files, Informations, then mark the field "Compilation".
-
5.7.2. setupFavorites
Start your favorite music thanks to trivum favorites in just three clicks. No more searching, no scrolling through long lists. And the best: adding a track to your trivum favorites is even faster. Any kind of music sources can be added to the trivum favorites - streams, fm stations and even audio inputs.
| trivum favorites can be added via TouchPad or WebVisu. The proceeding is identical. |
Add trivum favorite
Requirement:
-
audio playback is running (no matter what audio source is selected)
-
if you like the music
-
Go to your TochPad or open a WebVisu
-
Click/Press on the … Options icon
-
Click/Press on Add XXX to trivum favorites
-
Close the PopUp-Menu
-
→ The audio playback is added to your trivum favorites.
Play a trivum favorite
trivum favorites can be called up via TouchPad or WebVisu.
The proceeding is identical.
Requirement:
-
you have at least one trivum favorite
-
Go to your TouchPad or open a WebVisu
-
Click/Press on the Time/Date area (hamburger button)
-
Click/Press on trivum favorites
-
Select one of your favorites
If you selected an album, select a track or All tracks -
Select one of the queue options (Play now, Play next, Add to list etc.)
-
→ Playback starts, depending on which queue option you have selected
WebSetup settings
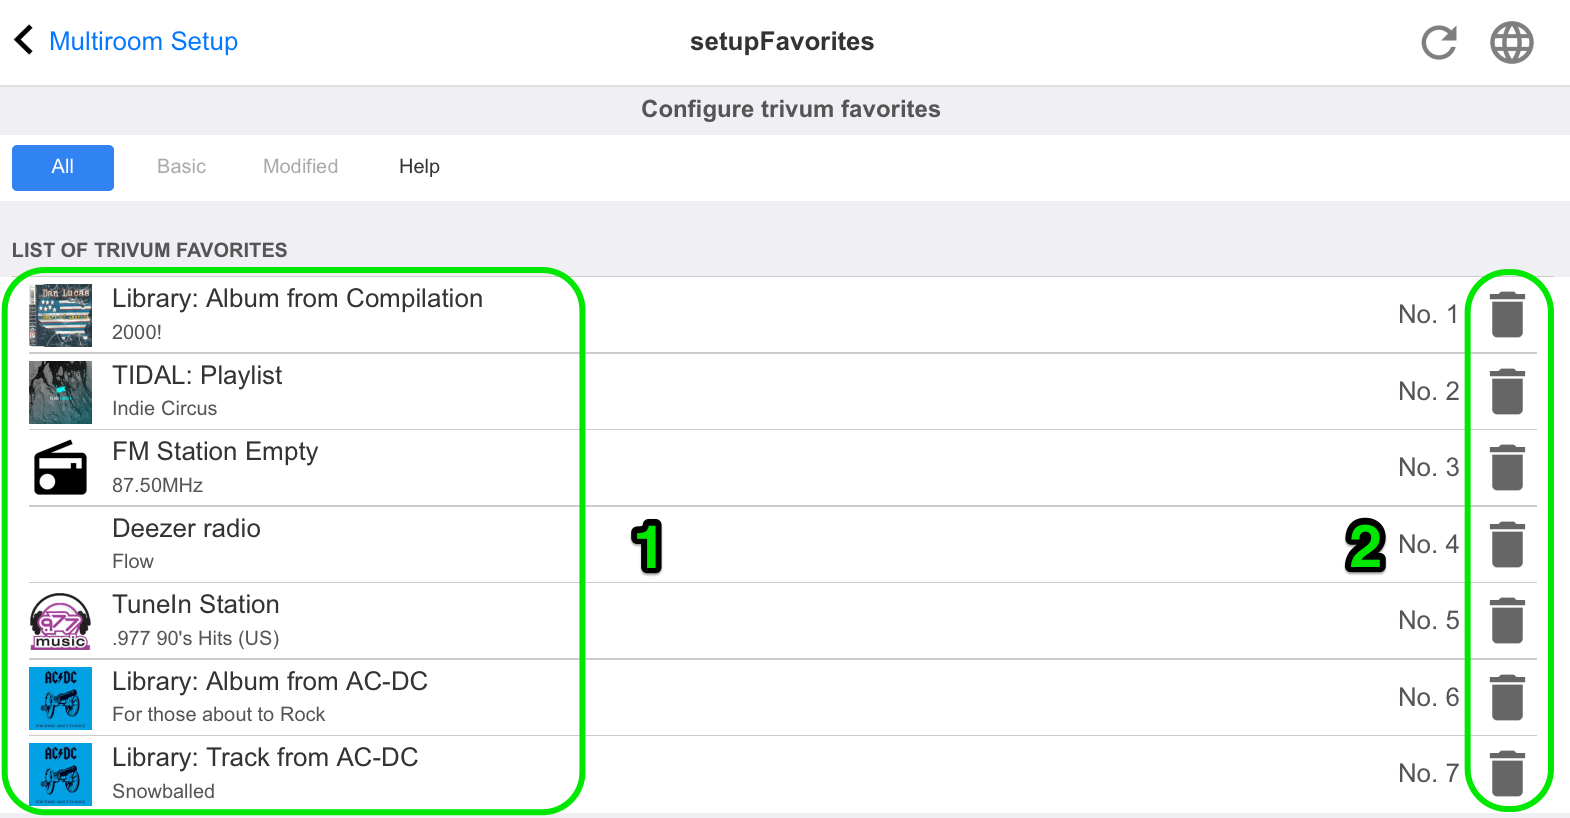
1 - the list of favorites.
2 - icons allowing to delete favorites.
5.7.3. setupFMStations
trivum multiroom devices with one or more built-in FM tuner have of course a classic station memory. With this, you can save up to 30 of your favorite radio stations, and select them easily by one touch.
| FM Stations can be both, configured directly on the TouchPad or via WebConfig. |
The screen to configure the FM stations looks like this.
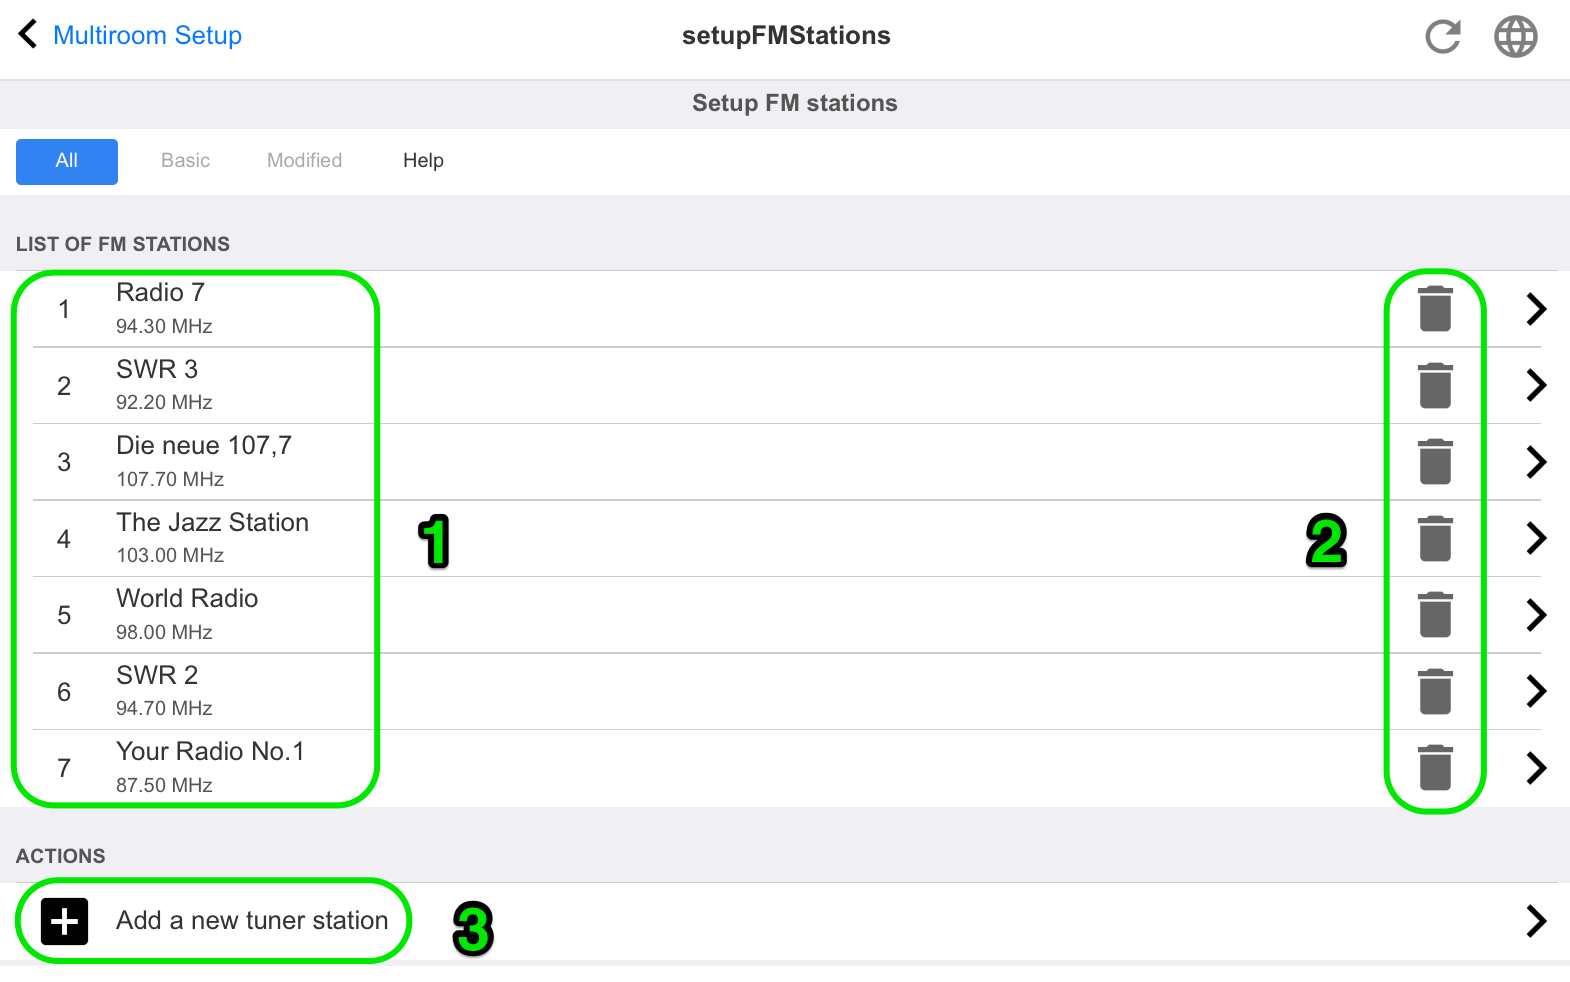
1 - the list of stations.
2 - buttons to delete stations.
3 - here you may add a station manually by entering it’s frequency.
5.7.4. setupDSPPresets
Current trivum-multiroom devices feature a built-in DSP for extensive sound optimizations. Thus, you can adjust the audio playback individually to your spatial conditions or to the music genre. Some DSP presets are already defined ex works.
Predifined DSP presets
trivum preset |
Virtual Surround |
Highpass filter |
Bass enhance level |
EQ#1 |
EQ#2 |
EQ#3 |
EQ#4 |
EQ#5 |
Flat |
no |
no |
no |
- |
- |
- |
- |
- |
Rock |
no |
no |
no |
32Hz, 0.8 +0dB |
125Hz 0.8 +3dB |
1500Hz 0.9 +0dB |
4000Hz 1.0 +2dB |
10000Hz 1.0 +4dB |
Pop |
no |
no |
no |
40Hz 0.5 -2dB |
250Hz 0.8 +1dB |
500Hz 0.8 +2dB |
1000Hz 0.1 +2dB |
10000Hz 0.5 -1dB |
Jazz |
no |
no |
no |
40Hz 0.5 +3dB |
250Hz 0.8 +1dB |
500Hz 0.8 -1dB |
1000Hz 0.1 -1dB |
10000Hz 0.5 +4dB |
Classic |
no |
no |
no |
40Hz 0.6 +3dB |
750Hz 0.1 -1dB |
- |
- |
16000Hz 0.5 +1dB |
Voice |
no |
no |
no |
80Hz 0.9 -2dB |
250Hz 0.1 +1dB |
750Hz 0.8 +2dB |
- |
16000Hz 0.5 +1dB |
Loudness |
no |
no |
no |
40Hz 0.8 +4dB |
500Hz 0.1 -1dB |
4000Hz 1.0 -3dB |
8000Hz 0.1 +3dB |
16000Hz 1.0 +3dB |
The screen to configure the DSP presets looks like this.
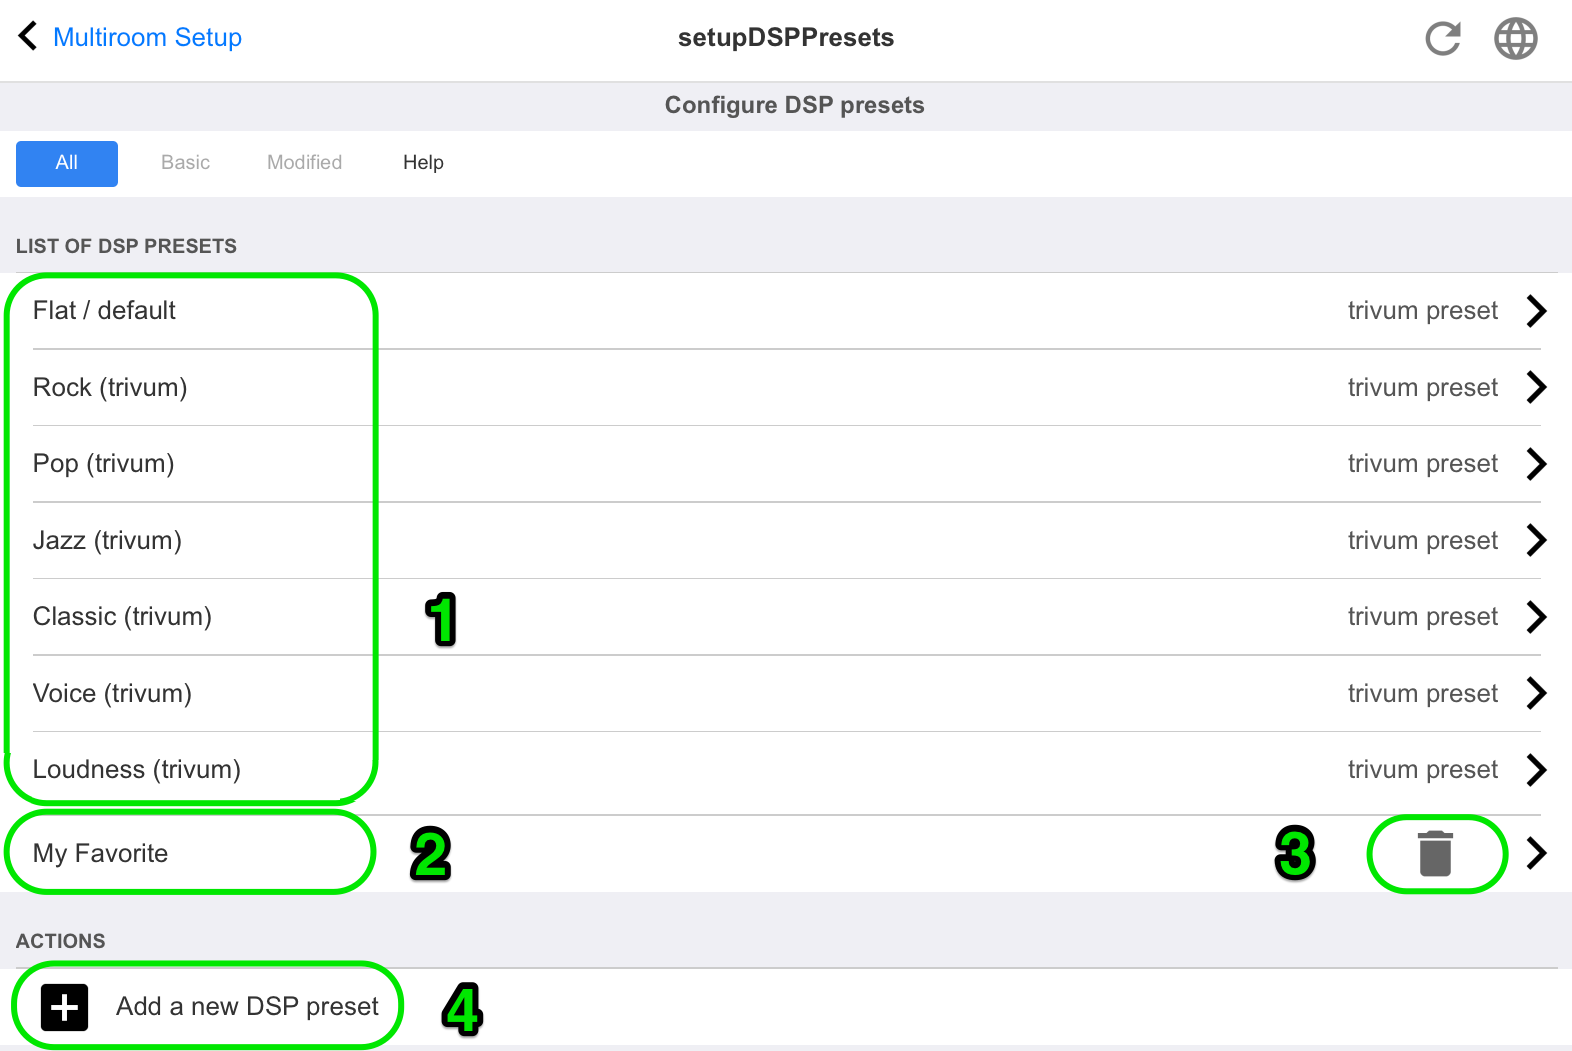
1 - the list of predefined presets.
2 - presets defined by you are listed below.
3 - only self defined presets can be deleted.
4 - here you may create a new preset, which leads to the following screen.
5.7.5. editDSPPreset
The screen to change a DSP preset looks like this:
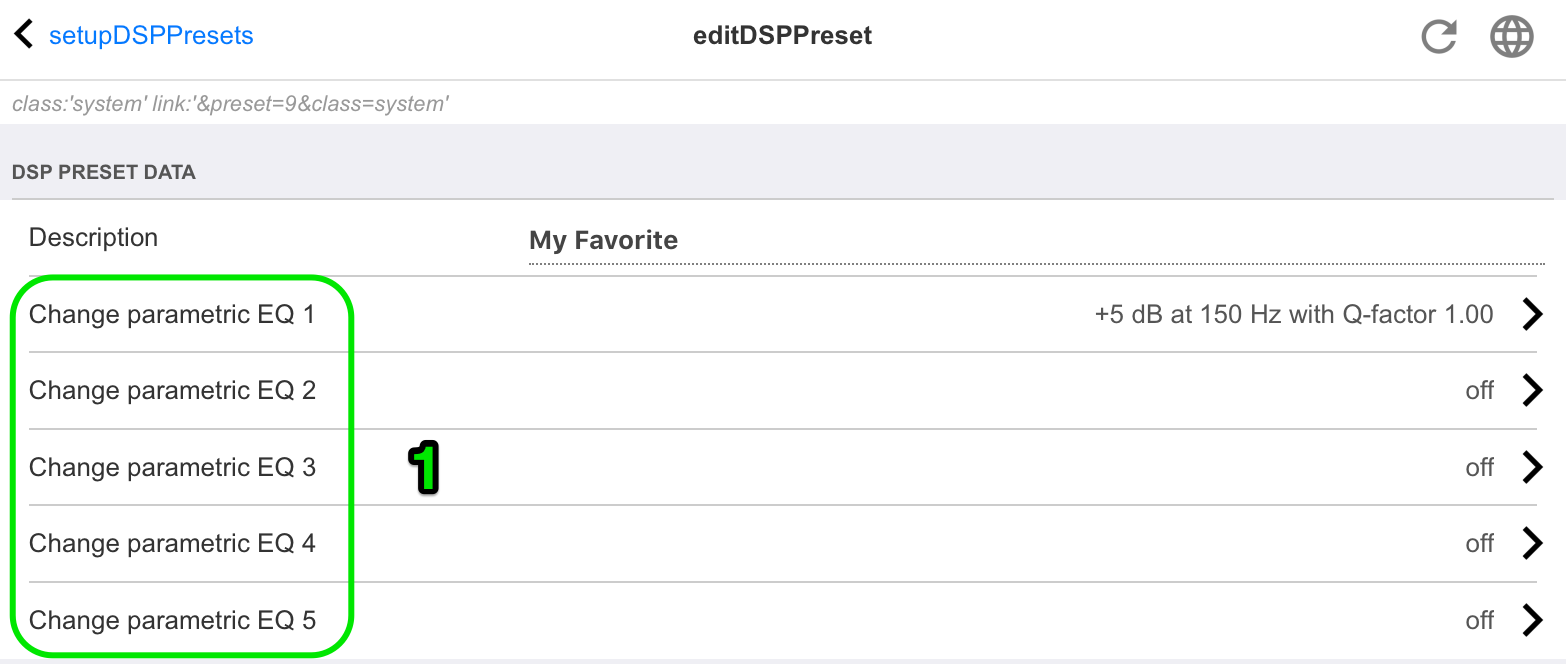
1 - individual EQ bands with frequency, Q factor and amount.
5.8. Automation
Here RTI and paging can be configured.
5.8.1. setupRTI
RTI is the link between your technical devices and provides you with a unified and comprehensive user interface. This surface is on hand-held remote controls, touch panels, tablets, smart phones and computers. trivum multiroom devices can be controlled from RTI systems and trivum can use RTI systems to control devices.
The screen to setup the RTI support looks like this:
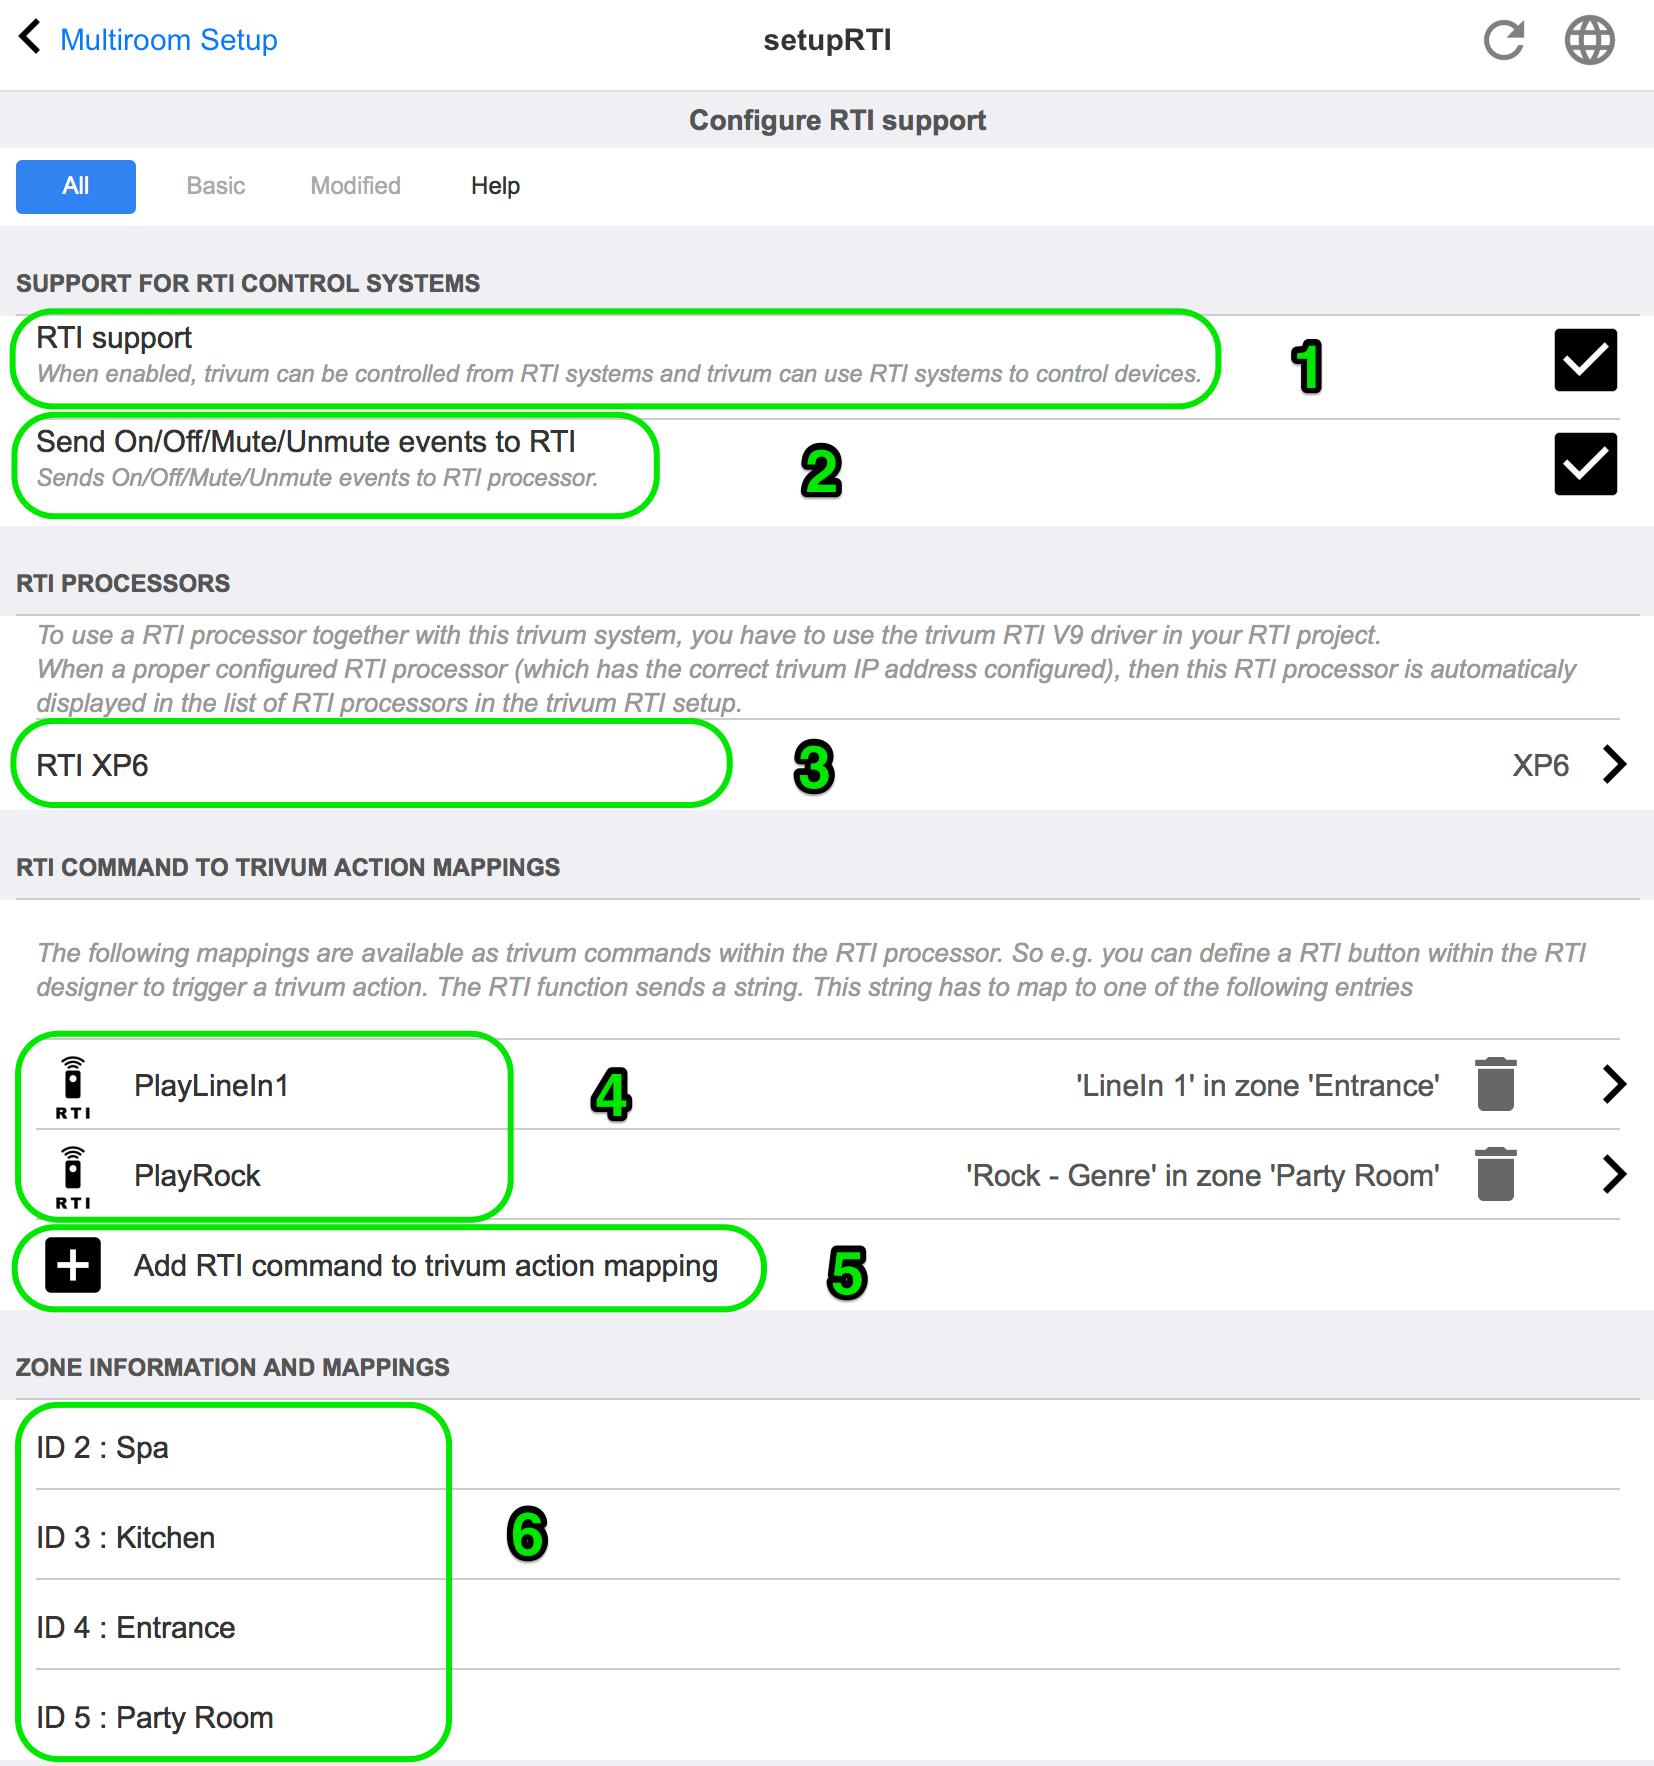
1 - enable RTI support and show RTI specific settings.
2 - by default trivum decides automatically which configuration requires sending of RTI events. Check this to always send RTI events.
3 - if an RTI processor tries to access trivum, it is listed here automatically.
4 - the list of RTI command strings that map to trivum actions.
5 - here you can map self-defined command strings sent by RTI to trivum actions. Whenever you click "add" another mapping is created under (4).
6 - overview of zones with their numeric ID’s, for identification within an RTI driver.
5.8.2. setupPaging
The paging function reduces the volume of the current music playback for a defined duration to play back the music, speech or sound from another audio source. The paging will be started and stopped via a UI action or KNX telegram to a defined group address. The volume of the paging event can also be controlled by KNX. With the paging function of the trivum-Multiroom Systems and appropriate third-party hardware, you can make announcements, e.g. for offices, conference rooms and so on.
The screen to define the paging looks like this:
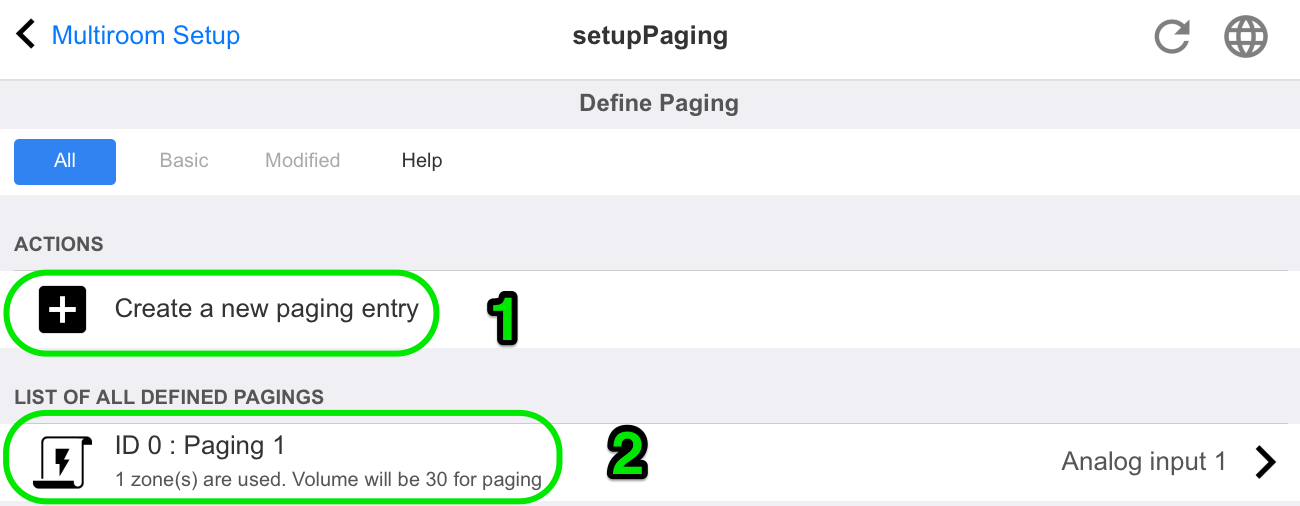
1 - click to create a new entry in the list (2)
2 - the currently defined pagings.
See also:
5.8.3. editPaging
The screen to change a paging definition looks like this:
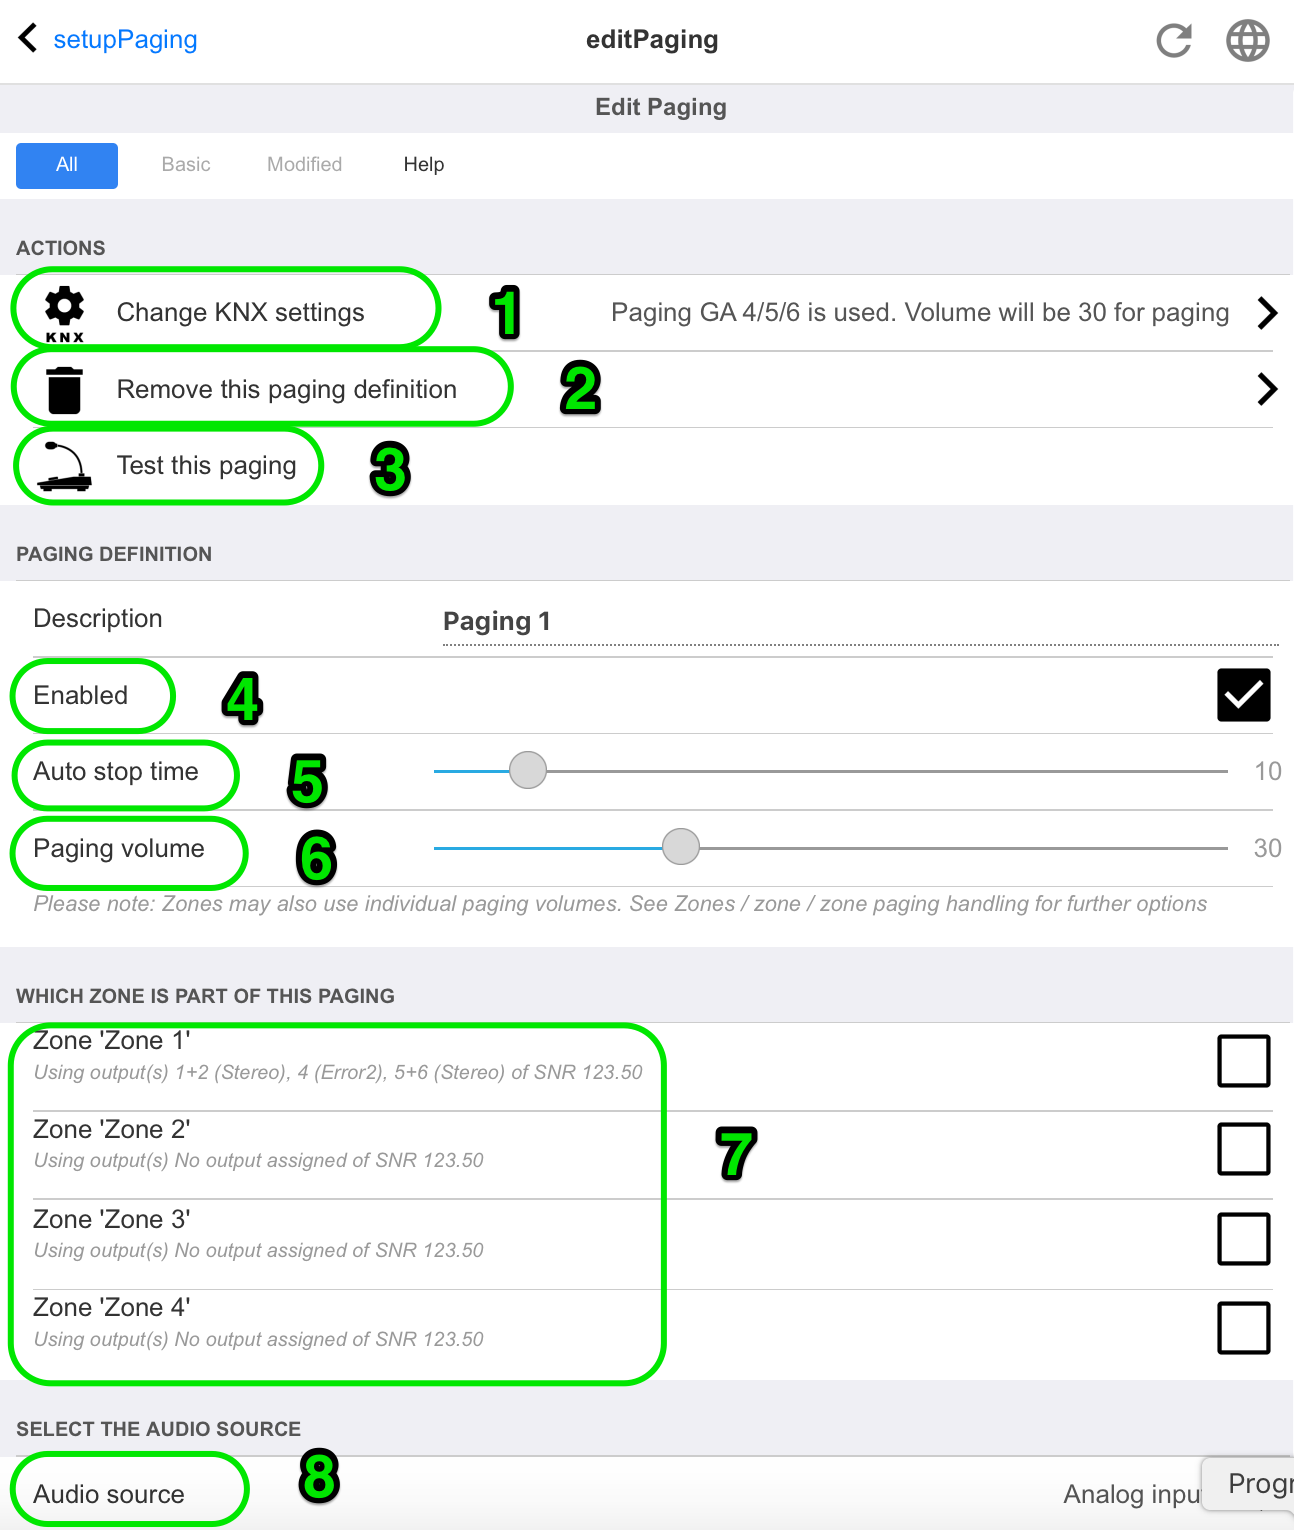
1 - to trigger the paging by KNX enter a group address here.
2 - remove the paging entry.
3 - run a quick test of the paging. As soon as started a stop button will appear.
4 - check this to have the paging enabled or disabled.
5 - how long should a paging play, in seconds, before it is stopped automatically. select 0 to play as long as the music or ringtone file is.
6 - the playback volume which is used by zones, by default. to set individual volumes per zone, look at the top of the setup page.
Read more under: How to configure a ringtone paging
5.9. KNX
The configuration is divided in several parts.
-
Basic
-
Zones
-
KNX Events
-
Text Displays
-
Paging
-
System
-
Actuators
5.9.1. setupKNX
trivum supports KNX as an active KNX member for many years. We continuously work on the optimization of the KNX function, to make it better, more flexible and even easier for the installer.
All trivum devices support KNX ex works, that means KNX is "built-in". Prerequisite for an trivum KNX operation is a KNX/IP router, or interface (a router is recommended for an unlimited number of connections). trivum devices communicate via KNX/IP using this IP router.
trivum multiroom systems can be fully integrated into a KNX environment. So you can control third party devices via the trivum TouchPads for example. Or leave the multiroom system react on outside commands.
An KNX/IP router enables the communication between the KNX environment and the trivum multiroom system.
To connect trivum devices useful with the KNX installation, the trivum devices must be parameterized.
Select "KNX / Setup KNX communication" for the global KNX setup:
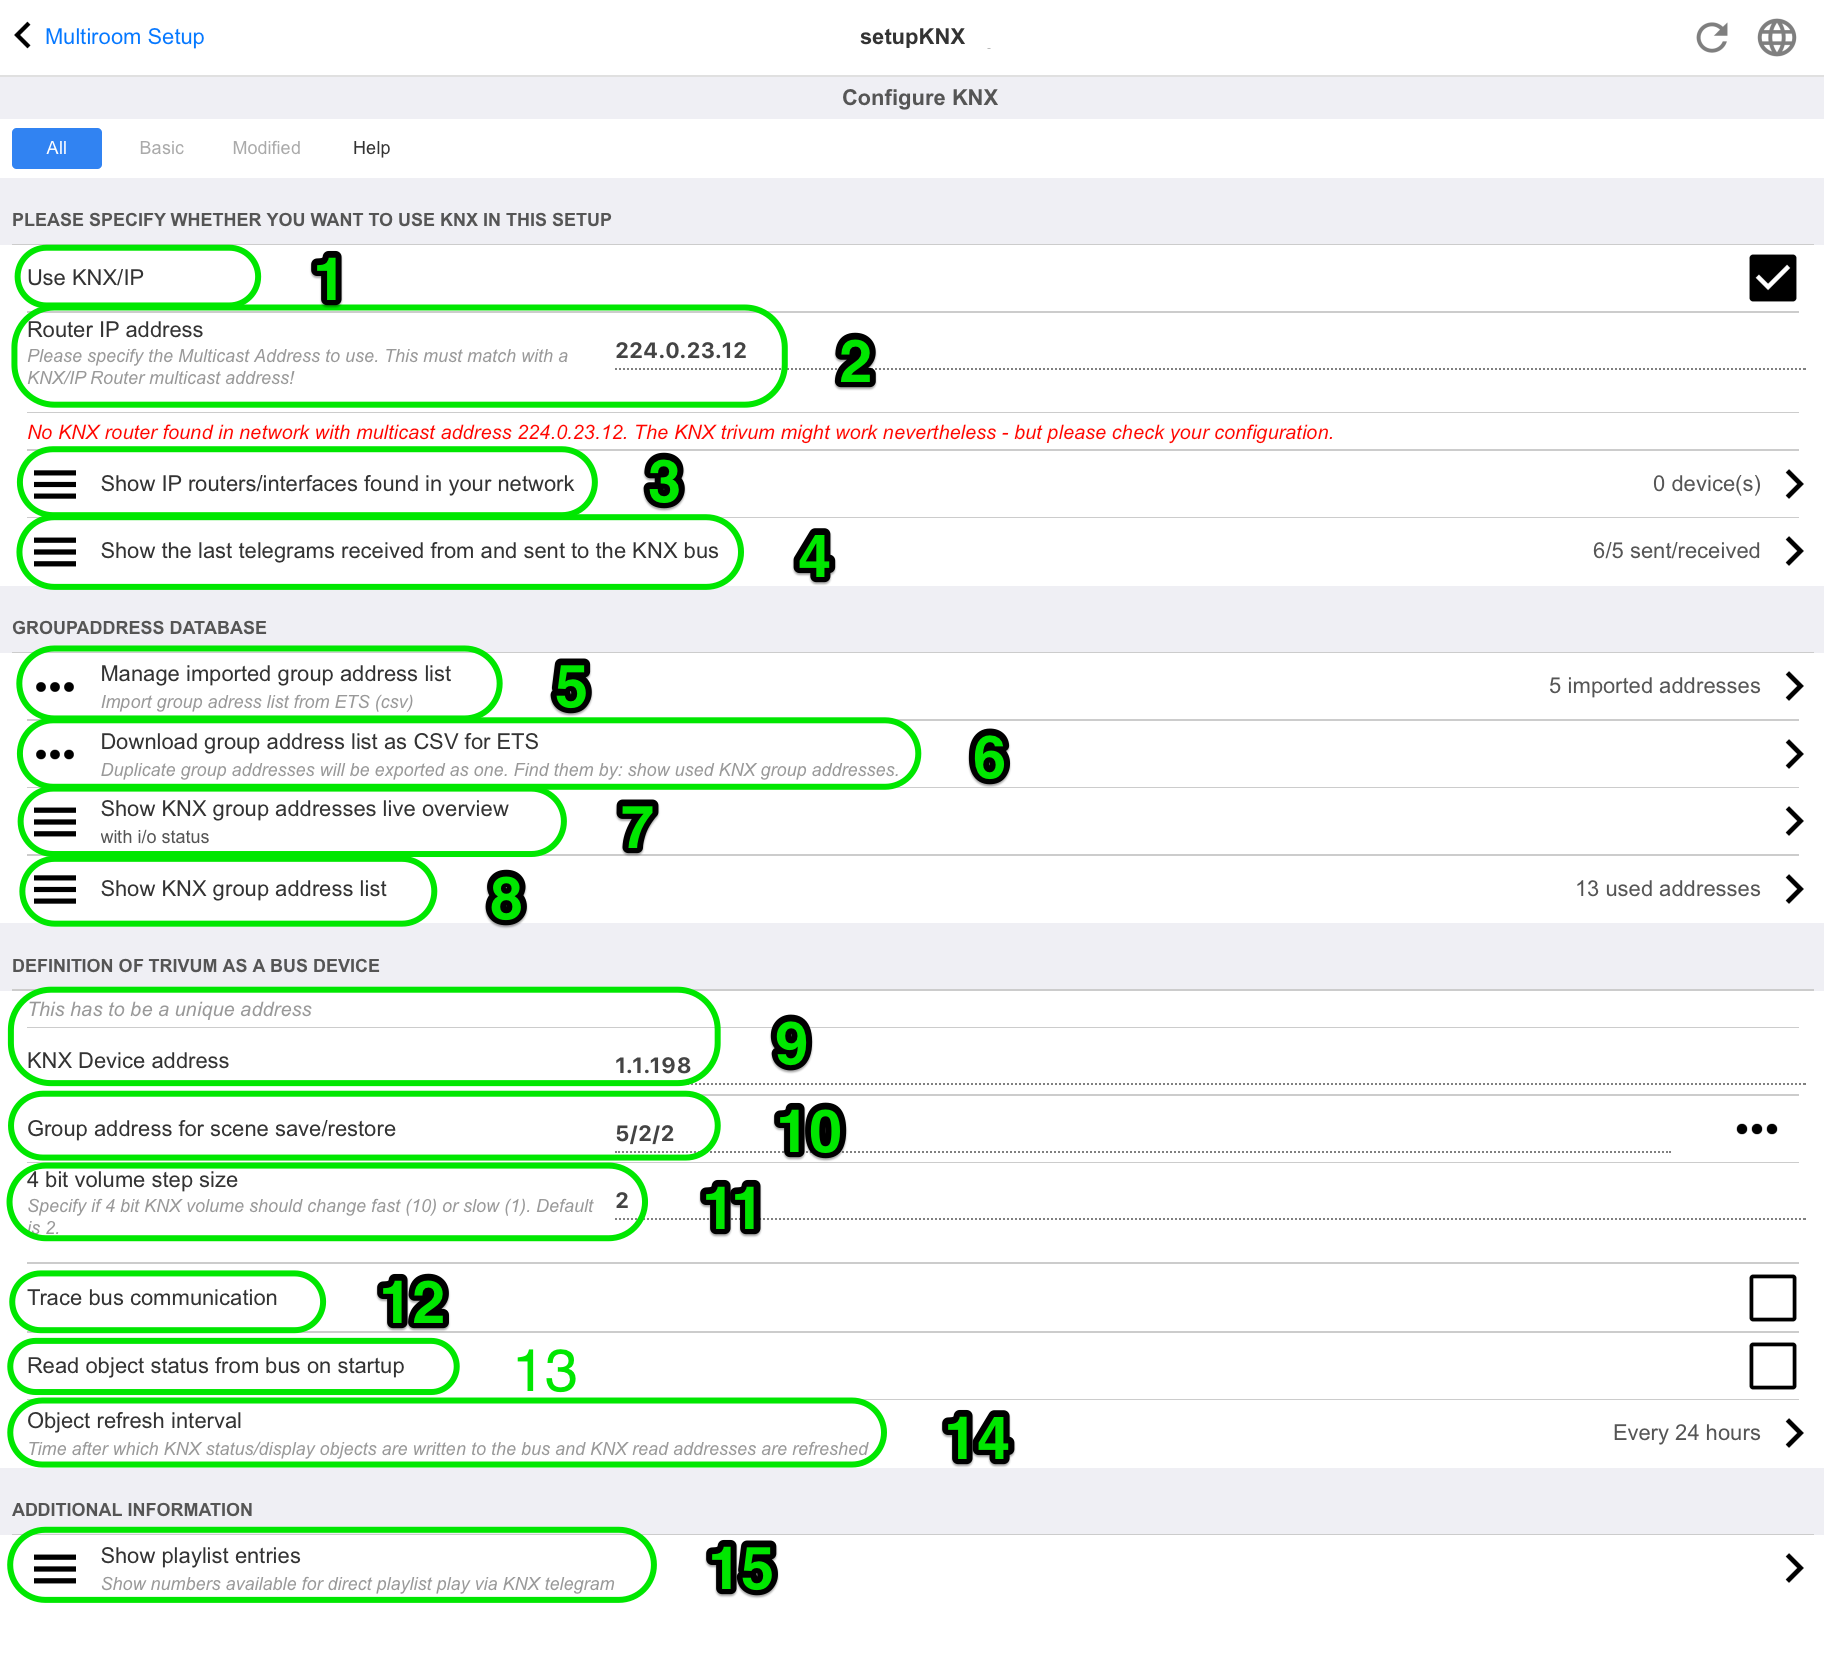
1 - enable receive and processing of KNX events from network, as well as sending of KNX status to the network, if configured.
2 - the multicast address where to listen or send to knx events. This is not the actual router device IP address (like 192.168.1.x) but always a multicast address starting with 224.
3 - if multiple KNX IP routers are detected in the network they can be listed here.
4 - link to the KNX trace where incoming messages with their time are listed.
5 - under "Import CSV" you may upload lists of group addresses exported by ETS.
6 - under "Export CSV" here you may download the list of already used group addresses.
7 - an alternative tracing page to check live if defined group addresses receive something
8 - interactive view of all defined addresses, allowing to jump to the configuration pages where they are used.
9 - the physical device address that the trivum device should use on the KNX bus. It’s just important that no other KNX device uses this address.
10 - if you want to store the current device state of trivum in a KNX scene, configure here the GA to program or recall the scene. read more details under "knx scenes" further below in the manual.
11 - for each zone a GA can be configured to control volume by 4-bit KNX messages. here you can configure the speed at which the volume changes. default is 2.
12 - to get a detailed log of incoming knx messages you have to enable this first. then go into: Information / Support / Logs&Warnings / Show KNX log
13 - select if the trivum device shall query configured group addresses for their status on startup
14 - normally, whenever knx data changes a message is sent immediately. but trivum may also re-send the current value inbetween, without any change, for example in case that a KNX display was taken off power temporarily. you may here configure an interval for such unrequested refreshs.
15 - NAS playlists with a special name starting like "P1 mylist" can be played directly, by configuring:
Configuration / Zones / zone name / KNX bindings / Play a NAS Index Playlist.
With "Show playlist entries" you get a list of all playlists, and the ones eligible for direct play being marked in green.
5.9.2. setupKNXEvents
trivum KNX events link the KNX commands, send from KNX devices, with the trivum actions of your trivum multiroom system. They defines exactly in which zone a trivum action shall be executed, as soon as a KNX datagramm with the correct value is sent to a defined group address.
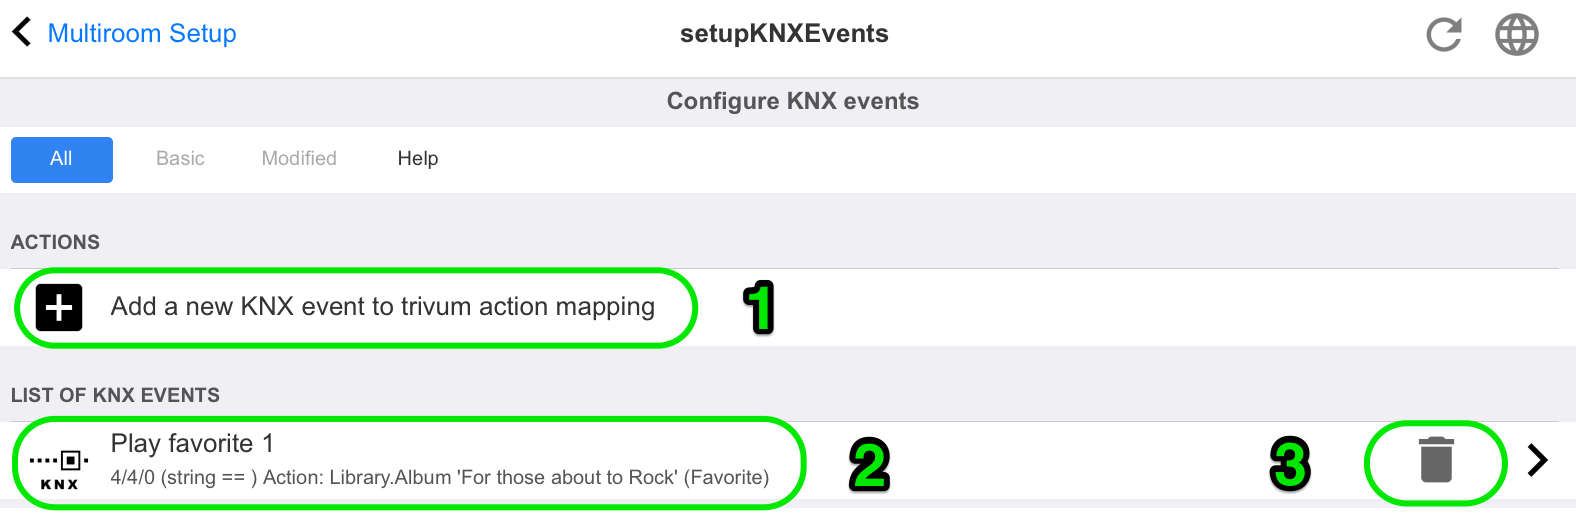
1 - here you can create such a new event, or action.
2 - list of existing events
3 - click into the trash bin to delete an event. if you click anywhere else in the row you can edit the event.
You can have up to 700 KNX event objects.
5.9.3. editKNXEvent
The screen to change a KNX event definition looks like this:
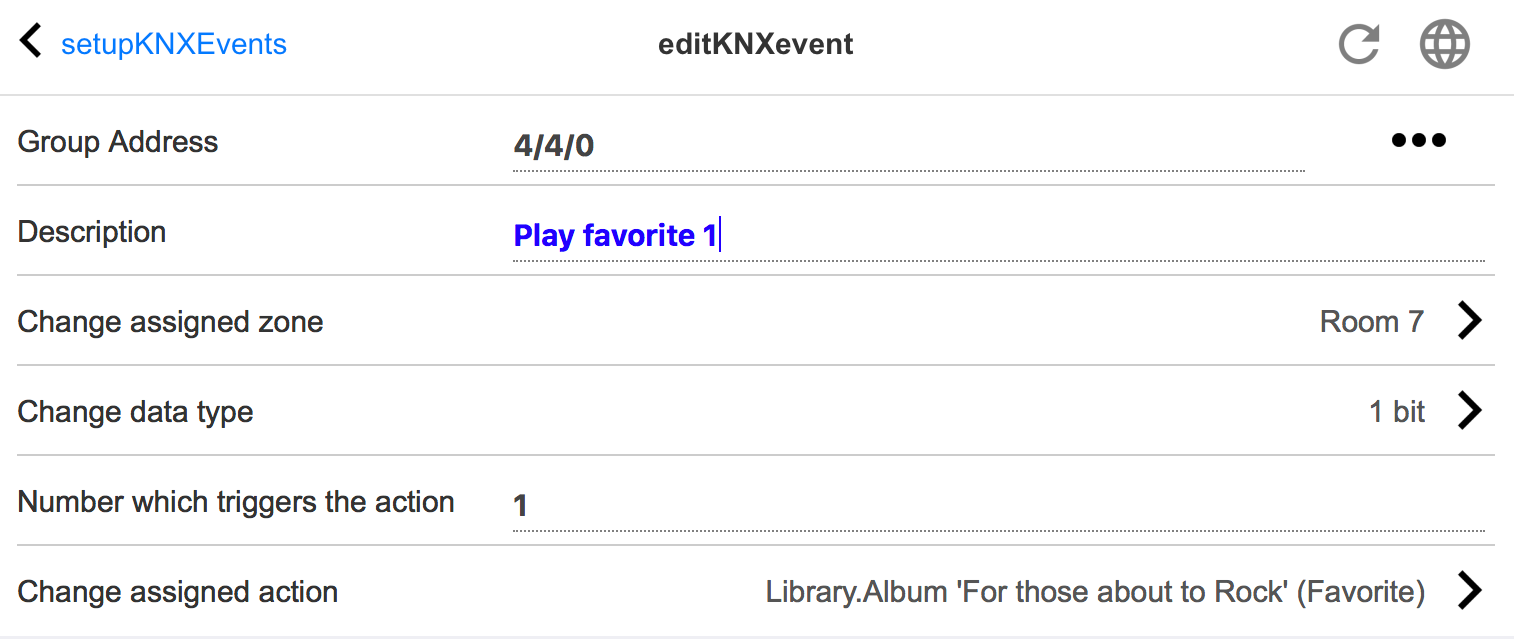
- Group Address
-
You can use the
 icon to select a KNX address from a list of imported KNX group addresses.
Or you can just enter a group address (e.g. 4/3/2).
icon to select a KNX address from a list of imported KNX group addresses.
Or you can just enter a group address (e.g. 4/3/2). - Description
-
This is helpfull to remember what the Event does
- Assigned zone
-
Many actions need the zone information. If the actions starts playing music, then this field specifies in which zone.
- Data type
-
The following values can be received:
datatype description binary value
1 bit - just 0 or 1
byte value
8 bits - values from 0-255
2byte value
16 bits - values from 0 65535
string value
string with up to 14 bytes
- Trigger filter value
-
When a KNX telegram with the specified group address is recognized, then the content of the telegram is compared with this filter value. Please be aware, that the data type has to match!
- Assigned trivum action
-
Many different actions are possible, like activating a Line Input, playing a favourite, or switching a zone off. Just click into "Change assigned action" and follow the interactive selection menus.
5.9.4. setupKNXDisplays
KNX displays are hardware units displaying 1 to 4 lines of text.
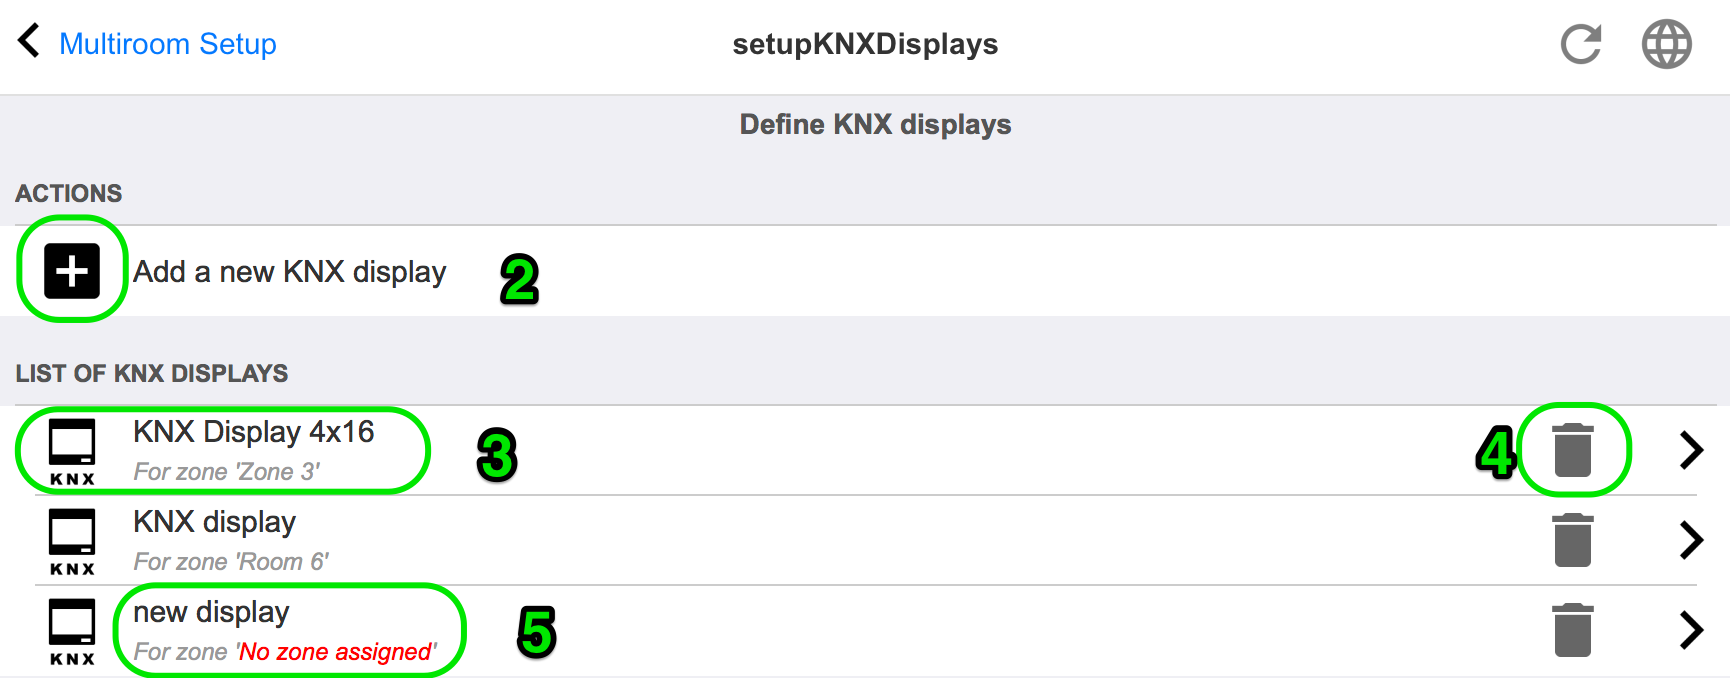
- 2 - Add a new KNX display
-
Click here and you get a new empty definition for a KNX display.
- 3 - Selection area
-
Click here to open the editor for one of the KNX displays. All the settings will be edited there.
- 4 - Icon for Delete
-
If you want to remove a display, just click on the
 icon.
icon. - 5 - Description and messages
-
If the KNX display is not fully or wrong configured, you will see a red message here.
5.9.5. editKNXDisplay
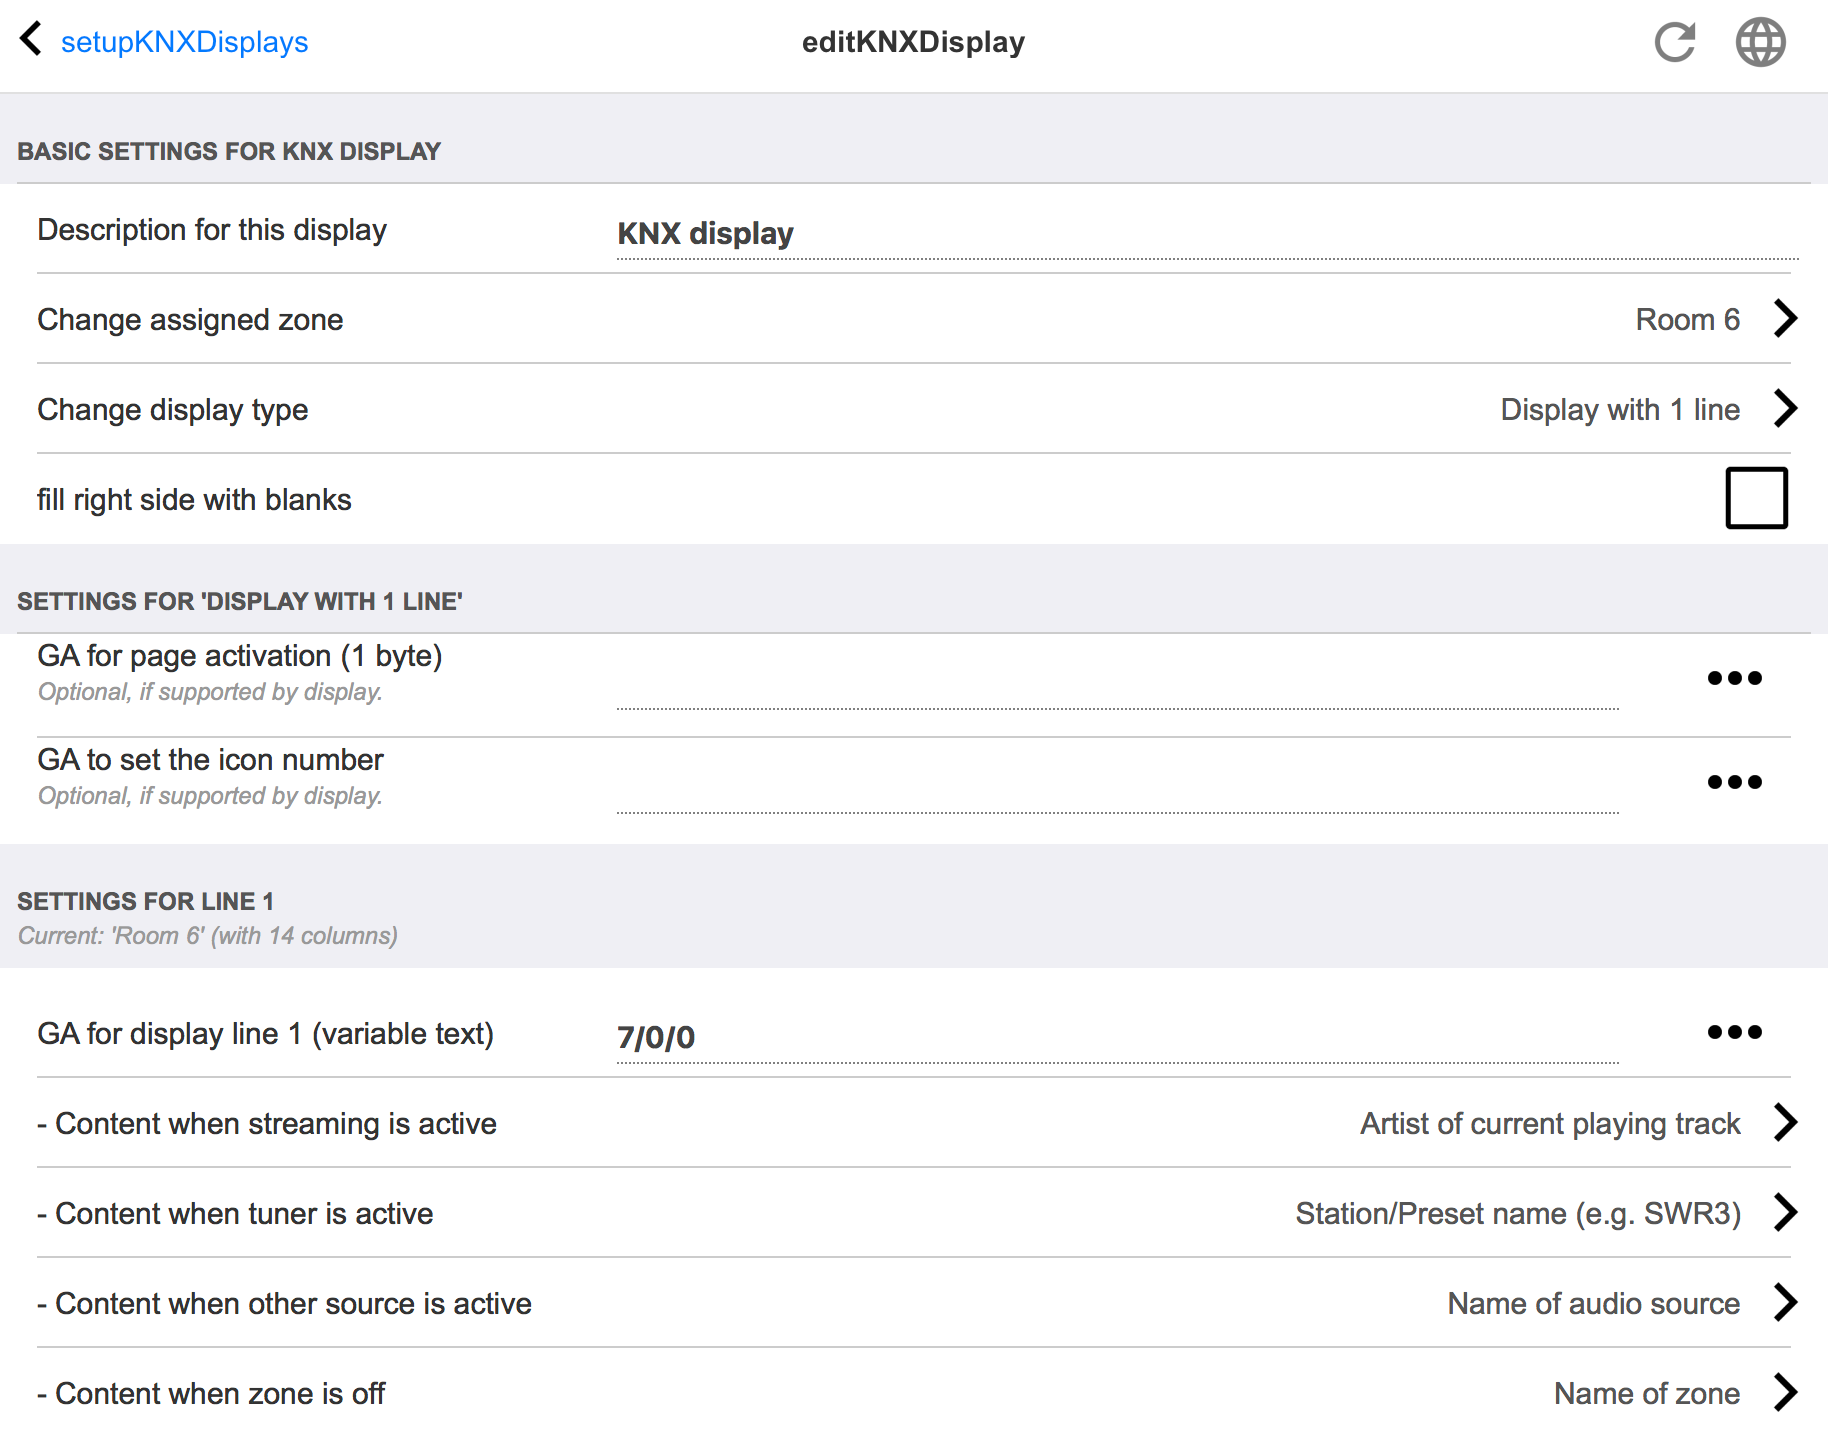
- Description for this display
-
a self defined name for your information.
- Change assigned zone
-
the zone from which text should be displayed.
- Change display type
-
configure the number of text lines here.
- Fill right side with blanks
-
if the text is shorter than 14 characters, it may optionally be filled with blanks.
- GA for page activation (1 byte)
-
if the KNX display supports different pages, a different page number can be shown if zone zone is on, or off. You can use the
icon to select a KNX address from a list of imported KNX group addresses.
Or you can just enter a group address (e.g. 4/3/2). - GA to set icon number (1 byte)
-
if the KNX display supports icon display, different icons can be shown if a stream source, tuner, or other source is active.
- GA for display line 1 (variable text)
-
where to send text for the first line.
- Content when streaming is active
-
if the zone is currently playing a stream content, select here what should be shown. Available are:
-
title of current playing track
-
artist of current playing track
-
album of current playing track
-
current streaming service/source
-
current tracknumber and number of tracks
-
current volume level
-
name of streaming source
-
nothing (empty text)
-
- Content when tuner is active
-
if the zone plays FM tuner then the available data will differ from streaming mode. Available are:
-
station/preset name (e.g. SWR3)
-
frequency (e.g. 97.70MHz)
-
name of tuner source
-
current volume level
-
nothing (empty text)
-
- Content when other source is active
-
for other sources like line input. Available are:
-
name of audio source
-
current volume level
-
nothing (empty text)
-
- Content when zone is off
-
while the zone if off, you may display:
-
name of zone
-
current time and date
-
nothing (empty text)
-
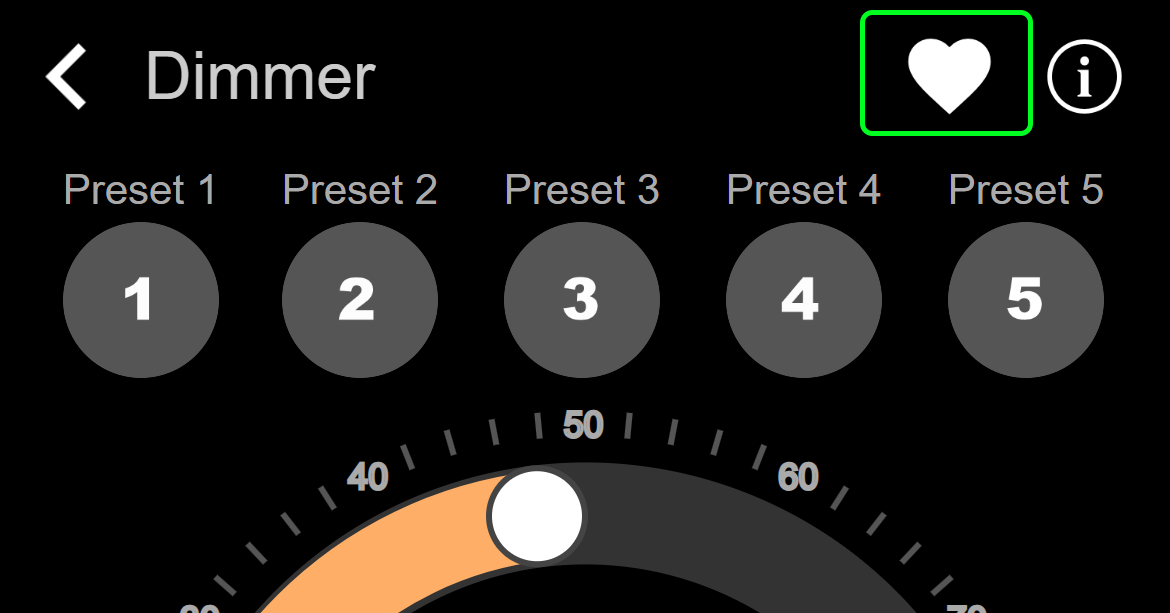
5.9.6. setupKNXActuators
The trivum MusicServer may not just receive KNX messages, but may also send commands, to control KNX devices. To enable this, KNX objects must be defined, like a light switch, or a shutter. This is done in the Automation Objects area (see top level of the setup).
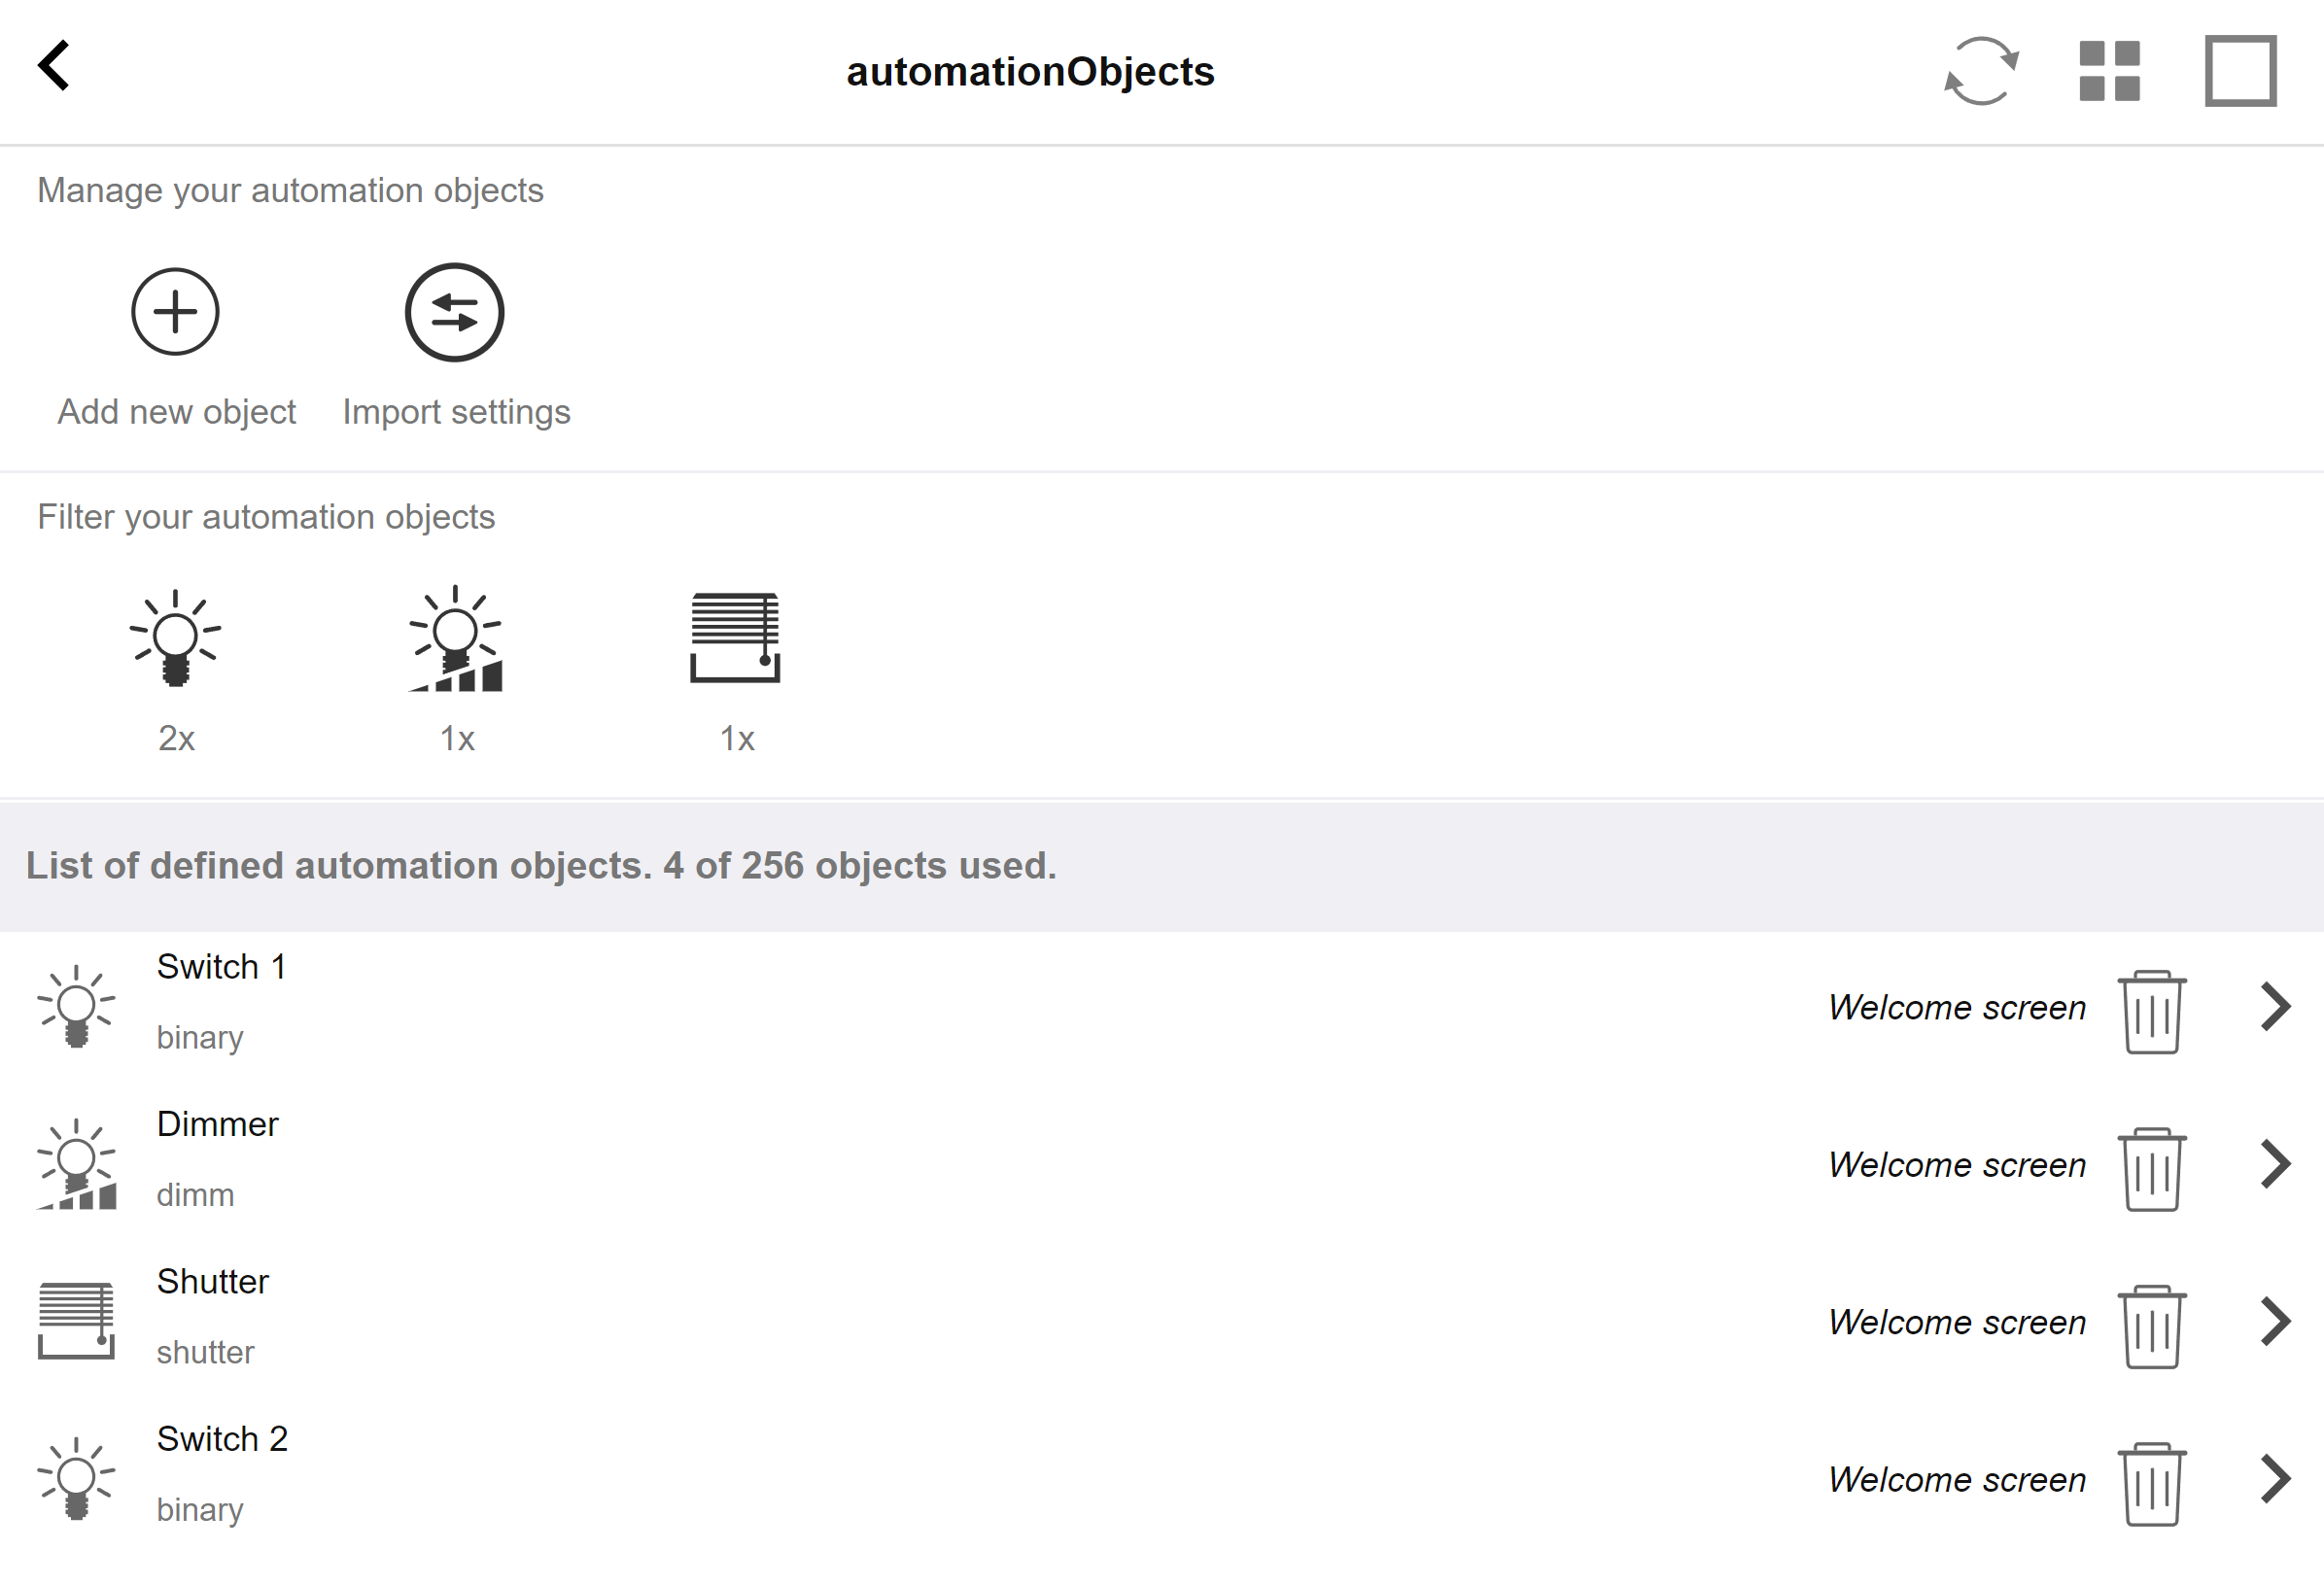
Many different types of Automation Objects are possible. Here are three examples:
-
switches may send a 1-bit message: toggle, or on, or off.
-
dimmers may send
-
a 1-bit message: toggle, on, off
-
and/or a 1-byte message with value 10 percent, 20 percent … 100 percent.
-
-
shutters may send 1-bit messages: down, up, step down, step up.
5.9.7. editKNXActuator
The screen to edit a KNX automation object looks like this:
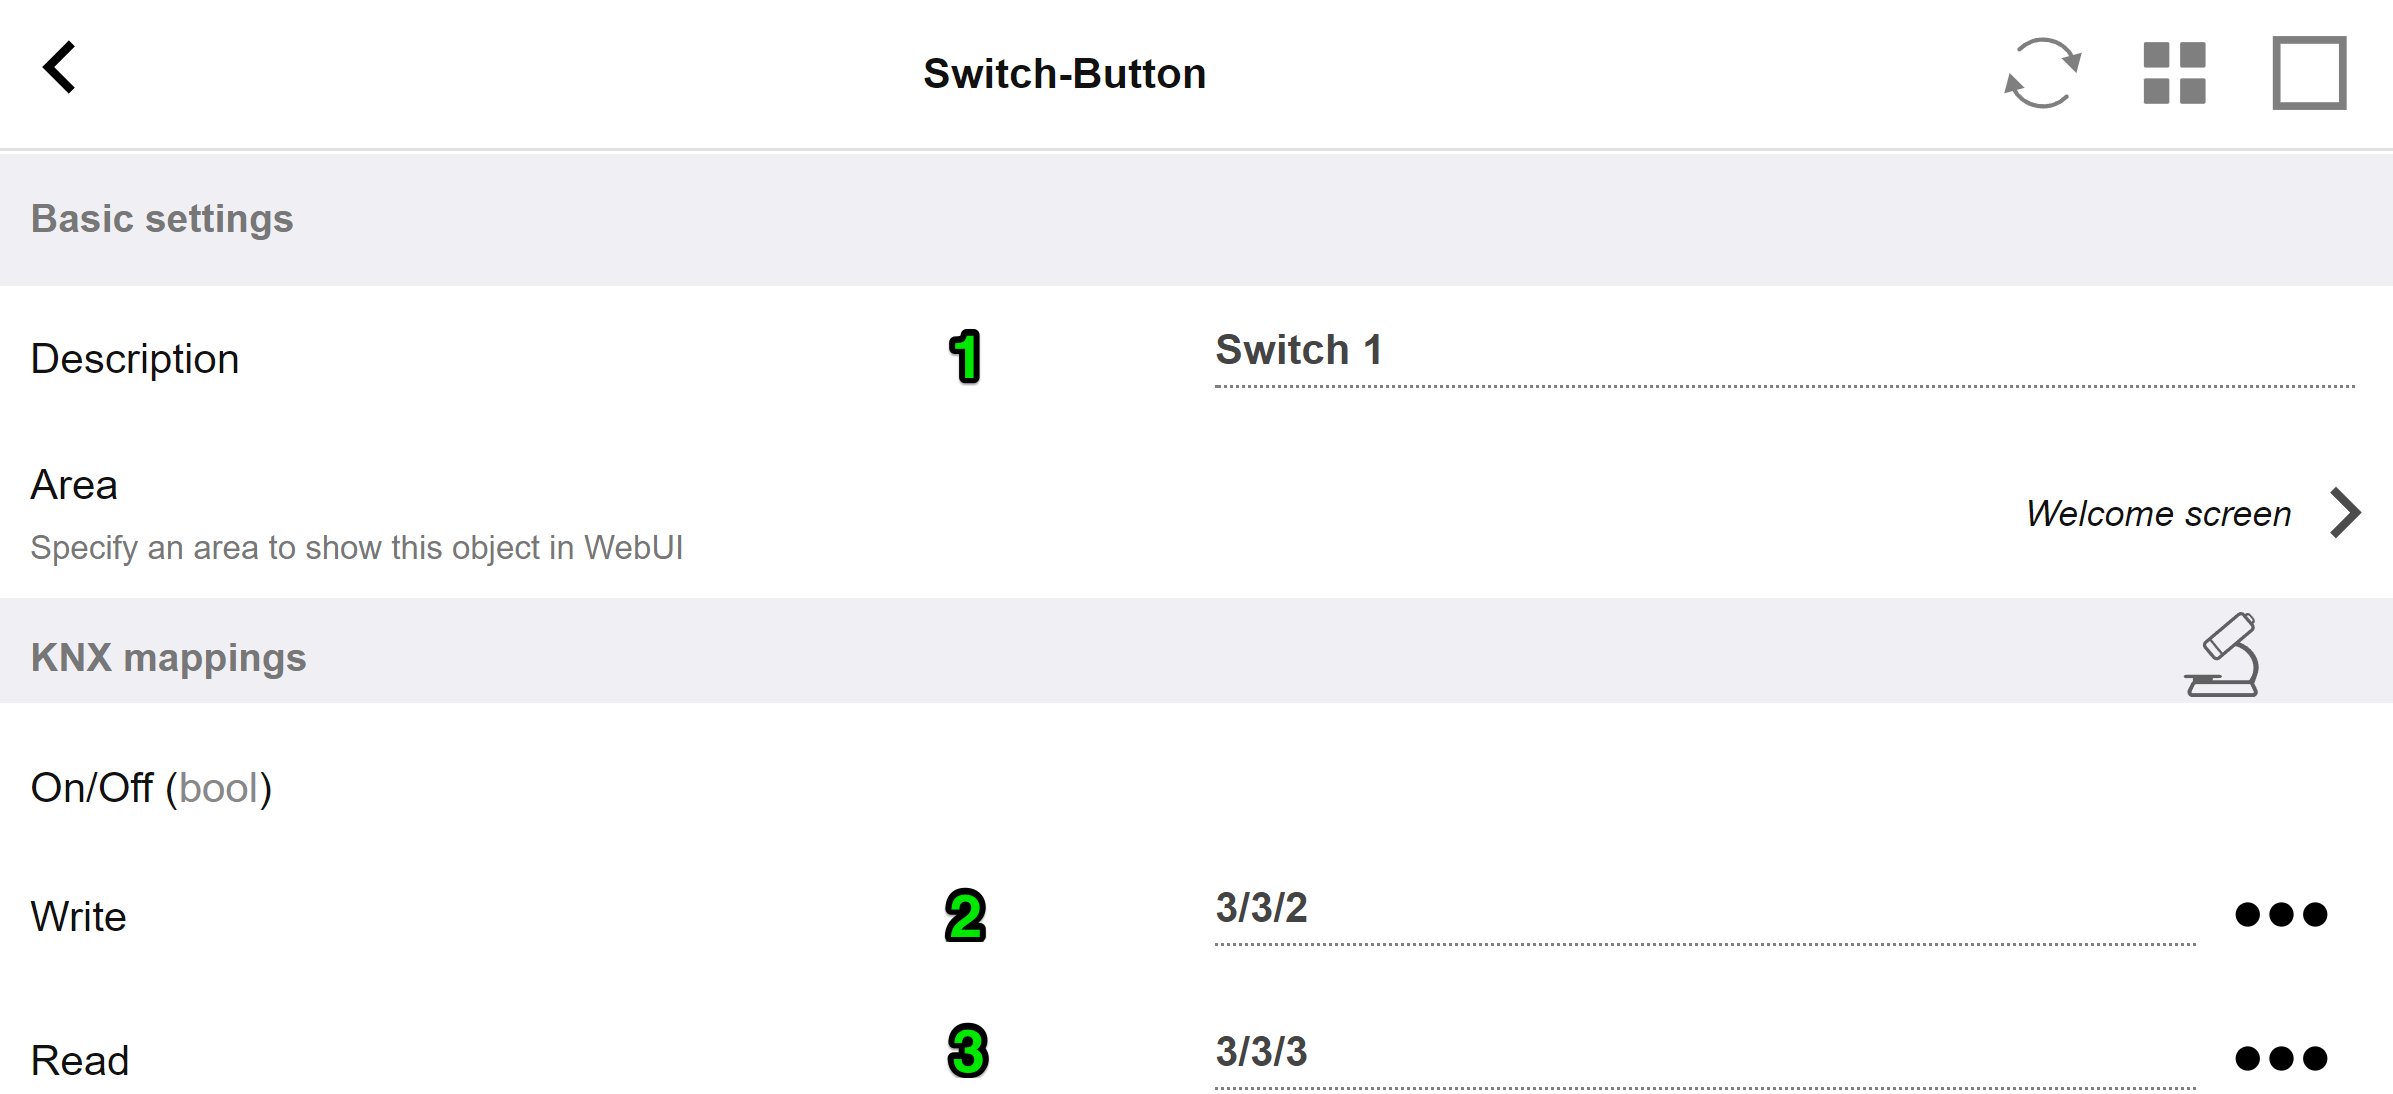
1 - name
2 - on/off GA
3 - optional GA to read current status. relevant only if toggle actions are used.
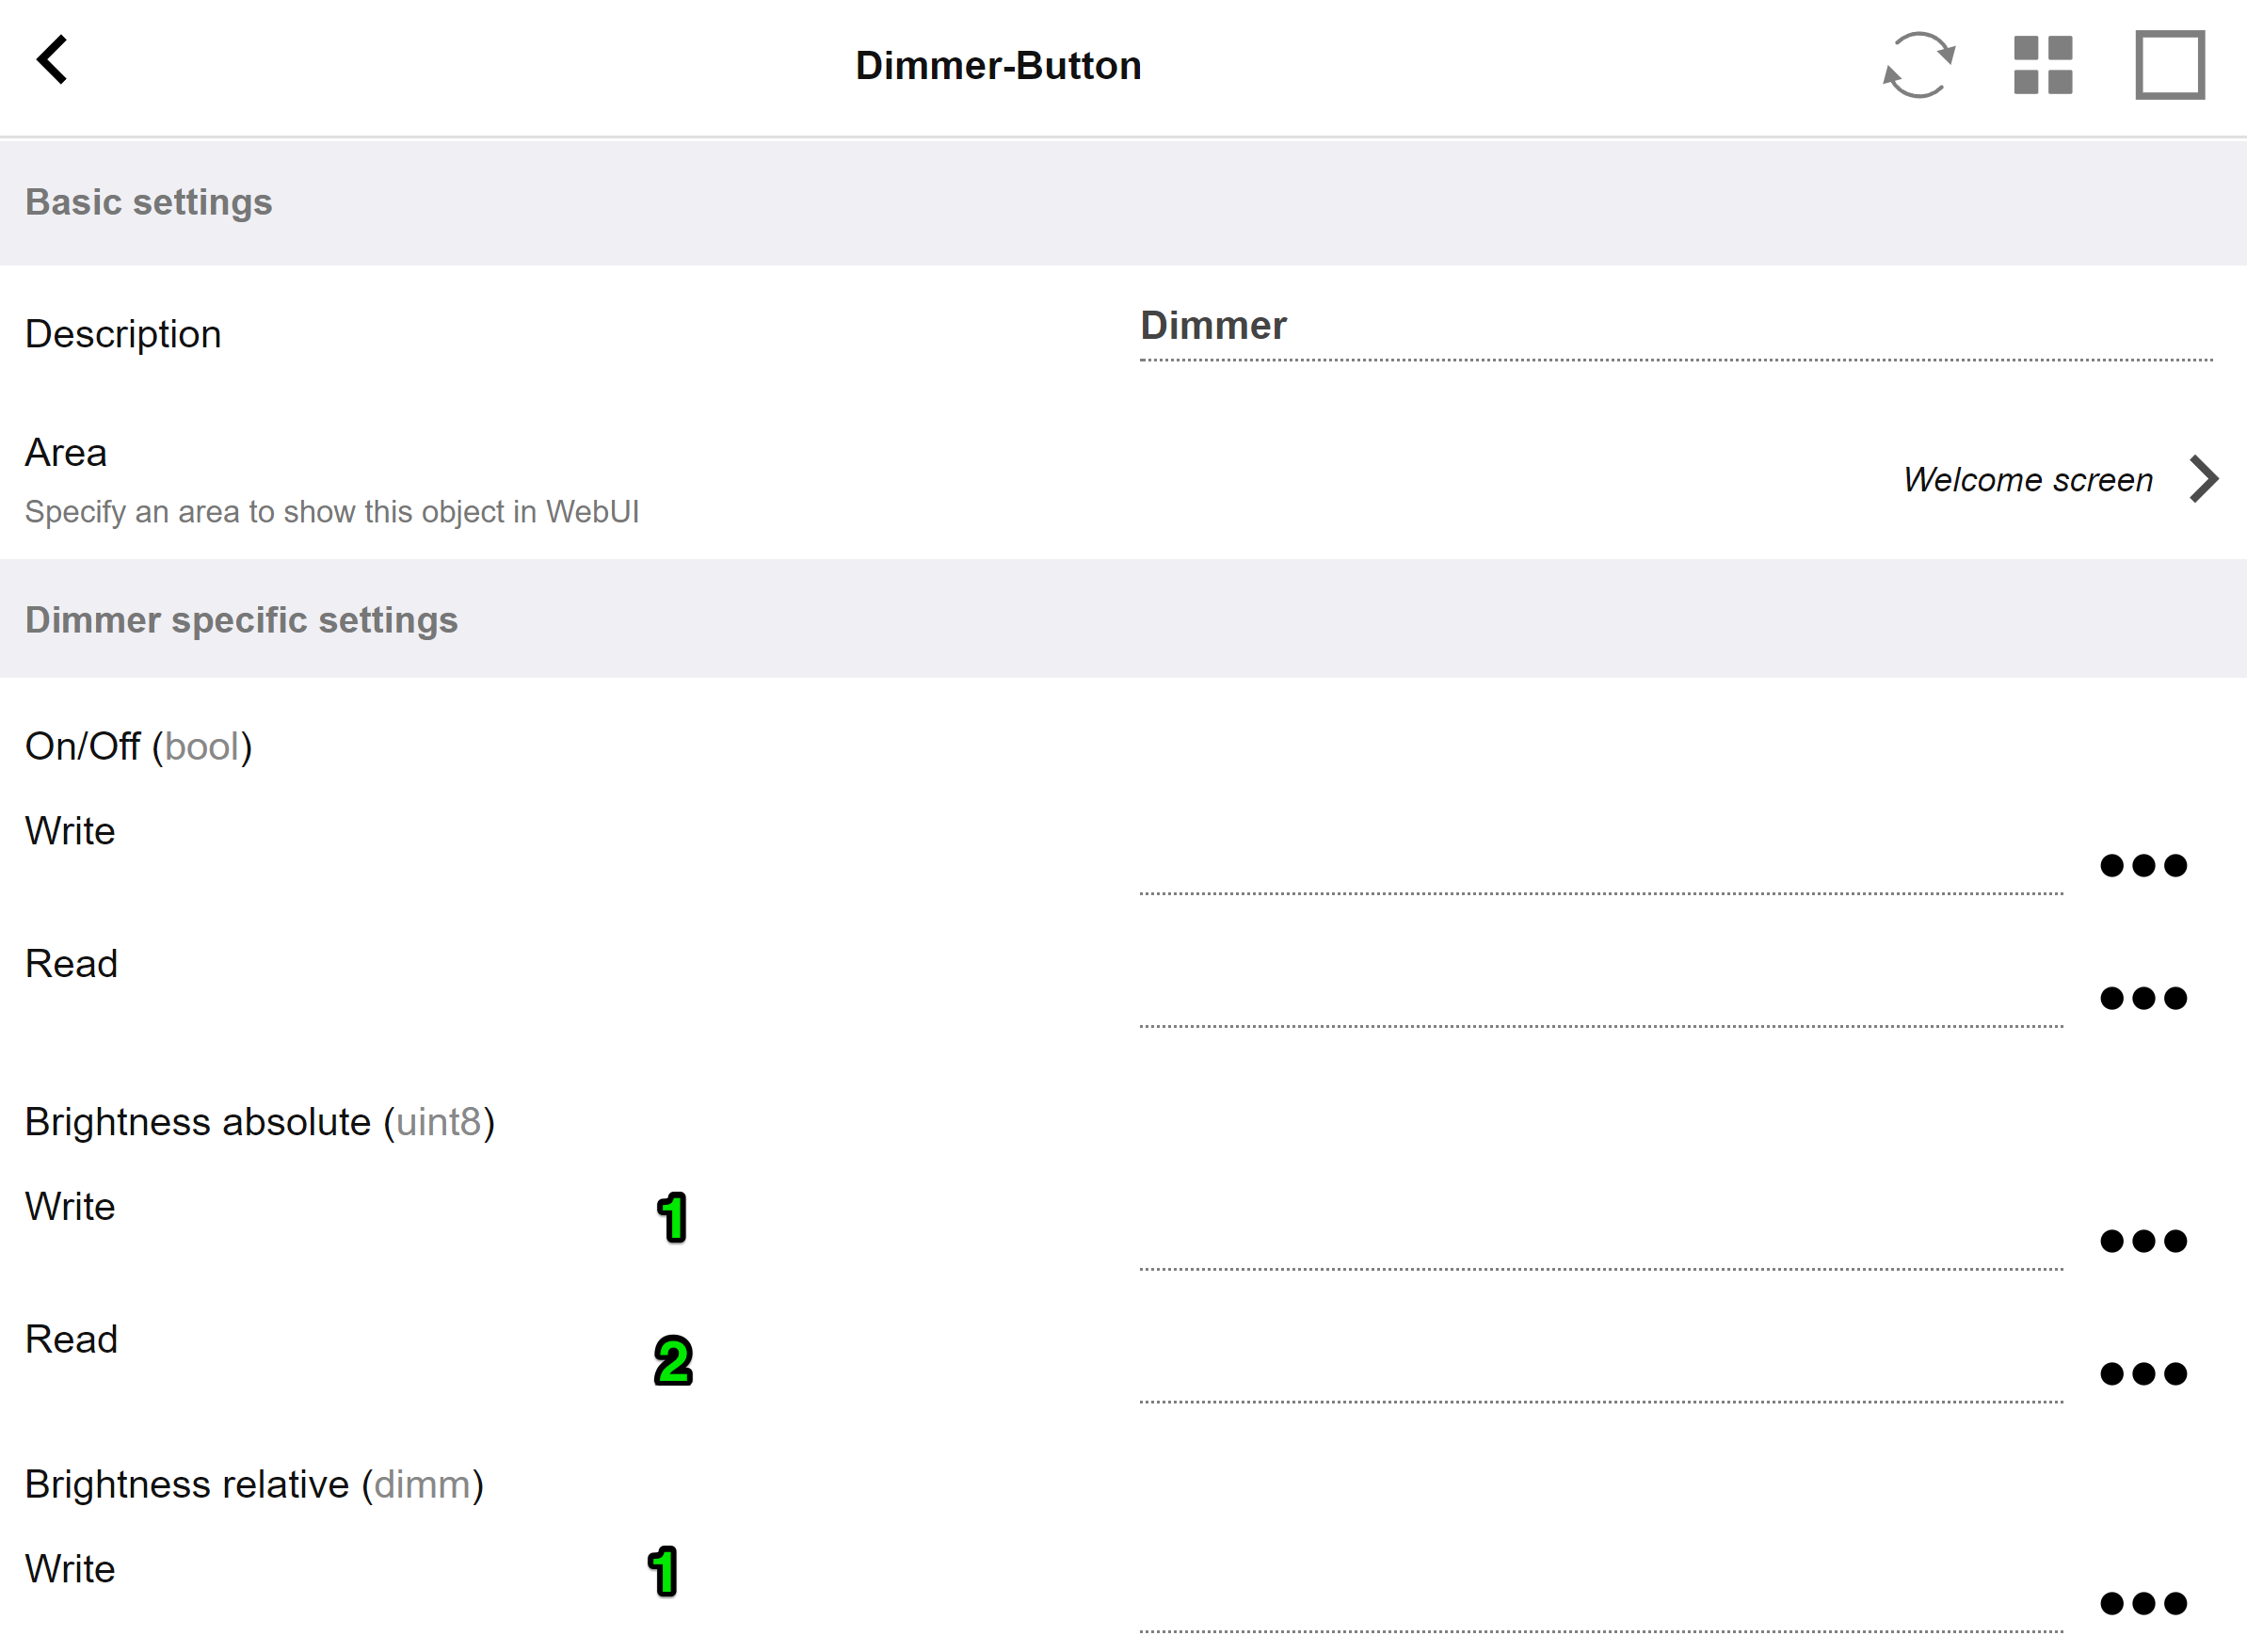
the dimmer is a binary actuator, extended by fields to set (1) or read (2) brightness.
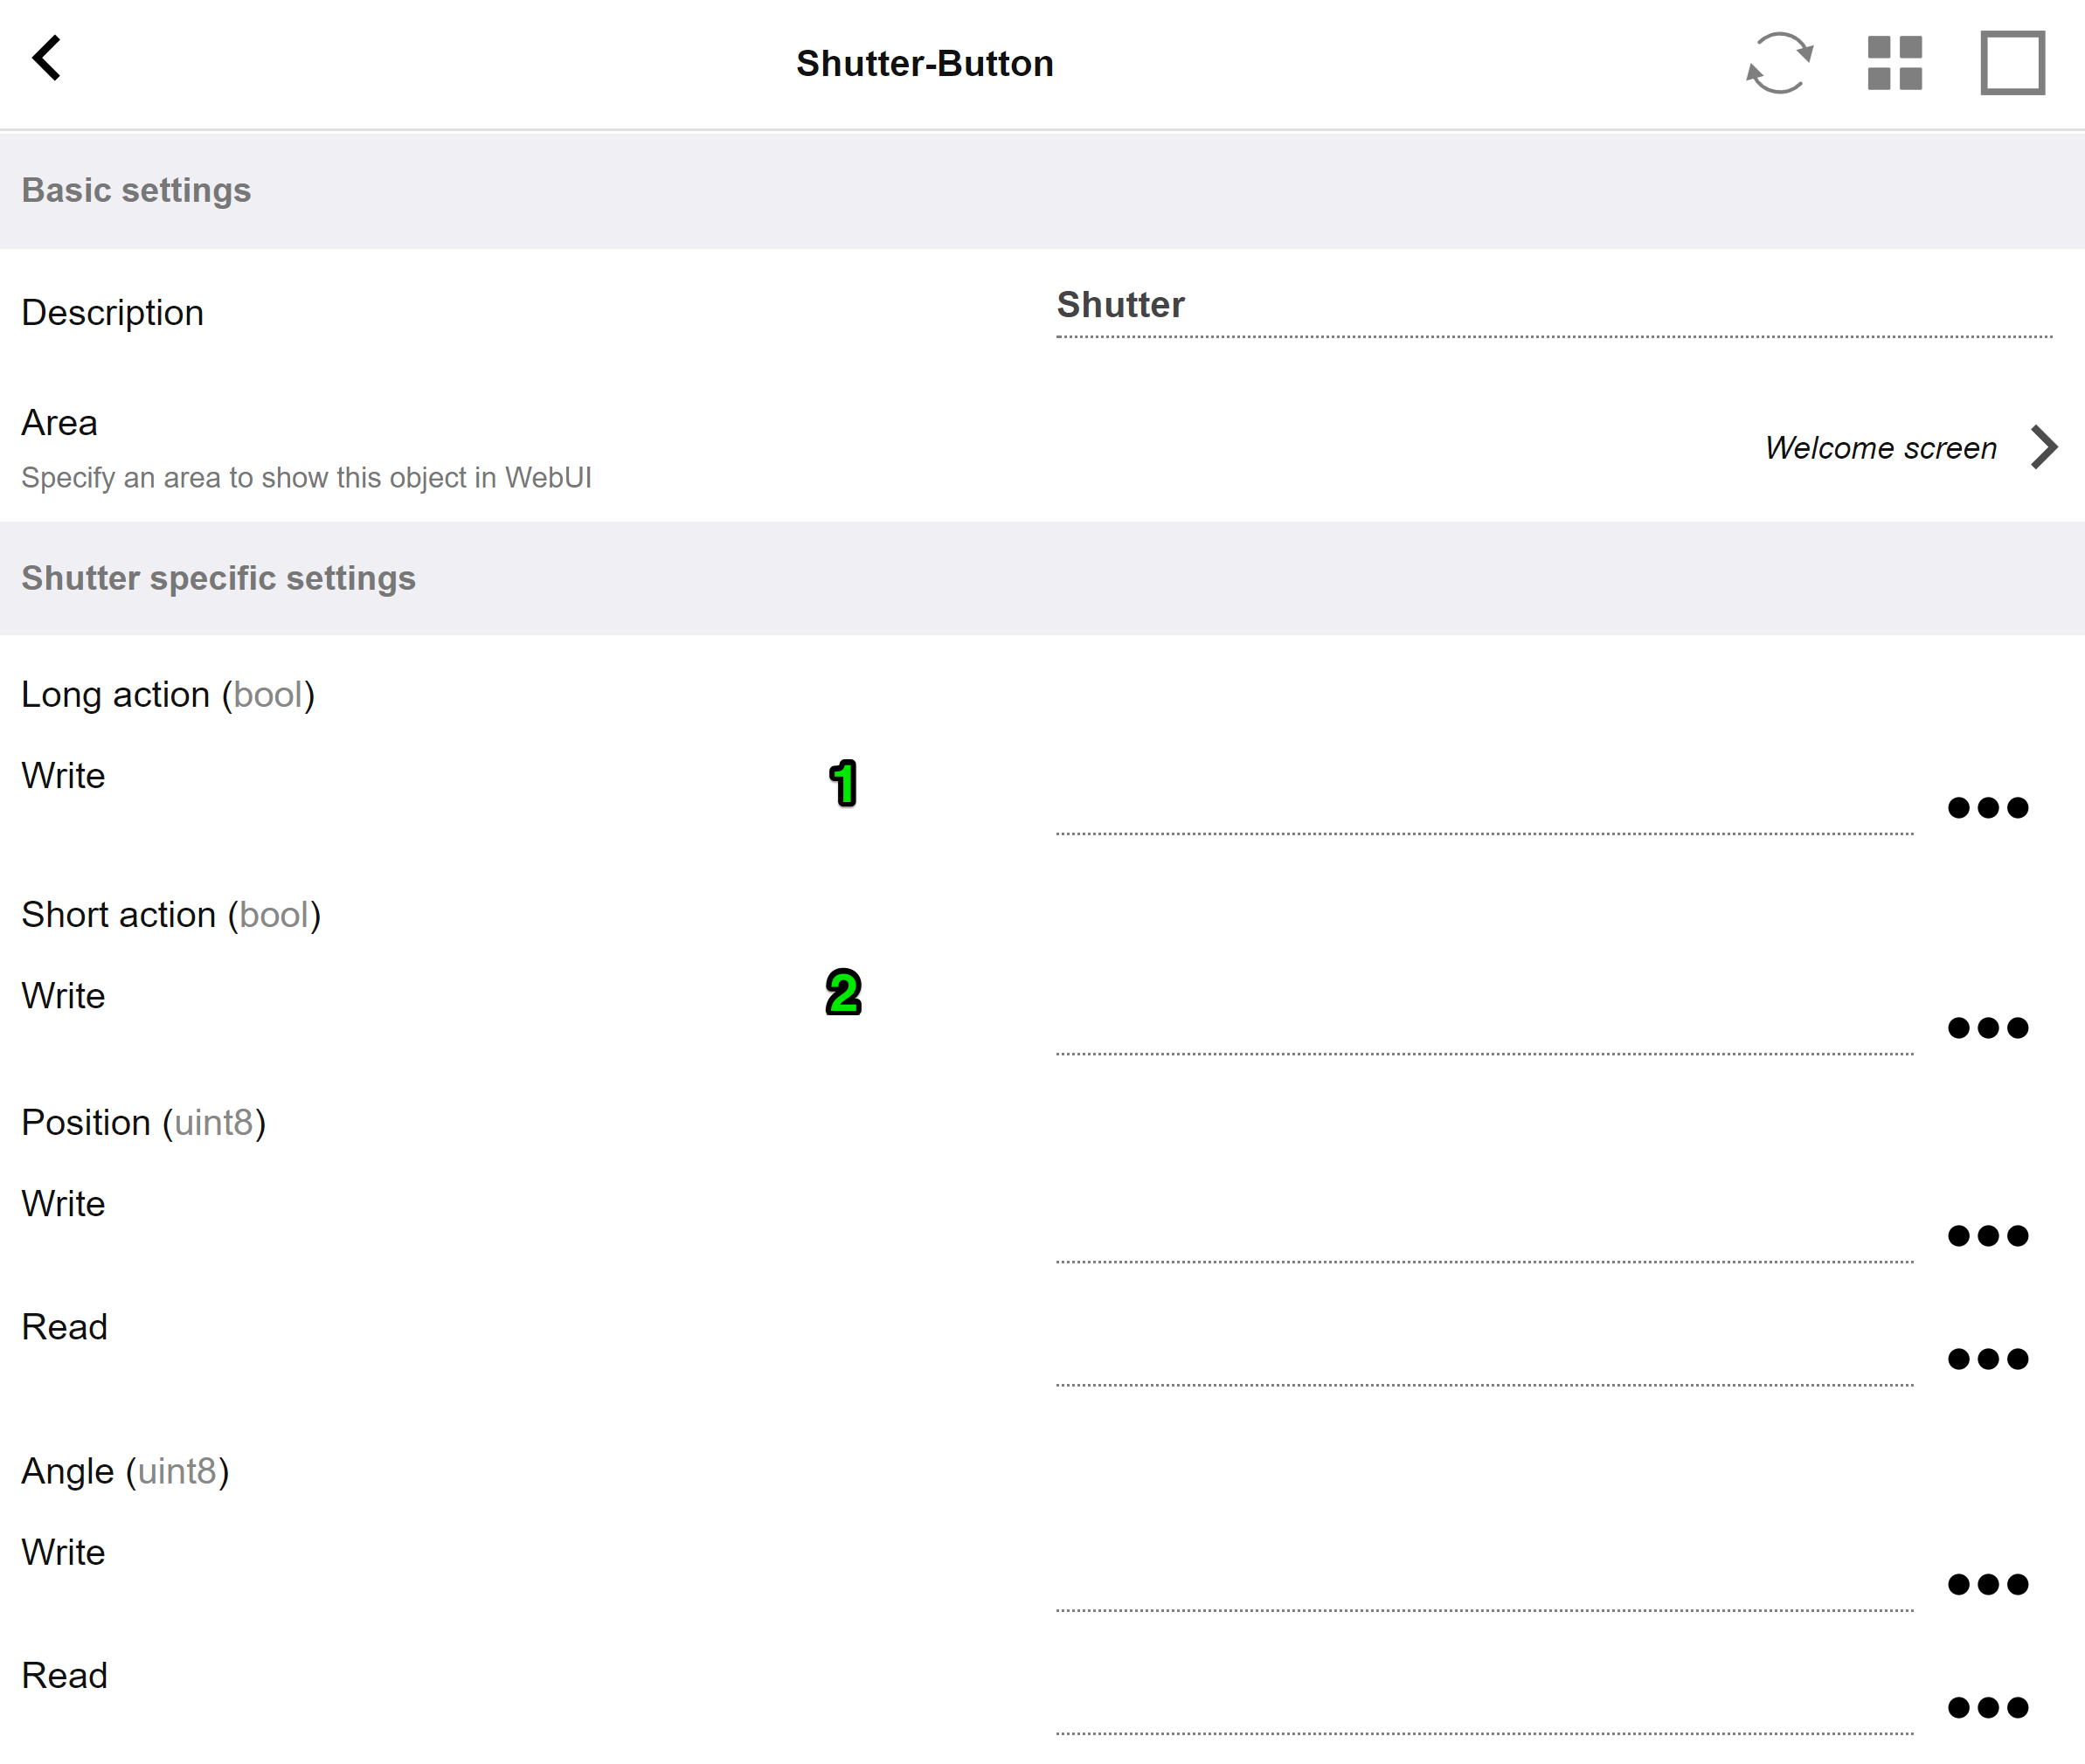
Most important with a KNX shutter actuator are the long action (1) to drive it fully up or down, and short actions (2) to change the slat angle. Direct writing of Position and Angle as an 8-bit value may be supported only by some KNX actuators.
5.9.8. Actuator example uses
Example 1: define them in the HomeControl area of the setup,
under Automation / Setup HomeControl
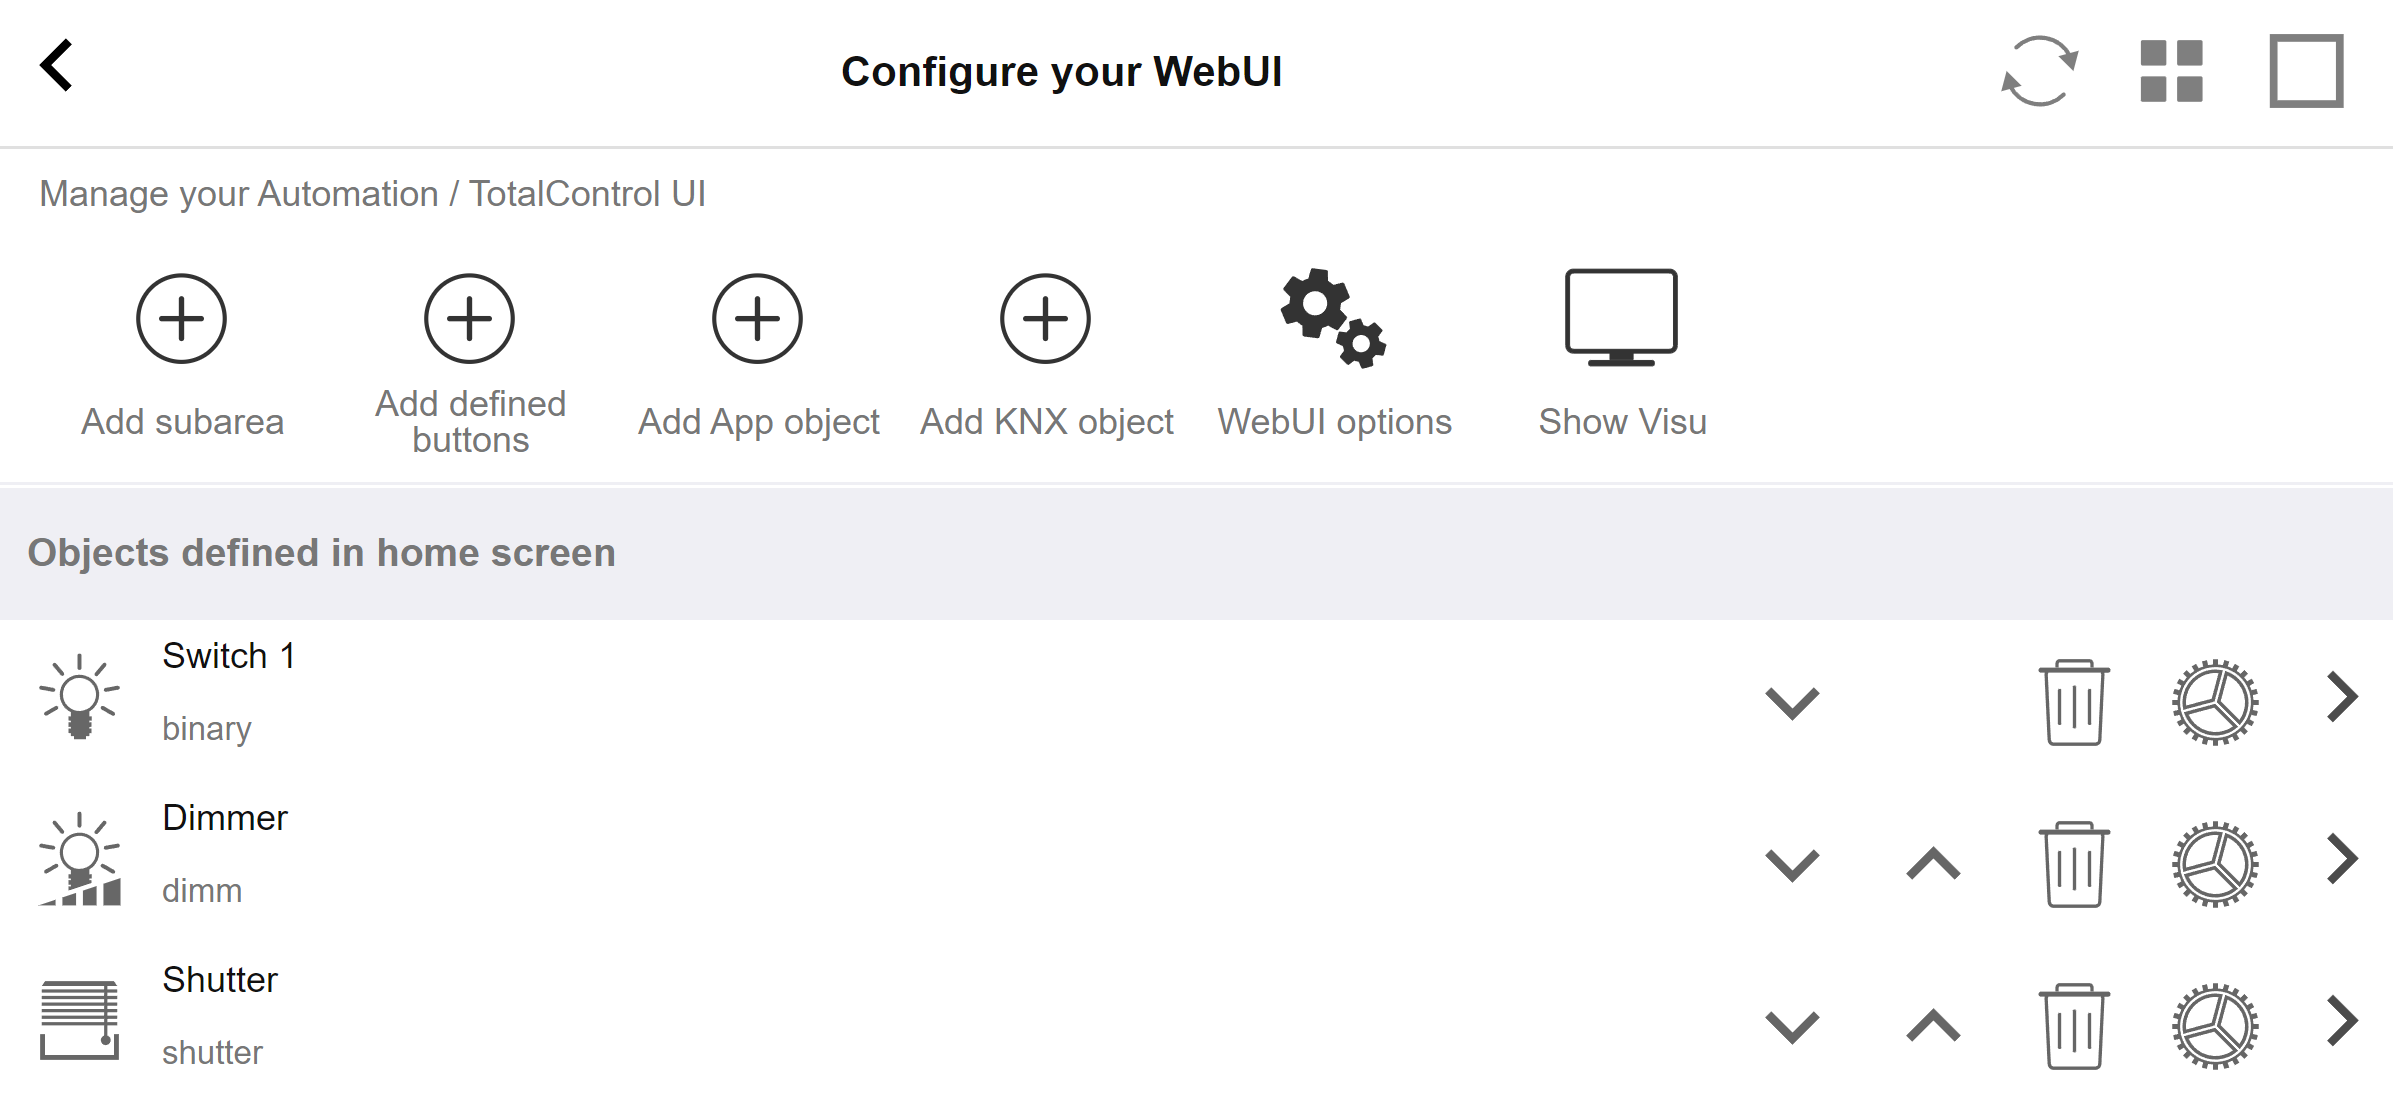
so they can be used in the HomeControl page of the WebUI.
Therein, you can also mark it as a favorite
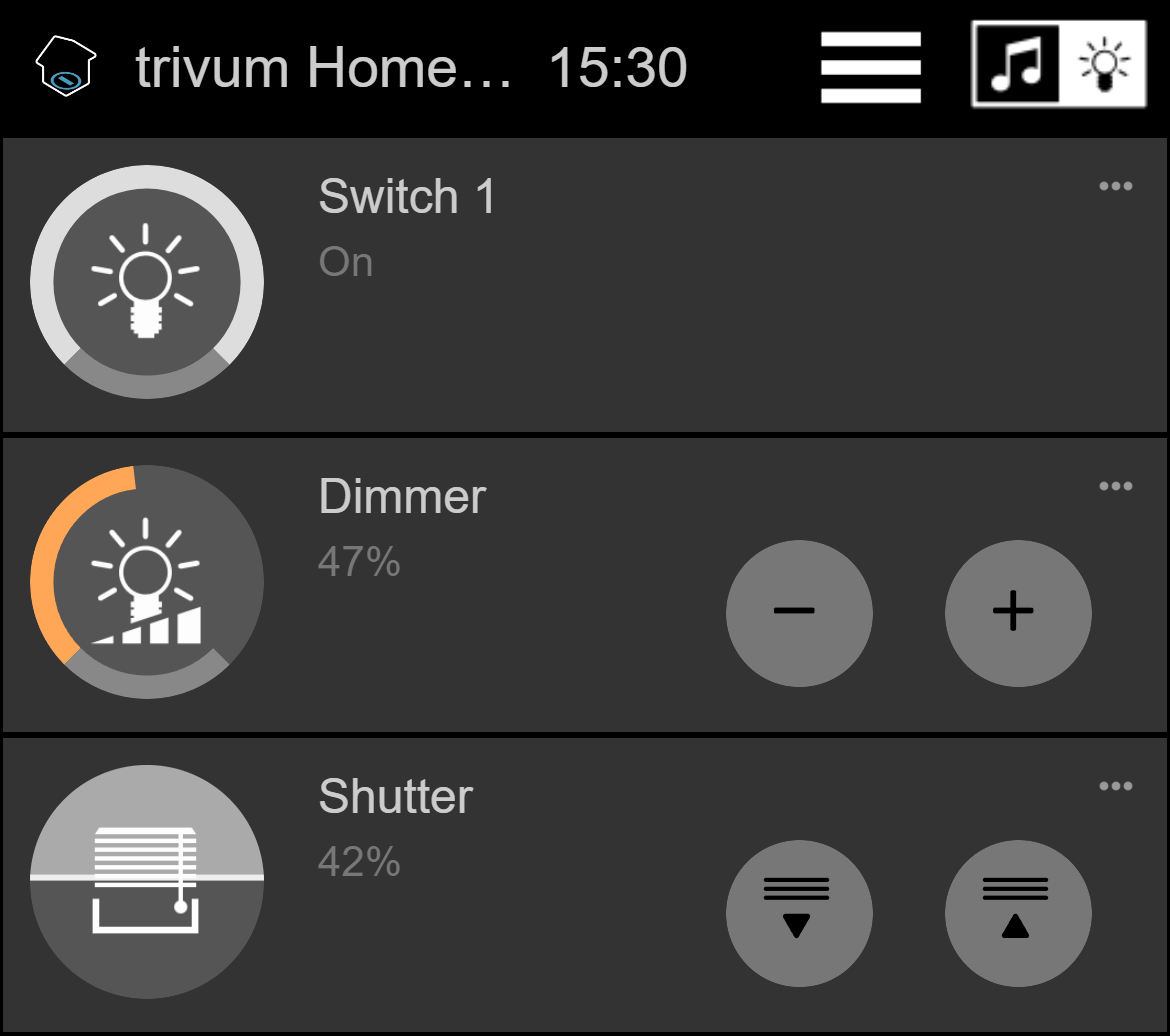
to make it appear in the music page of the WebUI, as a tile.
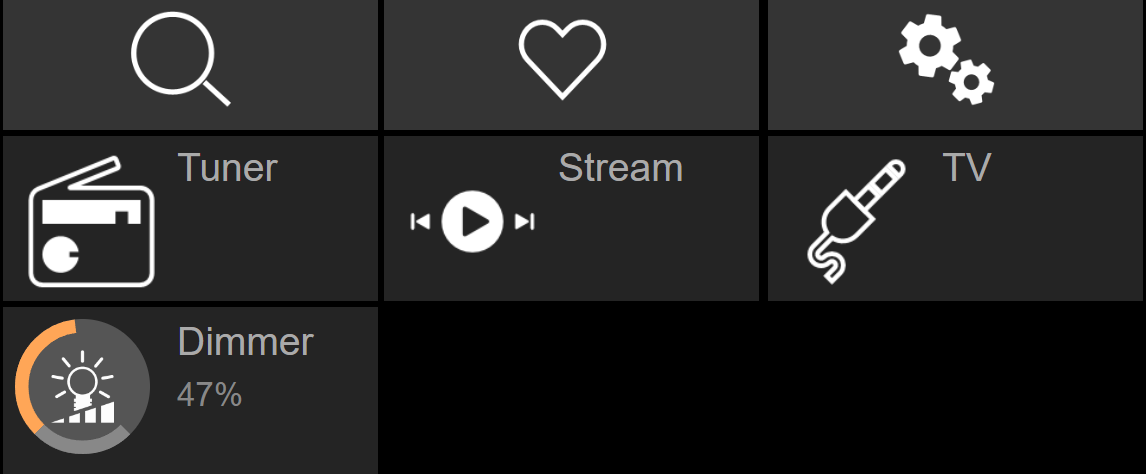
With this shortcut, the dimmer can just be be switched on or off. For full control, you still have to change to the HomeControl page as shown above.
Example 2: create a macro which switches a light switch on,
in V9 under: Configuration / Macros / new / trivum Action / action in zone / Control Automation objects
in V10 under: Customize / Macros / new / trivum Action / action in zone / Control Automation objects
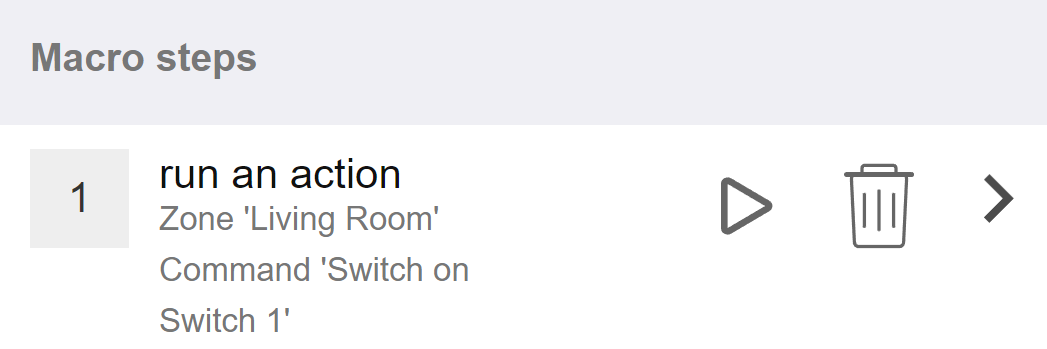
and call it when the zone gets switched on by a music selection.
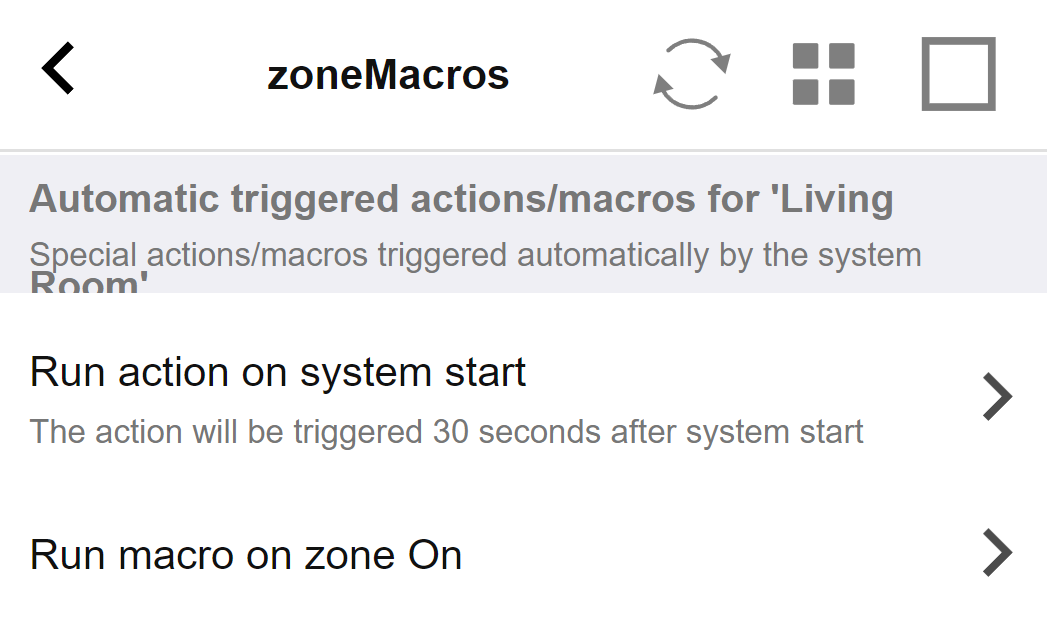
in V9 under: zones / zone / zone related macros
in V10 under: zones / zone / event handlers for this zone
5.9.9. zoneKNX
Here many basic KNX settings can be configured per zone.
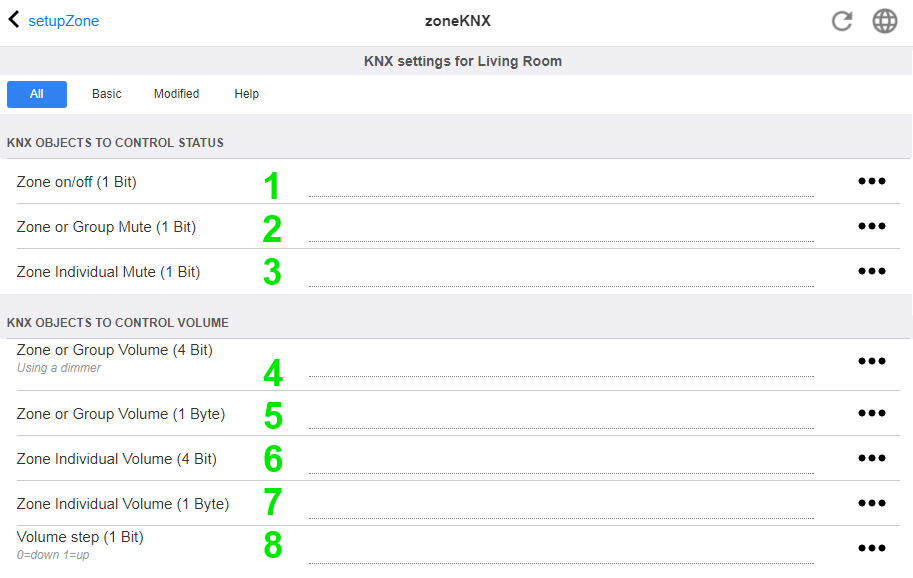
1 - enter a KNX group address (GA) here to switch the zone on or off by a 1-bit message with value 1 or 0. switching on means to play the most recent selected source again.
(After a system restart, no most recent source exists, therefore it will play the first defined KNX source, described further below.)
| KNX addresses can be entered like 1/2/3 or, much easier, like 1 2 3 |
2 - GA to toggle mute of the zone or, if the zone is part of a group, of the whole group.
3 - GA to toggle mute only of this zone, no matter if grouped or not.
4 - control zone or group volume by a 4-bit KNX message. for example, receiving value 1 starts dimm down, which runs until volume 0 is reached, or value 0 is received.
5 - control zone or group volume by a 1-byte KNX message. KNX values 0 to 255 are converted internally to trivum volume values from 0 to 100.
6 and 7 - this controls the volume level of just this zone, no matter if grouped or not.
8 - change the volume in one step, up or down, through 1-bit messages.
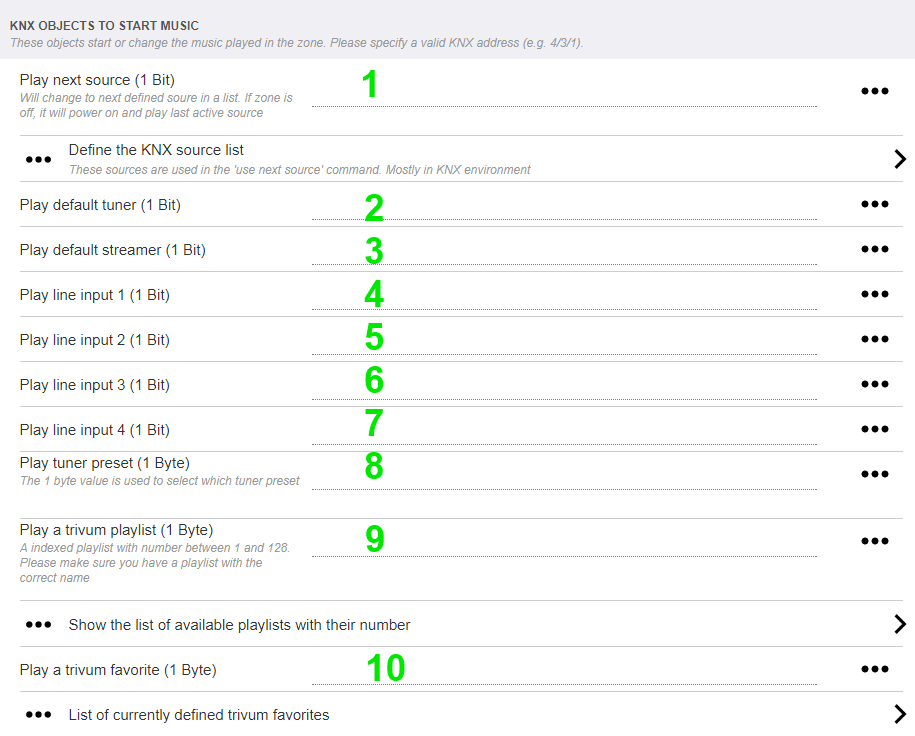
1 - the KNX sources are a set of actions to start a specific source, and/or to select a content within a source. by configuring a GA here the user may toggle between these actions by a 1-bit message.
2 - start FM tuner by a 1-bit message
3 - start streamer. this will play the most recent selected content within that streamer, if any.
4 to 7 - select line inputs.
8 - if you have defined FM tuner presets, start them here, with value 0 being the first preset.
9 - if you have NAS playlists with a name starting like "P1 mylist" or "P2 mylist" then a KNX 1-byte message value 0 will play "P1 mylist".
10 - if trivum favorites are defined play them directly here.
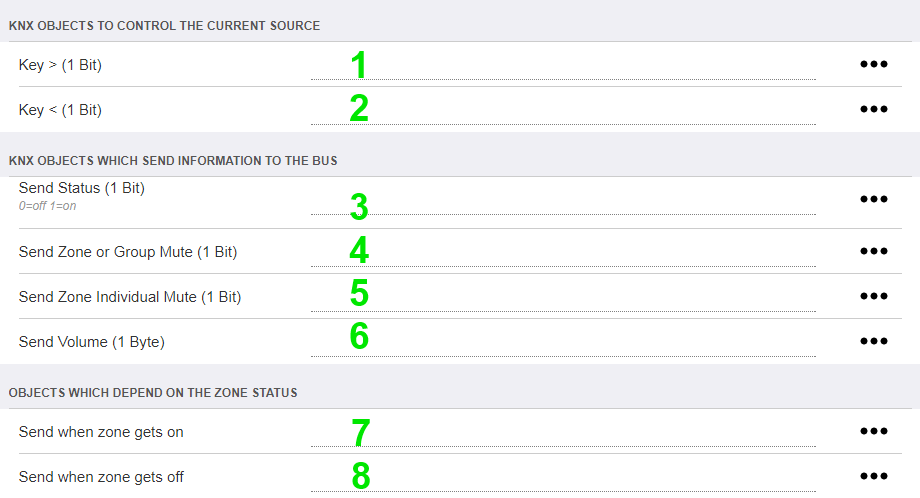
1 and 2 - skip to the next or previous thing in the current selected music. For example, while playing an album, this will skip to the next track.
3 - send the zone status to the KNX bus: 0=off 1=on (including mute)
4 and 5 - tell to the KNX bus if the group or zone is muted
6 - send current zone volume level as a KNX 1-byte message, with range 0 to 255
7 - use this to configure in detail what to send when the zone is switched on. may send a value "1" or "0".
8 - use this to configure in detail what to send when the zone is switched off. may send a value "1" or "0".
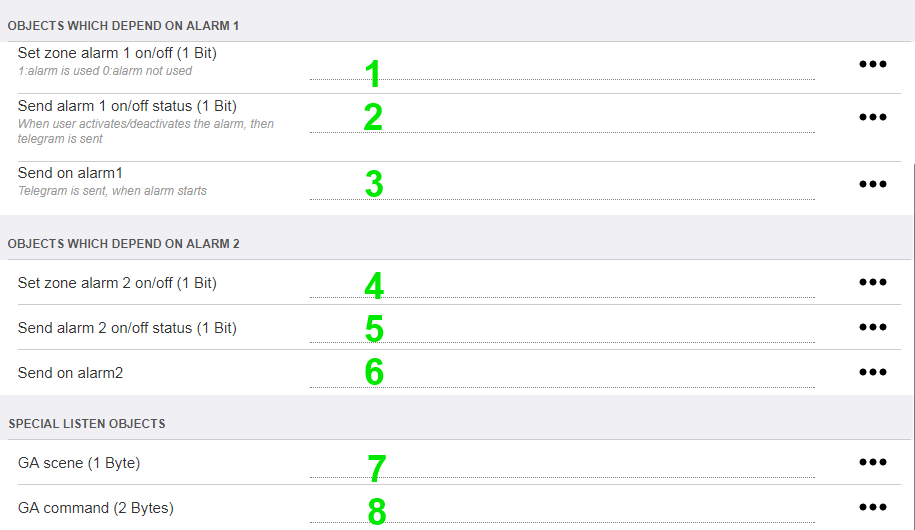
1 - set alarm clock to be active or inactive
2 - tells when alarm clock activity is toggled via UI
3 - sends 1-bit value "1" if alarm clock starts playing
4 to 6 - same settings for the 2nd alarm clock of this zone
7 - GA to tell this zone if it’s part in a current scene.
this is used in combination with:
Automation / KNX / Setup KNX communication / Group address for scene save/restore.
read details under: KNX music server scenes
8 - directly run a command in this zone through a 2-byte KNX value.
for the possible values see the list of zone commands in the
trivum API
documentation.
here is an excerpt of codes:
ZONECMD_POWER_OFF              001
ZONECMD_MUTE                   002
ZONECMD_VOLUME_INC             003
ZONECMD_VOLUME_DEC             004
ZONECMD_POWER_TOGGLE           006
ZONECMD_VOLUME_INC2            009
ZONECMD_VOLUME_DEC2            010
ZONECMD_VOLUME_INC5            011
ZONECMD_VOLUME_DEC5            012
ZONECMD_USE_PREV_SOURCE        029
ZONECMD_USE_NEXT_SOURCE        041
ZONECMD_USE_NEXT_ZONE          042
ZONECMD_DEFAULT_STREAMING      050
ZONECMD_DEFAULT_TUNER          051
ZONECMD_VOLUME_DEC_1           080
ZONECMD_VOLUME_DEC_10          089
ZONECMD_VOLUME_INC_1           090
ZONECMD_VOLUME_INC_10          099
MULTIKEY_BASIC_FORWARD         400
MULTIKEY_BASIC_BACKWARD        401
for example,
-
sending a value 1 will power the zone off
-
sending 400 (as 2 bytes value 1 144) will skip to the next track.
5.9.10. setupKNXPaging
If pagings are defined then they can also be controlled by KNX. to do so select KNX / Paging to get this page:
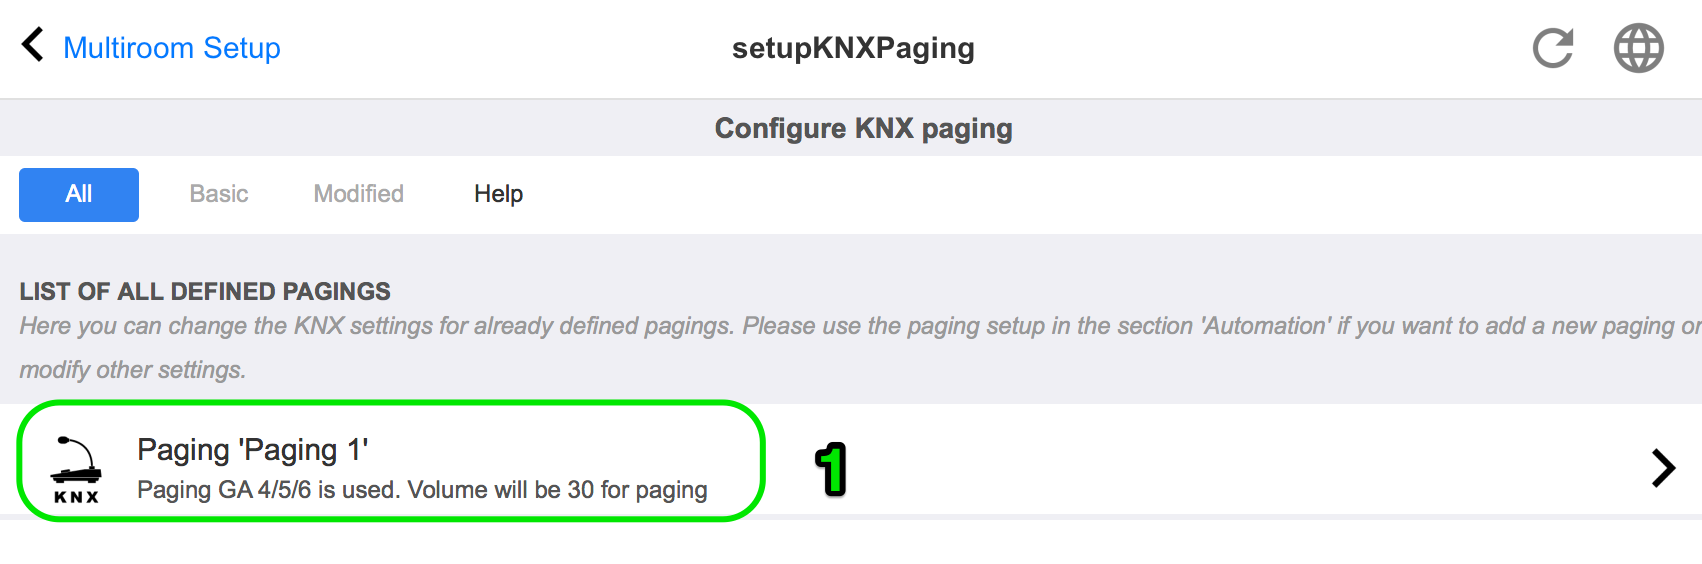
1 - select one of the paging entries to edit.
5.9.11. pagingKNX
The screen to change the KNX paging definition looks like this:
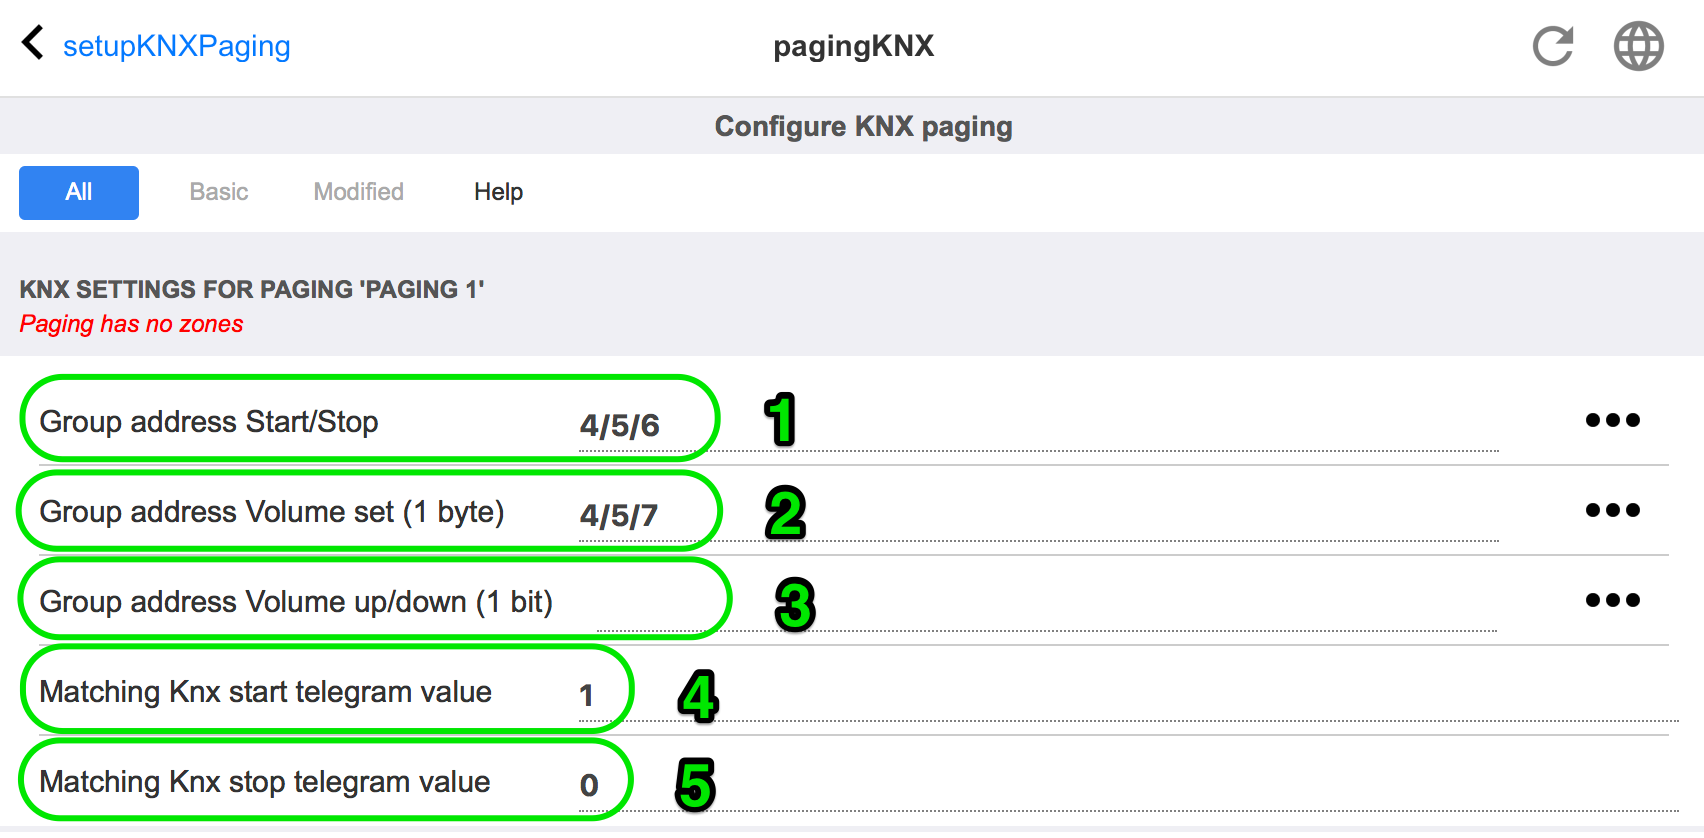
1 - the paging can be started by a KNX 1-bit message to this GA.
2 - instead of using the predefined paging volume, a different volume can be set by KNX through this GA.
3 - while a paging is playing it’s volume can be modified by this GA. for example, sending a 1-bit message "0" will decrease the volume. the minimum volume for active paging is 5.
4 - normally, sending "1" to (1) starts the paging, but this behaviour can be changed here.
6. trivum KNX support
General informations
6.1. Introduction
trivum supports KNX in the MusicCenter software since 2005. The trivum TouchPads (4.3" and 7") are KNX room controllers with the ability to control light, dimmers, RGBs, shutters and climates.
trivum joined the KNX team in 2009 as one of about 100 KNX members.
6.1.1. Function overview
The trivum Music Systems and the trivum TouchPads have KNX builtin. This means, that they can be controlled from other KNX devices or/and that they can control other KNX devices.
trivum Music Systems
Most of the time KNX will be used to control trivum Music Systems. Starting music or changing the volume are the most common requests. But the KNX support by trivum can do much more - it can control KNX devices (e.g. moving up/down a motorized TV) and has a wide range of actions which can be mapped to any KNX switch.
trivum TouchPads
The trivum TouchPads are very flexible and beautiful room controllers. They can switch lights, dimm lights, control RGBs, shutters, climates and even show information on any KNX display. The functions are shown using simple buttons on the display. And they even allow to control KNX by a web browser.
6.1.2. Function examples
| These are just few examples. Many other functions are possible. |
- Control Music in a Bathroom using a regular 4 button KNX switch
-
You just have to map Source change on button one, volume up on button two, Volume down on button three and Power off on button 4.
Thats it. Get in the bathroom in the morning and listen to music with a simple press on your KNX button. - Listen to music in areas when you walk through
-
Using a KNX motion sensor, this sensor can start a specific playlist in an area. After some time, the motion sensor will also switch off the music.
6.1.3. First steps
All you have to do is:
-
activate the KNX support in the trivum setup.
Please select the icon,
then "Setup KNX communication" and "Use KNX/IP".
icon,
then "Setup KNX communication" and "Use KNX/IP". -
make sure that your KNX IP router has been found in the network.
-
then go to the KNX zone setup (
 ) and select a zone
 -
enter the KNX group address to switch the zone on or off. This KNX group address should be the group address which is sent by a KNX button in your house.
-
for a first test, make sure the zone is playing some music. then press the KNX button to switch it on or off. (directly after a system restart, switching on may not work, as no recent selected music exists.)
6.2. Getting started
6.2.1. Bus access
The trivum devices talk KNX/IP. This means, that a KNX IP Router or interface is neccessary to establish a communication with the KNX bus.
6.2.2. ETS software
trivum devices are configured via web browsers, because they have a builtin web server. This means, that there is no need to use the ETS software.
But you should nevertheless take care of the following points:
-
Each trivum MusicCenter (master) has to have a unique device address. This is necessary, because each KNX bus device has to have a unique ID which identifies the hardware. Even if a KNX over IP device is not physically attached to the bus, it is nevertheless neccessary to have this unique ID.
-
If you use filter tables in your KNX IP router, then you need to have a KNX dummy application
-
Define the group addresses which are ONLY used by trivum (e.g. MusicCenter + TouchPad) in the ETS. So the installer can see that they are used and that he cannot use them in another context.
6.2.3. About KNX/IP router
Basic
|
Since software V9.60 trivum devices can communicate not only with KNX IP routers, but also with KNX interfaces, like Gira X1. An IP router is recommended, as there is no connection limit (supports any number of devices). If you have more than one KNX IP router in your network, then each of them need to have different IP addresses and different IP multicast addresses. |
Which KNX/IP router ?
Here is a list of KNX IP routers and the link to the internet description:
There are more IP routers available from other brands.
Read also: Gira X1 integration with trivum
KNX/IP router settings
It is important to configure the KNX/IP router. "Out of the box" most KNX/IP routers do not what they should. So make sure that it has the right network settings, and that it routes the KNX telegrams from the bus to the network. Also make sure that is does not block telegrams, so disable telegram filtering for a first test.
Unicast IP address
The unicast IP address of a KNX/IP router should be in the same network as the trivum components and the other components who uses the KNX/IP router to interface with the KNX bus. Please make sure that the ETS software can use the KNX/IP router also to access the bus. This is the first step to make sure everything is fine.
Multicast IP address
If you just have one KNX/IP router in the installation, then 224.0.23.12 should be the multicast address.
This is the default and wellknown KNX/IP router multicast address.
If you have more than one, the other IP routers have to have valid multicast addresses.
Locally available multicast addresses start with 239.x.x.x., e.g. 239.100.50.10, 239.100.50.11, …
|
Useful information about multicast IP addresses: |
|
Don’t forget to download the changes you make in the ETS to the IP router. |
Filter settings
Filter and routing configuration is also necessary for the KNX/IP router.
Please enable the router (using the ETS) that he routes the KNX telegrams to the IP network and from the IP network the KNX bus.
The easiest way is to use the "no filtering" option. This means, that all the telegrams are routed between KNX bus and IP network.
If you have to or want to use filtering, then you have to use for example the GIRA dummy application. You enter trivum group addresses in that application, then program the IP Router telegram filter to pass through telegrams for these addresses.
|
Filtering is more secure - but needs more configuration:
|
Test communication
If you’re not sure whether your KNX/IP router works, please start your ETS software and select the KNX/IP router as communication interface.
Make sure that you use "IP Routing" as communication mode. Open the group monitor and see if messages from your KNX devices appear.
If this works ok, open the web configuration of your trivum Music System, unter trivumip/setup.
Then make sure that the multicast IP address matches in the trivum setup and the KNX/IP router settings.
If the trivum setup does not recognize the KNX/IP router please goto to the section Solving KNX problems
If the KNX/IP router is recognized, but trivum does not receive any KNX message although filter settings are correct, read more about network problems under Solving KNX problems
6.3. trivum KNX Setup
6.3.1. Basic settings
-
In the web configuration of your trivum device, make sure that KNX support is enabled as described above under "First steps".
-
in the following, you may enter all your KNX group addresses manually, or you may upload a prepared list of group addresses exported from ETS, under:
Automation / KNX / Setup KNX communication / Import CSV / Manage imported group address list.
6.3.2. KNX Group Address format
trivum uses the ETS project default of 3-level group adresses with 5, 3 and 8 bits, with a range from 0/0/0 to 31/7/255.
When entering group addresses in the setup, the system accepts 3 formats:
-
type it with slashes: 1/2/3
-
type it with spaces: 1 2 3
-
type a 1-level GA value like: 2563
A 1-level value is converted to 3-level automatically. Trivum also provides an online converter under
6.3.3. Zone KNX configuration
See zoneKNX for all available datapoints per zone.
6.3.4. KNX Event Datapoints
The trivum KNX event objects are a very flexible instrument. They can be used to trigger functions with KNX telegrams.
See editKNXEvent about event configuration.
6.3.5. Actuator Datapoints
The trivum MusicCenter software can even control KNX actuators, like:
-
KNX binary actuators
-
KNX dimm actuators
-
KNX shutter actuators
This is done in the HomeControl and Automation Objects section of the setup.
For example, if you define a KNX shutter, then you can control this shutter
-
by placing it in the HomeControl page of the WebUI.
-
by adding actions in the WebUI (music page) to control some functions directly.
-
through actions in a trivum macro.
-
or on a trivum Touchpad, by defining it in the page editor, and use it by the touch scren.
Another example, if you define a light switch object, you can toggle that when a zone is switched on or off, by calling macros in the zone event handlers.
See editKNXActuator for details.
6.3.6. Datapoints of KNX Displays
See setupKNXDisplays about how to integrate KNX displays with trivum.
6.3.7. Datapoints of Paging
To run a paging controlled by KNX,
-
see editPaging about how to create paging entries
-
see pagingKNX about how to link these with KNX
6.3.8. KNX Datapoint types (DPT) used by trivum
trivum KNX Datapoints have one of five sizes:
1 bit, 4 bits, 1 byte, 2 bytes, 14 bytes.
the same size can be used for many different purposes.
if you have to specify DPT types in your external
KNX application select one of these:
-
1 bit:
DTP name |
Examples |
1.001 switch |
zone on/off |
1.003 enable |
pause, mute, alarm on/off |
1.002 boolean |
send zone status, mute, alarm on/off status |
1.007 step |
change volume level by one step |
1.010 start/stop |
play next source, tuner, streamer |
1.017 trigger |
key < or >, zone gets on, alarm starts |
-
4 bits:
3.007 dimming control |
volume up/down |
-
1 byte:
5.001 percentage100 |
absolute volume level with knx value 0-255 |
5.010 counter pulses |
play trivum playlist x, tuner preset x, save scene, call scene |
-
2 bytes:
7.001 pulses |
zone command 2 bytes |
9.001 temperat.celsius |
float value (with KNX touchpad) |
-
14 bytes:
16.001 character string iso-8859-1 |
with most KNX displays |
16.000 character string ASCII |
incl. UTF-8 with Tense OLED display |
6.4. KNX Examples
6.4.1. A 6-fold KNX control element (music controller)
In this example, a 6-fold KNX control element should control our trivum-multiroom system. The controller should be able to operate some basic functions:
-
previous source / next source
-
volume level +/-
-
mute / power off
-
a 6-fold KNX control element
-
the trivum multiroom system is integrated in your KNX installation via KNX/IP router
-
the KNX support of your trivum multiroom system is enabled and ready for use
Add KNX event
To control the music of your trivum multiroom system using a 6-fold KNX control element, the KNX telegrams of the KNX controller must be assigned to trivum actions. This is done via the trivum KNX events. Each trivum KNX event is the link between a certain type KNX telegram and his corresponding trivum action.
To create and configure an trivum KNX event, proceed as follows:
-
Open the WebConfig
-
Go to: Automation / KNX / Events
-
Click on: Add mapping.
An editor for a new KNX event is opened. -
Enter the following data:
Field |
Description |
Example |
Group Address |
KNX group address that triggers the action |
6/1/1 |
Description |
Name or description of the KNX event |
Bathroom_nextZone |
Change assigned zone |
trivum zone, in which the assigned trivum action is performed |
Bathroom |
Change data type |
Data type of the value that triggers the action |
1 bit |
Value for comparison |
Value that triggers the action when received |
1 |
Change assigned action |
trivum-action to be performed |
nextSource |
Repeat steps 3 and 4 for all other functions the 6-fold KNX controller should have.
HINT: You should make a backup before each change and archive this.
6.4.2. A simple wall button for next source, and to switch off
If you have a wall button that can only send 1 or 0 on the same group address it is still possible to achieve these two functions.
-
configure zone sources. This is done in the web configuration under:
zones / zone name / change the knx bindings / define the KNX/HTTP source list.
Here you can, for example, configure playback of different web radio stations.
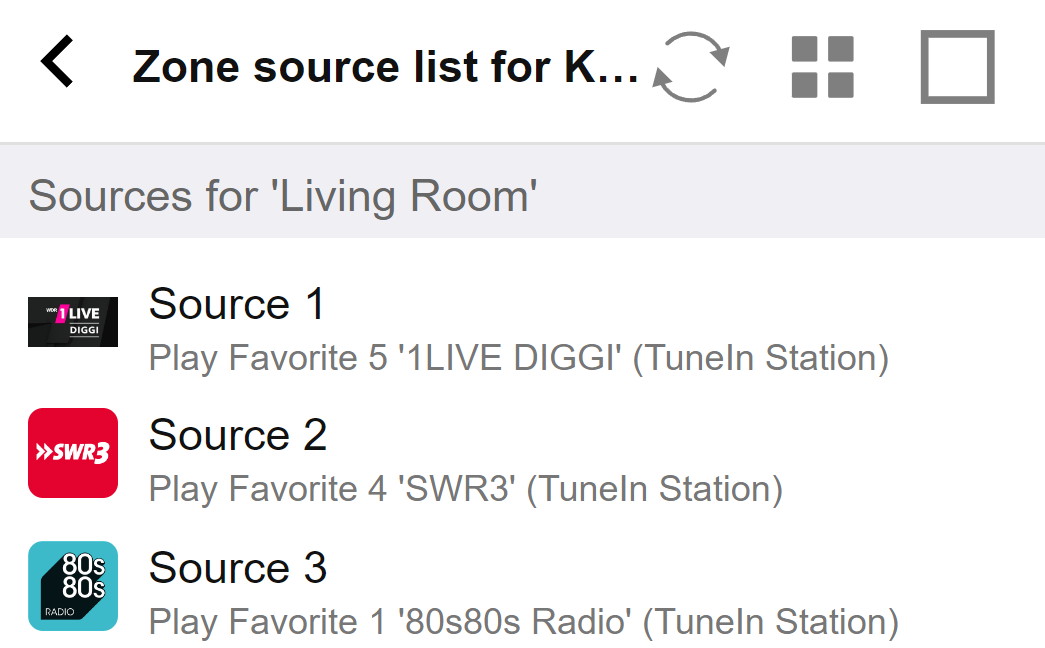
-
configure KNX event to toggle forward through the zone sources:
knx / events / add mapping
set GA: for example 7/1/0 1-bit value 1
set action: activate a source / next source -
configure another KNX event to switch the zone off:
knx / events / add mapping
set GA: for example 7/1/0 1-bit value 0
set action: set volume or state of a zone / off
Result: if your wall button sends 7/1/0 1-bit value 1, it will toggle through
web radio stations.
If it sends 7/1/0 1-bit value 0, it will switch the zone off.
Parameterize KNX-controller
The next step is to parameterize the 6-fold KNX controller (e.g. in ETS) with the correct group addresses matching your KNX event.
6.5. Solving KNX problems
Most of the problems with KNX/IP is related to wrong or insufficient configuration of the KNX/IP router.
6.5.1. KNX/IP router
Please make sure that you set the correct unicast and multicast IP addresses. Please refer to KNX/IP router settings.
6.5.2. KNX/IP interface
These are limited to only a few parallel connections. Make sure that no other (or too many) devices are using the interface at the same time.
6.5.3. Filter settings
Please make sure that you set the correct filter and routing parameters. Please refer to Filter settings.
6.5.4. Checkout Aerne KNX Tester
This is an iPhone App which is very helpful to check if your IP router works.
6.5.5. Network problems
The communication is based on multicast communication.
That means one network participant is sending a message into the network,
and all other participants should receive it, in parallel.
This has to be allowed by the switches - and routers/gateways which might be part of your network.
Please check the following areas:
-
Use a single network switch, not multiple switches
If you have two or more network switches between the KNX IP router and the trivum device, then this may already cause a communication failure, that trivum does not get any KNX message.
Reduce the system. Connect both KNX IP router and the trivum-device to the same network switch. Ideally use a simple, unmanaged network switch like TP-Link 1008P or similar.
Read more details on that under Details of UDP Multicast Communication.
-
Managed network switches
-
Make sure that the switches are allowed to use multicast addresses.
-
Depending on network switch model and firmware, it can help to activate IGMP with Querier, or even to deactivate it.
-
Also check the spanning tree settings.
-
Check if the Switch has the latest Firmware. Run an update if necessary.
-
-
Cabling: double check that no network ring is created.
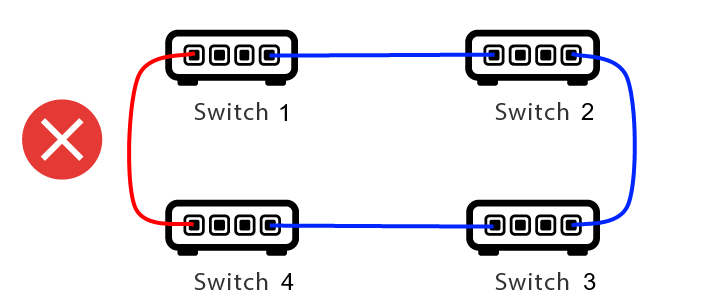
Here is one cable too much.
-
If Switch 1 sends a multicast UDP message, the message may be sent to Switch 2, and from that to Switch 3.
-
and in parallel, it is sent to Switch 4, and from that to Switch 3.
-
and what will Switch 3 do? send two packets to 2 and 4?
In the worst case, it may cause a packet storm: the same packet is repeated many times without intention. So carefully check if every cable is really needed.
6.5.6. Details of UDP Multicast Communication
KNX messages are sent by UDP multicast, normally on group 224.0.23.12.
Imagine this LAN topology 1:
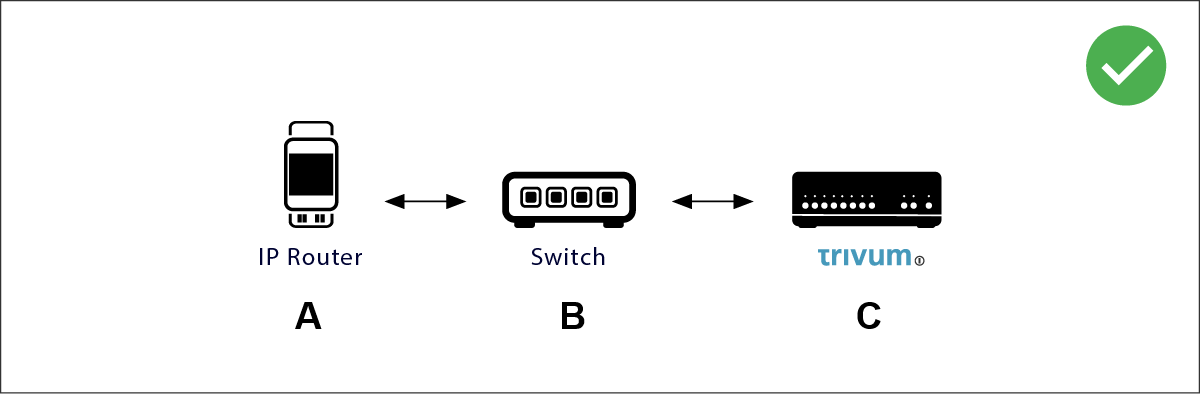
Multicast basically means: device (A) (IP router) gives a KNX message "1/2/3 1bit 1" to the network switch (B), and tells that switch to send this to all other devices in the network.
But switch (B) will not do this. It will not send the message to all devices. Instead, it will only send it to devices which have subscribed to receive messages on group 224.0.23.12. This is the case with device trivum ©, which is connected to the same switch. On startup it told the switch: I want messages for group 224.0.23.12. So normally it gets them.
Imagine this LAN topology 2:
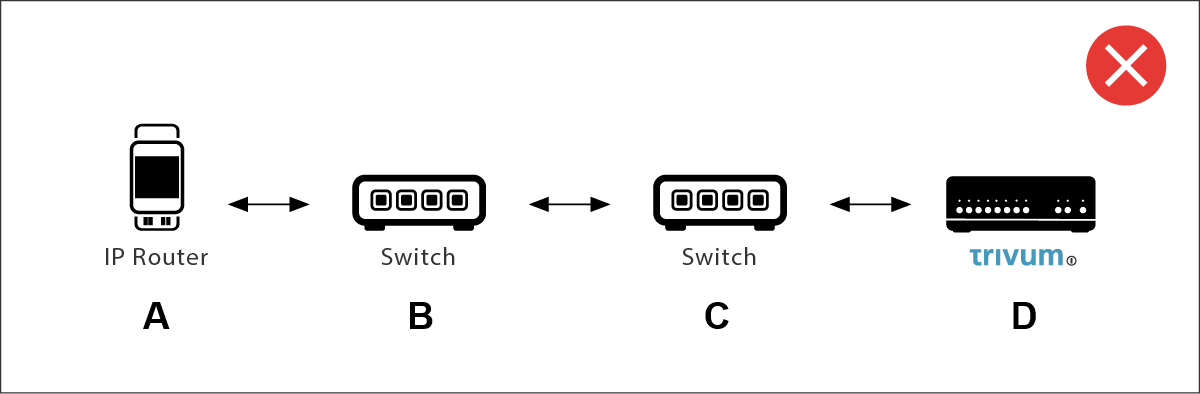
Here is a problem. On startup, trivum will tell Switch ©: I want messages for group 224.0.23.12.
Good. But will Switch© also tell Switch (B) that someone connected to him is interested in that group? Not sure. Depends on the Switch firmware, model, vendor, management settings, etc. etc.
If Switch © does not pass on a subscription request, then KNX messages from (A) will not be passed on by Switch (B).
Therefore, if trivum cannot receive KNX input, connect all to a single, simple network switch.
6.5.7. Group addresses
If you use filtering in your KNX/IP router, then really make sure that you use a dummy application or another tool to tell the KNX/IP router to not block the group addresses which are used by the trivum system.
6.5.8. Device addresses
Each bus device on the KNX bus has to have a unique device address. Make sure that you specified a valid KNX device address in the KNX setup of the trivum devices.
|
It is good practice to add the devices which rely on KNX/IP as communication interface also to the ETS configuration, although it is not really necessary.
So please use a simple dummy device, name it to identify that it represents the trivum device and assign a valid device address. |
6.5.9. KNX scene control
Scenes can be stored and recalled by objects
-
in the HomeControl interface of a trivum music server, under:
Extras / Setup HomeControl / Add KNX Object.
This requires software V9.62 or higher. -
in the HomeControl interface of a trivum Touchpad, under:
HomeControl / Definition / Add KNX Object
This requires software V3.01 or higher. -
on the KNX pages of a trivum Touchpad, under:
user interface / Page Editor
Up to 4 modes are available:
-
Mode 1 covers all objects of the HomeControl or Touchpad KNX area, no matter in which area, or on which screen. It remembers the state of objects within the trivum device. So far only lights and some shutters (with position feedback) are supported.
-
Mode 2 covers only objects in the same HomeControl area, or on the same Touchpad KNX page
-
Mode 3 is only available on a Touchpad KNX screen page. It asks interactively which objects should be saved as part of a scene.
-
Mode 4 does not remember anything in the trivum device, but sends a KNX command to KNX light and shutter actuators, that they should remember or recall their current state. You have to enter a KNX group address in this case, and a scene number, for example 1. Then a long press on the scene will send 129 (save scene 1) to actuators. A short press will send 1 (recall scene 1).
It is recommended to use Mode 4 by default, if your KNX actuators support it.
With modes 1 to 3, a trivum device stores up to 16 scenes.
6.5.10. KNX music server scenes
If you want to store the current trivum-device state in a KNX scene, perform these steps:
-
under Automation / KNX / Setup KNX communication / Group address for scene save/restore enter a group address, e.g. 1/5/99. for your convenience you may type this as "1 5 99".
to program a scene:
-
configure each zone that should take part in KNX scenes. for example enter: Zones / first zone / KNX bindings / special communication objects / GA scene to include in scene: 1 5 90
-
send by KNX: GA 1/5/90 1-bit value 1. this will tell the first zone that it takes part in the scene.
-
repeat this step with all further zones that should take part in the scene.
-
finally send by KNX: 1/5/99 1-byte value 128. this will save the current state of participating zones as scene 1. value 129 would store a scene 2, and so on.
use a programmed scene:
-
send by KNX: 1/5/99 1-byte value 0. this will call the first scene. value 1 would call the 2nd scene, and so on.
| only basic states of zones are stored, like the current selected source (FM tuner, Streaming, Line input). the system will not store complex informations like the current selected Audio Service Playlist. |
6.5.11. KNX music server scene examples
The following step by step example requires that you have the ETS software for Windows. In this software, you can open the group monitor, then send KNX messages by this group monitor for testing.
store a scene 1 with 2 zones
-
In a web visualization, do this manually:
Switch zone 1 on, selecting FM Tuner source.
Switch zone 2 off.
Now zone 1 is on, zone 2 is off.
We want to store this overall system state as a scene. -
configure in zone 1:
configuration / zones / zone 1 / knx bindings / GA to include in scene:1/2/3 -
configure in zone 2:
configuration / zones / zone 2 / knx bindings / GA to include in scene:1/2/4 -
tell zone 1 and zone 2 that they will take part in the next scene:
-
in the ETS group monitor, send a 1-bit value 1 to GA 1/2/3.
-
in the ETS group monitor, send a 1-bit value 1 to GA 1/2/4.
-
now zone 1 and zone 2 know that their current state should be saved when the next scene save command is received. no scene is saved yet. this was just a preparation.
-
configure globally:
automation / knx / setup / group address for scene save/restore:2/1/0 -
send command to trivum to save the current state of zone 1 and zone 2 as scene 1. to do so
-
in the ETS group monitor, send 1-byte value 128 to GA 2/1/0
because "128" means "save the first scene" (1-1+128).
(do not use a different data type then 'byte' for sending)
-
-
Now the system saves scene 1 with these informations:
-
zone 1 should be on, with FM tuner.
-
zone 2 should be off.
-
recall a scene 1 with 2 zones
-
switch all zones off
-
send a command to trivum to recall scene 1. to do so
-
in the ETS group monitor, send an 8-bit value 0 to GA 2/1/0
because "0" means "recall the first scene" (1-1+0).
-
-
Now the system should recall scene 1 with this state:
-
zone 1 is on, with FM tuner.
-
zone 2 stays off.
-
store a scene 2 with 3 zones
-
open the trivum app or WebUI, and put the system into this state:
-
switch zone 1 on with fm tuner.
-
switch zone 2 on with line input 1.
-
switch zone 3 on with streaming.
-
-
prepare the zones KNX configuration:
-
configuration / zones / zone 1 / knx bindings / GA to include in scene:
1/2/3 -
configuration / zones / zone 2 / knx bindings / GA to include in scene:
1/2/4 -
configuration / zones / zone 3 / knx bindings / GA to include in scene:
1/2/5
-
-
tell the zones that they will take part in the next scene:
-
in the ETS group monitor, send 1-bit value 1 to 1/2/3.
-
in the ETS group monitor, send 1-bit value 1 to 1/2/4.
-
in the ETS group monitor, send 1-bit value 1 to 1/2/5.
-
the scene is not saved yet!
-
configure globally:
-
automation / knx / setup / group address for scene save/restore:
2/1/0
-
-
tell the trivum-device to store scene 2:
-
in the ETS group monitor, send 8-bit value 129 to
2/1/0
because "129" means "save the second scene" (2-1+128).
-
recall scene 2 with 3 zones
-
set all zones off
-
tell trivum to restore scene 2:
-
in the ETS group monitor, send 8-bit value 1 to 2/1/0.
because "1" means "recall the second scene" (2-1+0).
-
-
now this sould happen:
-
zone 1 switches on with fm tuner.
-
zone 2 switches on with line input 1.
-
zone 3 starts streaming, and plays the streaming content last used in that zone. (selected content is not stored in scene!)
-
6.5.12. Tracing/Logs
If you want to check if the trivum device can receive KNX telegrams, you should
-
enable tracing of KNX messages under:
automation / knx / setup knx communication / trace bus communication -
then go to: automation / knx / knx monitor
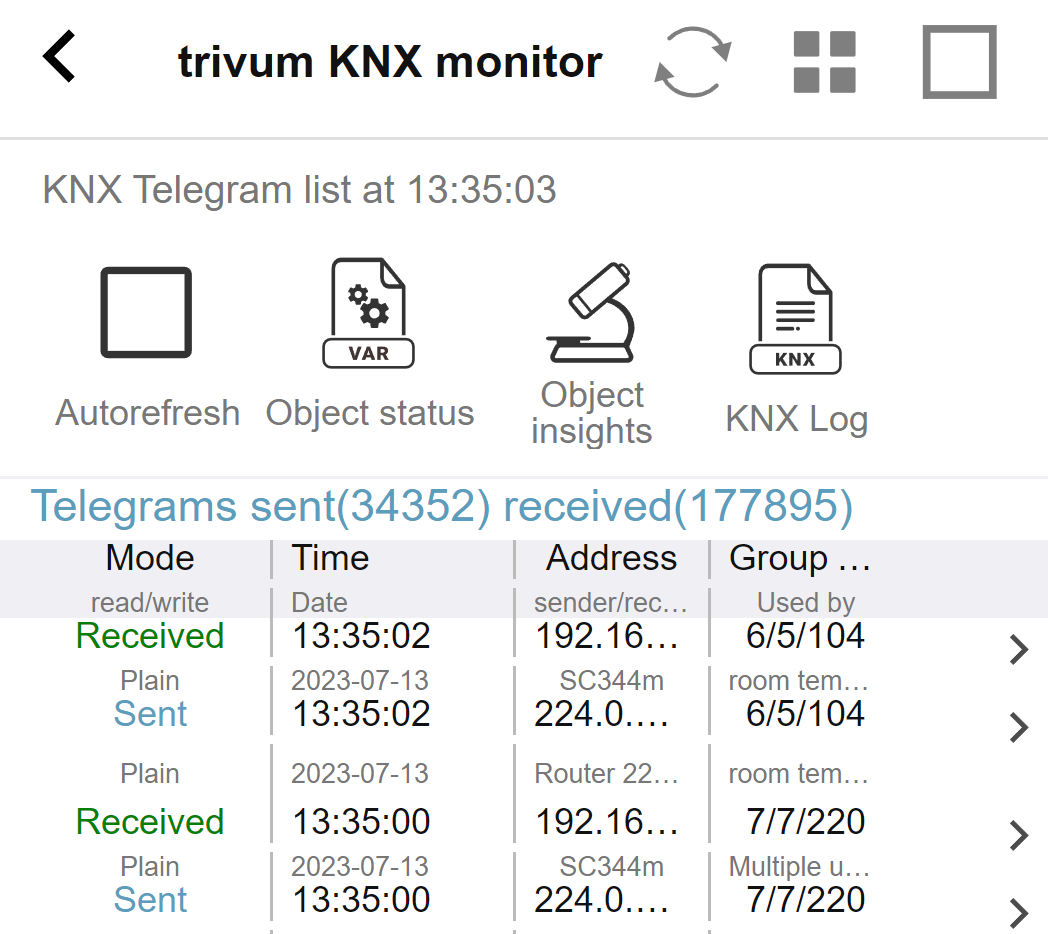
this is an interactive view which updates automatically,
which is helpful to see if anything comes in.
With much traffic, however, you may loose overview,
and informations are cut, especially in mobile view.
In that case better use the KNX Log under:
Automation / knx / knx monitor / KNX Log / Print
6.5.13. Gira X1 integration with trivum
Gira X1 can be used as IP interface
The Gira X1 contains an IP interface, and can be connected with trivum through KNX interface mode. This requires trivum software V9.60 or higher.
Please note that the X1 is not an IP router, but just an interface. It can handle up to 3 ip interface connections in parallel, for example with one trivum MusicServer, and 2 trivum Touchpads.
If you have more devices that need to communicate with the X1, an extra IP router is required, like the Siemens N146, which sends UDP multicast messages on group addresses like 224.0.23.12.
Integration steps with Gira G1
In a project for the Gira G1, or the Gira Smart Home app,
you create a web browser object. There you type an url like
http://trivumip
containing the IP address of your trivum MusicServer system.
Then you can use the full trivum music control within Gira.
Furthermore you can define in your Gira project some KNX switches to control trivum. They will send KNX messages which are sent via the X1 to the trivum device, for example to play a music favorite.
6.5.14. Gira HomeServer notes
Gira HomeServer requires an extra IP router
The Gira HomeServer itself contains no IP router or interface, so it can not pass through KNX messages from the KNX wire to LAN for trivum. So the Gira HomeServer requires an extra IP router for communication.
6.5.15. Gira QuadClient integration notes
WebTouch customization by parameters
By default it is sufficient to configure an URL in your QuadClient browser plugin,
like http://trivumip, and the WebTouch is shown.
But you can change the appearance and improve control by adding parameters, like for example
http://trivumip?parm1=value1&parm2=value2
Supported parameters are:
|
select white user interface. Default is black, which can also be changed in system setup. |
|
select black user interface. |
|
change content size to enforce display of n rows in menus and result lists. |
|
give the WebTouch a numeric or text ID to identify it in the trivum setup |
Example:
?skin=white&rows=10
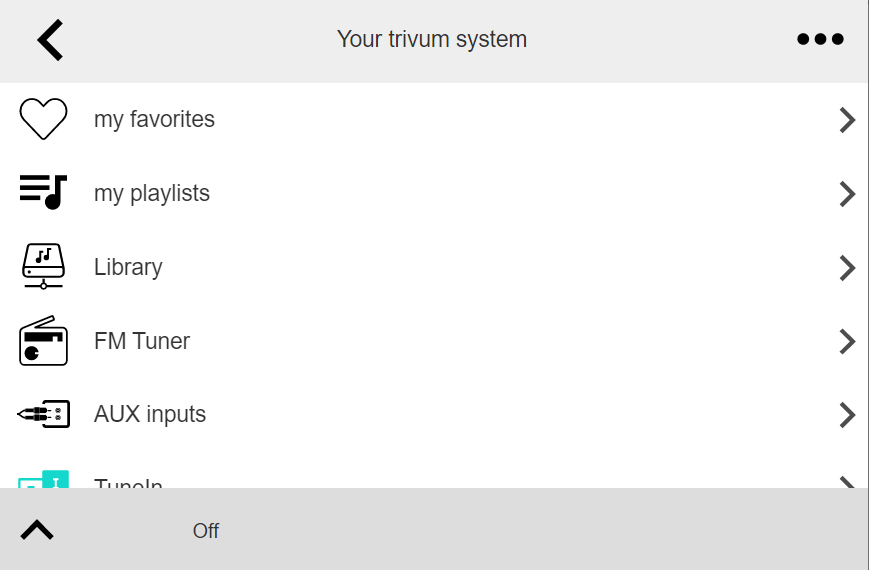
Example:
?skin=black&rows=15
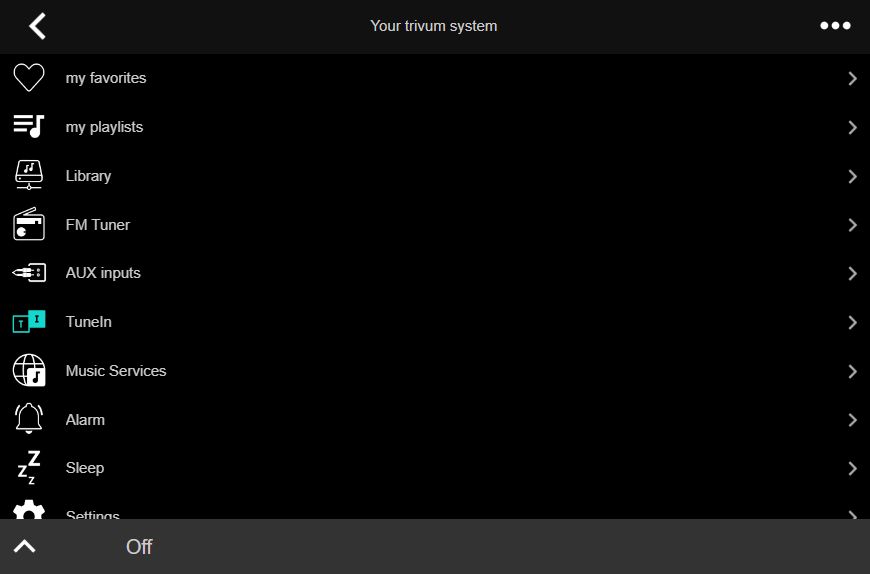
Gira QuadClient only shows a black screen
This happens if the firmware of your HomeServer differs from the HS+FS Experte software (and QuadClient therein).
For example, we had one report of a HomeServer with firmware 4.11.0 and HS+FS Experte 4.11.3. This only produced a black screen in QuadClient, not just with trivum, but with any website URL. The solution was to update the HomeServer to the same firmware, in that case 4.11.3.
You can find the installed HomeServer firmware version by logging into the HomeServer and looking in the debug area.
Gira QuadClient browser compatibility
Using the correct web browser: IE 10 or higher
Gira QuadClient is a software running on Touchpanel PC’s with Windows operating system.
Before trying to integrate the trivum web visualization
in a QuadClient project, make sure that the Windows system
contains at least Internet Explorer 10 or higher.
It will not work with older version of Internet Explorer.
To find out the browser version used on the PC,
you may configure a browser in the QuadClient with this url:
If this shows that your QuadClient uses IE 7 you must update the web browser and/or Windows system, or read the below article.
URL for integration
Just use http://trivumip, for example: http://192.168.1.200/
Gira QuadClient: how to fix IE7 mode with IE11
Even if you have IE11 on your Windows system, the Gira QuadClient may use Internet Explorer in IE7 mode, so all you get is an error message by trivum.
For best information about the browser mode used, we recommend to configure two browser plugins in the same Gira quadrant, with URL’s:
http://yourtrivumip/             - name: trivum
http://www.whatismybrowser.com/  - name: test
Now run the QuadClient, and you see:
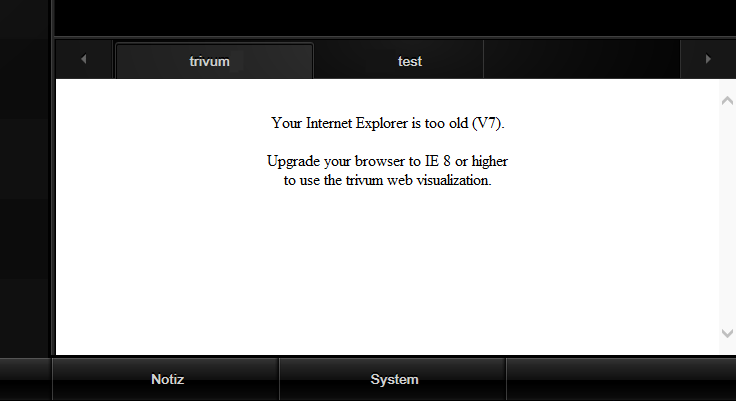
To fix this,
-
stop the QuadClient
-
download the file fix-gira-ie7-mode.zip
Extract the zip file, and run fix-gira-ie7-mode.reg.
This will enter a single value into the Windows registry:HKEY_CURRENT_USER\Software\Microsoft\Internet Explorer \Main\FeatureControl\FEATURE_BROWSER_EMULATION hs_client_net.exe = dword:00002af9 -
alternatively you may enter the value manually:
-
run the Windows Registry Editor,
regedit -
go to the
HKEY_CURRENT_USERlocation given above -
select "new DWORD value" with name: hs_client_net.exe and value 2af9 (hex)
-

-
run the QuadClient again. The error is gone.
On very first use, the IE may only show a blank area.
-
This can be fixed manually by a reload, e.g. via right mouse button, or in our example by switching to the second tab, and then back to trivum.
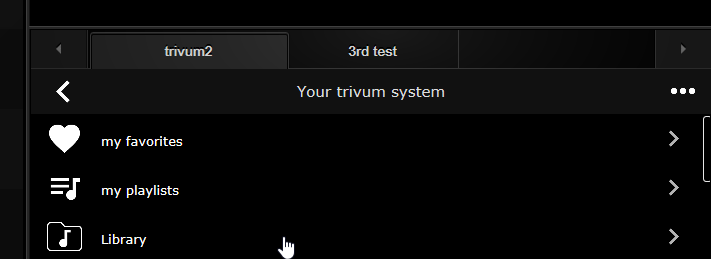
to automate this reload, go in the trivum-setup to
system / setup / advanced settings
the type the advanced option string "fixgrayie".
Gira QuadClient known issues on Touch PC
On touch panel PC’s any kind of long press may not work within the Gira QuadClient.
If this happens, go into the web configuration:
V9:
-
go to: system / setup / user interface details, and activate: use +/- buttons for volume control.
-
go to: devices / control units, therein select the control unit matching your touch PC. enable: Off on power short press.
V10:
-
go to: devices / apps and touchpads / general settings, and activate: use +/- buttons for volume control.
-
go to: devices / apps and touchpads, therein select the control unit matching your touch PC. enable: Off on power short press.
Diverse functions in the KNX area within the web visualisation will not work, for example any kind of popups on RGB, dimmer or climate controls. Do not use these, but instead use the KNX controls of your Gira installation.
6.5.16. Integration in visualizations of other vendors
If your wall panels contains an integrated web browser you can test trivum integration, even without trivum hardware, by configuring the web visu URL from our online demo:
This will require hardware with one of these web browsers:
-
Internet Explorer 10 or higher. (IE7 to 9 will not work!)
-
Firefox
-
Chrome
7. AirPlay and trivum
The trivum Multiroom system supports streaming via the AirPlay technology. The user can enable/display AirPlay support and can specify which room/zone should be visible as an AirPlay output.
| It depends on the specific trivum hardware how many different AirPlay outputs are independently available. |
Further information about AirPlay is available in WIKIPEDIA, in English and German
7.1. AirPlay Versions
7.1.1. AirPlay1
AirPlay has been introduced by Apple in June 2010. Many manufactures and Apple itself supports this technology to stream music to speakers. trivum supports AirPlay since many years and will continue to support AirPlay.
7.1.2. AirPlay2
Apple supports AirPlay2 since 2018. The Apple HomePod speakers became the first Apple speakers which supports AirPlay2 in Q2 of 2018.
AirPlay2 is the multiroom extension of AirPlay and enables users to group AirPlay2 speakers. trivum Multiroom Systems do not support this AirPlay extension. They are compatible with AirPlay, but do not support the AirPlay2 grouping or other AirPlay2 extensions to AirPlay. This is because trivum itself is a multiroom system and we have a strong and reliable support for Multiroom and grouping. Control grouping via 2 different technologies would lead to unstable systems and inconsistent Multiroom installations because of the mixture of the two multiroom technologies.
| Apple will still support AirPlay - and so the trivum zones are still visible as AirPlay outputs. |
7.2. AirPlay and Group Play
If you create groups in trivum you can only send AirPlay input to the master zone of that group. The master zone has the same name as the group.
Example:
-
SC344 device has zones: living room, kitchen, sleeping room, bathroom
-
All zones are off. In the user interface, user selects "group" with all zones.
-
Because all zones are off the system takes the first zone as group master zone: living room.
(If a single zone, like bathroom, would be playing right now, then the system may select that one as master zone.) -
Then you can send AirPlay only to the input named "Group living room".
The non-master zones of a group are called Slave Zones, and are normally marked by round brackets ( ) in their Airplay input names. Do not try to send Airplay to a Slave Zone, this will be blocked.
7.3. Android and AirPlay
With Android 10 or higher and the app
AirMusic [ROOT/Android 10+] (vendor: airmusic.app)
from the Play Store it may be possible to stream audio from Android devices to trivum through AirPlay.
However, it may not work with every app and device. You can try a free demo.
-
start the AirMusic App
-
select a trivum network input.
you will get a system popup: allow recording? yes.
If no trivum inputs are listed, read more here:
https://www.trivum-shop.de/support/docs/en/trivum-troubleshooting.html#airplay-inputs-cannot-be-found -
on first use you may get another button at the bottom right about notifications access. allow this all, it is important. it allows to send the current artist and track name to trivum, and to control volume by extra buttons in the AirMusic notification bar.
-
further recommended settings:
general settings: automatic stop of connection: change the default 2 minutes to 5 minutes or higher. if no music is played for 5 minutes, the network input is deselected, and you have to select it again. -
then start the youtube app, play a video. music should start to play in the selected trivum-zone.
-
for volume control:
volume hard keys of your mobile cannot be used. instead, swipe from top downwards to see the AirMusic notification bar. It should show a text "AirMusic is active", with volume control buttons.
8. Howtos and FAQ
8.1. How to create a playlist under "playlists"
-
create an empty playlist, to add tracks later:
Playlists / edit (at the right top) / add (at the left)
the newly created list is now the current list. if you play some music,
opening…at the right top will also show a functionAdd track to playlist
with the current list’s name. -
or create a playlist from what is playing right now:
Play some music. Then-
select
…at the right top -
select: show play queue
-
select
…at the right top -
select: Save queue as my playlist
-
this will create a new playlist containing the current music selection.
8.2. How to add the current music selection to a playlist
Play some music. Then
-
select
…at the right top -
select: show play queue
-
select
…at the right top -
select: Add queue to a playlist
this will add the complete play queue content at the list’s end.
8.3. How to quick add the current playing track to a playlist
First, tell the system what should be your current playlist.
To do so, go into
-
playlists
-
select one playlist, to have it’s content shown.
There is no need to play it, just show the content. -
then go back in the menu, back to the music player screen.
Now select some music. A NAS album, a music service playlist, whatever.
If you want to add the current playing track:
-
select
…at the right top -
a popup with More music opens.
This should now offer:Add track to playlist: …, with the current playlist’s name.
Select that, and the track is added immediately.
8.4. How to add the current playing album to a playlist
There is no quick add function for this. Instead,
-
play the album of interest.
-
select
…at the right top -
select
show play queue -
select
…at the right top -
select: Add queue to a playlist
8.5. How to play a playlist starting from track n
and how to play any content with many tracks, like a NAS album, starting from a specific title.
By default, if you select a playlist, then a track therein, only this single track is played in endless repeat.
If you want to play the whole list, starting from a track, then there are two ways:
Method 1 uses the play queue:
-
play the whole playlist by "Replace list"
-
select "…" at the right top, then "show play queue"
-
in the play queue, click into the track to jump to
and then it will play the whole list starting from the selected track.
Method 2 uses the play immediate option:
-
in the web configuration, go to
V9: System / Setup / User interface details
V10: Devices / Apps / General Settings
and check "Do play immediate". -
then, in the web visualization, select a playlist, click into the start track,
and without further menus it will play the whole list starting from that track.
8.6. How to join all titles from trivum Favorites into a playlist
-
make sure the "Do play immediate" option is not set.
-
select the first trivum favorite. when being asked for "play now, play next etc." select "replace list". this is not possible with web radio stations which always play immediately.
-
select the second trivum favorite. when being asked for "play now, play next etc." select "add to list".
-
continue this way with all favorites you want to add to a playlist.
-
then click at the left top, until you see the player screen, with the currently playing track.
-
select "…" at the right top, and "show play queue".
-
select "…" at the right top, and "save queue as a trivum playlist".
8.7. How to limit the user interface (WebApp/Touchpad) for commercial use
For use in restaurants, bars or fitness studios it may be required to provide only a minimal user interface to select predefined music, without the possibility to configure anything.
This can be achieved by options under:
V9: System / setup / user interface details
V10: Devices / Apps and Touchpads / Show/hide menus
-
Show Main menu
By default a touch on the date or the hamburger button ![]() of the user interface brings up the main menu, titled "Your trivum system".
Disable this option to let the user use only predefined actions
and default sources. Actions are usually configured under:
of the user interface brings up the main menu, titled "Your trivum system".
Disable this option to let the user use only predefined actions
and default sources. Actions are usually configured under:
V9: Configuration / zones / zone / define the zone related actions
V10: Customize / zones / zone / define the zone related actions
-
Show Zone menu
By default, a WebApp/Touchpad is able to switch between different zones.
This can be fully disabled by this option.
Setting the zone for a control unit must then be done
in the web configuration, under:
V9: Devices / Control units / unit / Assigned zone
V10: Devices / Apps / unit / Assigned zone
-
Don’t show default sources
By default all builtin sources for a zone are made available as actions on the right, for example with SC344 this means Stream, Tuner, Line Input. To save space or avoid the use of unwanted sources enable this option. There is also a separate setting for FM tuner available.
Since software V9.72 these settings are under:
Configuration / actions / define which standard sources should be available
Since V10 these settings are under:
Customize / Actions / General settings
-
Allow switching between Music-/Home Control on standard visu
If AutomationObjects (KNX etc.) are defined, a button for the
automation area is shown at the right top.
Disable this option to hide this button on the WebApp.
On Touchpads, separate options exists in their web config:
System / setup / display settings / Show mode switch button.
But if KNX objects are defined, they are still accessible.
To avoid this, set access PINs on the KNX pages.
8.8. More options to limit the user interface
In addition to the main limiting options above, these are available:
V9: System / setup / user interface details
V10: Devices / Apps and Touchpads / Show/hide menus
-
Hide 'System setup' in WebApp clients
Keep users from reaching the web configuration easily via the normal WebApp.
-
Hide 'All Off' button in Zone menu
If you want to limit control units to specific zones, you will probably also want to keep single control units from being able to switch off all zones.
-
Hide 'Group' button in Zone menu
Keep users from grouping zones manually. If predefined zonegroups exist they are still available.
V9: Devices / Control units
V10: Devices / Apps
If you enter a control unit (WebApp or Touchpad) here, this can be set:
-
Show actions in menu
This will no longer show any actions at the right side of control units, but move (predefined) actions into the main menu.
-
Specify zones which can be controlled
By default every control units can switch into any zone. With this option it can be limited to one or more specific zones.
V9: Configuration / Zones / zone / basic settings
V10: Customize / Zones / zone / default sources
-
Default line audio input:
This can be set to 'no default', to hide the line audio input for this zone.
V9: Configuration / Zones / zone / basic settings
V10: Customize / Zones / zone / basic settings
-
Zone is available in ZoneSelect menu
If this is disabled the zone is no longer visible in the zone list of WebApps and Touchpads.
8.9. How to play a music service playlist by KNX
Example: to play a Deezer playlist by a KNX event, perform these steps:
In a Control Unit (e.g. trivum web visualization),
create a trivum favourite from a Deezer playlist like:
Music Services / Deezer / Charts / Playlists / Pop Radio / All tracks / More …
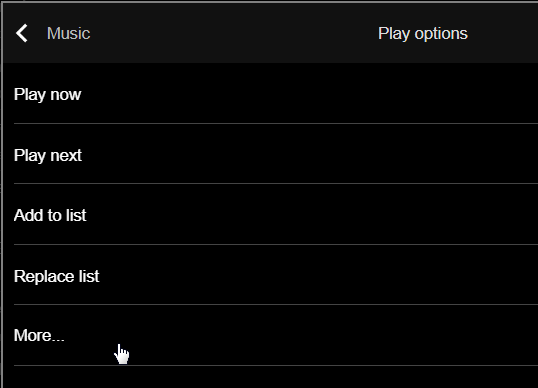
then: Add Deezer.Playlist to trivum favorites.
In the web configuration:
-
Automation / KNX / Setup KNX communication / Use KNX/IP -
Automation / KNX / Events / Add a new KNX event.
click into the event.
fill in the group address, data value, and assigned zone.
change action to:
Activate a source / Streaming / play a trivum favorite.
select the Deezer Playlist, with mode: Random in Random.
Then, on a KNX event with the matching group address and value,
the playlist is played, each time starting with another random track.
8.10. How to play a music service playlist by a one touch action
Follow the above instructions how to create a trivum favorite from a Deezer playlist.
Then go into the web configuration, and select:
Zones / Zone 1 / actions / action 1:
Activate a source / Streaming / play a trivum favorite.
select the Deezer Playlist, with mode: Random in Random.
→ on a Control Unit in that zone, a new action will appear at the right side, allowing to play the Deezer playlist directly.
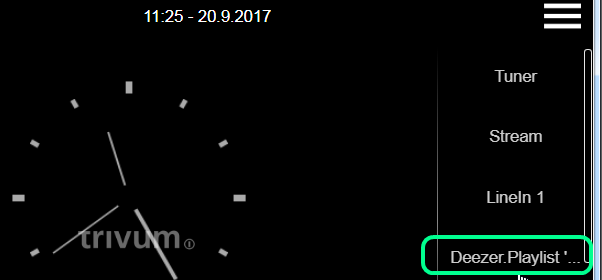
8.11. How to play multiple albums by one action or KNX event
This can be done indirectly, by creating a playlist containing multiple album contents, this way:
-
in the control unit (Touchpad or WebTouch), select and play the first album.
-
then select the next album(s) this way:
Library / album / album name / all tracks / add to list
without playing them now. Go back to the player view, showing the current playing track.
-
select "…" and then
Show play queue / "..." / Save queue as my playlist /
   enter a new playlist name /
   "Save with name: new name"
Now you have a new playlist, containing the tracks of multiple albums, which can be used in any action or KNX event.
8.12. How to configure a Ringtone Paging
MP3 files can be uploaded directly in the paging setup menu.
The files are converted internally to a raw PCM format,
and synchronized to connected slave devices automatically.
However this is done only if the device(s) have at least 350 mbytes
of free internal disk space left.
It is recommended not to upload more than 100 files, as the internal storage
is also needed for other things like cover art.
Create a Paging
select: Extras / Paging / create, click into Paging 1, editPaging.
-
at the bottom, select Audio source: Stream. go back one level.
Upload the ringtone file(s)
-
click into "Audiofile", then "Upload your MP3 file here", and follow the instructions.
After an upload you will see the main configuration page.
Go again to Extras / Paging. -
check which zones (all) should take part in the paging.
-
set the paging volume level. take 10 (low) for a first test.
-
select auto stop time: 3 seconds, for a first test.
-
click on: "test this paging". as soon as you clicked this you also see a line "stop paging" to stop it.
-
check if sound plays in all zones.
if you have two devices combined as master/slave
check if zones of the slave play as well.
if not then synchronization may have failed,
probably due to lack of SD card space.
in such a case try to clean up the slave SD card this way:
-
open a new browser tab, type: slaveip/setup
-
change the slave to master mode (temporarily)
-
configure a dummy paging therein, to get into the ringtone file list
-
delete unneccessary ringtone files
-
also try: Music / Music on NAS / Clear music database,
in case that a large NAS database was still stored on the slave -
change the slave back to slave mode
Run the Paging
-
create a zone action:
-
Zones / Zone 1 / Actions / Action 1 / Start paging / select paging.
→ in a web visualization in this zone you will now see an action "Paging".
-
-
to run it by KNX:
-
Automation / KNX / Setup KNX communication / Use KNX/IP
-
Automation / KNX / Paging / Paging 1 / enter group address
→ now a KNX event for that address will run the paging.
-
-
to run it by HTTP:
-
read more in the document:
trivum API documentation
For example, if you have a doorbell which is able to send an HTTP request when the bell button is pressed, configure in the doorbell software a call like:
/xml/paging/start.xml?id=0
which will run the first paging.
-
Further notes on older configurations
Stream pagings configured on SC before software version V9.21 used a different way, requiring to reserve one Streamer per device, just for paging. If you see a source marked as "Static Streamer" it means this old system. It is recommended to migrate such configurations to "SC Streamer" mode (and to change the shared zone stream back) to get full use of all streamers.
Configuration on C4 systems
On C4, .MP3 files are played directly by a dedicated stream source card
which is used for the paging. The ringtone files must be uploaded
to the system’s internal flash disk.
-
select: Extras / Paging / create, click into Paging 1, editPaging.
-
at the bottom, select Audio source, then select one stream source card you want to reserve for paging. if you have multiple card hosts, the Stream Source must be in the first card host, to allow it’s sound to be played everywhere. If the paging Stream Source card is also used to play normal music, then that music will be stopped by a paging, and must be reselected afterwards.
-
click into "Audiofile", then "Upload your MP3 file here", and follow the instructions.
After an upload you will see the main configuration page.
Go again to Extras / Paging. -
select the uploaded Audio file.
-
check which zones (all) should take part in the paging.
-
set the paging volume level. take 10 (low) for a first test.
-
select auto stop time: 3 seconds, for a first test.
-
click on "test this paging".
as soon as you clicked this you also see a line "stop paging" to stop it. -
check if sound plays in all zones.
For infos how to run this paging, see above under Run the Paging.
8.13. Maximum Speaker cable lengths, speaker distance limits
Example: ceiling mounted speakers are connected to SC or RP devices by Cordial CLS-215 TT (2x1.5mm2) cable, or CLS-225 (2x2.5mm2) cable.
How long can they be?
For inwall/ceiling speakers with a plain crossover the only concern with long cables is the power loss. Due to the logarithmic nature of the sound pressure level one could say that a maximum loss of 25% is acceptable.
For the above cable types this means:
-
2x1.5mm2:
50m for 4ohms speakers (or 2x8ohms parallel)
100m for 8ohms speakers -
2x2.5mm2:
90m for 4ohms speakers (or 2x8ohms parallel)
175m for 8ohms speakers
8.14. SC344 Analogue Input Cabling Options
If you want to connect a TV or other audio source to SC devices you can use one of these options:
-
If your TV has Cinch output, direct Cinch to Cinch.
-
If your TV has only TOSLink output, use a D/A converter like
-
For long analogue connections via Network cable, adapters exist as well, in different price ranges.
Very simple Stereo Audio Extender Cat5:
https://www.amazon.de/dp/B01BF6KFOS/
With builtin transmitter:
https://www.amazon.de/dp/B014VZGMXI/
9. Errors and Solutions
9.1. Reset of SC devices
The devices SC340, SC344, SC348, SC044, SC344V2 have a small white reset key, which can be used like this:
9.1.1. Soft Restart
-
press the reset key, and keep it pressed.
the red LED shows a slow blink. -
after five seconds, the red LED shows a continuous light.
release the reset key then. -
the system will restart.
9.1.2. Reset the network interface to DHCP
This requires software V9.49 or higher.
-
press the reset key, and keep it pressed.
the red LED shows a slow blink. -
after five seconds, the red LED shows a continuous light.
keep the reset key pressed. -
after fifteen seconds, the red LED shows a faster blink.
release the reset key then. -
the system will restart, reset the network interface to DHCP, then restarts again. this may take about two minutes.
-
as soon as you can get into the web configuration, check the network settings, as these have not been changed. so check them for errors and correct wrong data.
9.1.3. Reset to factory defaults, or a recent software state.
This requires software V9.49 or higher, and an SC344v1 or v2 device with hardware 3 or lower. It can no longer be used with SC344v2 hardware 4 or higher.
-
press the reset key, and keep it pressed.
the red LED shows a slow blink. -
after five seconds, the red LED shows a continuous light.
keep the reset key pressed. -
after fifteen seconds, the red LED shows a faster blink.
keep the reset key pressed. -
after 25 seconds, the red LED shows a very fast blink.
release the reset key then. -
the system will restart, reset the network interface to DHCP, delete the whole current software, and restore the factory software (or a recent software snapshot taken during update to V9.49). this may take about three minutes.
-
as soon as you can get into the web configuration, run a software update, and upload the backup text file of your system configuration.
-
check the network settings! although the network interface was reset to use DHCP, this may change again on the next reboot. so correct them as well in the web configuration.
9.2. How to reset a AudioBox P150 system
The AudioBox P150 has several front panel buttons, which can be used during restart for special functions:
9.2.1. Soft Restart
-
press Power and Vol- together, until the power LED blinks fast. Release the keys.
-
the system will restart.
9.2.2. Reset the network interface to DHCP
-
switch the device off. wait 5 seconds.
-
switch it on. the white Power LED will show a slow double blink.
-
keep Power pressed for at least 50 seconds, until the Power and Stream LEDs show a fast flashing. Then release the key.
-
the system will restart, reset the network interface to DHCP, then restarts again. this may take about two minutes.
-
find the new IP, e.g. with the IP finder for Windows, available from service.trivum.com
-
check the network settings! although the network interface was reset to use DHCP, this may change again on the next reboot. so correct this immediately in the web configuration.
Note: the LED flashing signal requires software V9.49 or higher.
9.2.3. Reset to factory defaults
-
switch the device off. wait 5 seconds.
-
switch it on. the white Power LED will show a slow double blink.
-
keep Stream and Power pressed for at least 50 seconds, until the Stream, Tuner, BT and Power LEDs show a fast flashing. Then release the keys.
-
the system will restart, reset the network interface to DHCP, delete the whole current software, and restore the factory software. this may take about five minutes.
-
find the new IP, e.g. with the IP finder for Windows, available from service.trivum.com
-
check the network settings! although the network interface was reset to use DHCP, this may change again on the next reboot. so correct this immediately in the web configuration.
-
the system cannot play sound yet! run a software update to fix this.
-
then upload the backup text file of your system configuration.
Note: the LED flashing signal requires software V9.49 or higher.
9.3. Invalid zone or wrong device mode:
May also appear as: Zone undefined
Possible Reason 1: The Touchpad or web visu tries to use a zone that no longer exists, as it was removed from the MusicCenter configuration.
Possible Reason 2: The device belonging to the current selected zone is not configured as a Slave device, but as a Master. Go into the web configuration of master and/or slave device. Either remove the zone from the master, or change the slave device from master to slave mode.
9.4. Limited Network (no multicast):
A trivum device tries to send multicast messages to another trivum device, but these do not reach their target. They are blocked, or filtered.
Check the configuration of your network switches, or Router, concerning Multicast. Read details in the article: https://www.trivum-shop.de/support/docs/en/trivum-troubleshooting.html#groupplay
Also make sure all trivum devices use the very latest software version.
9.5. Zone is offline:
The device where this zone belongs to is currently not reachable in the network. Make sure it is switched on and connected by LAN cable.
9.6. NTP Error 10:
This indicates a name resolution problem. Trivum tries to access a time server ntp.ubuntu.com. This name must be resolved to an IP address. Sometimes the Nameserver used in a network provides a bad IP with a slow or malfunctioning server.
If you have a static IP setup, try changing your nameserver to 8.8.8.8 then restart the MusicCenter.
10. trivum API
The trivum system can be automated by HTTP calls.
Read more in the document: