1. Introduction
trivum supports KNX in the MusicCenter software since 2005. The trivum TouchPads (4.3" and 7") are KNX room controllers with the ability to control light, dimmers, RGBs, shutters and climates.
trivum joined the KNX team in 2009 as one of about 100 KNX members.
1.1. Function overview
The trivum Music Systems and the trivum TouchPads have KNX builtin. This means, that they can be controlled from other KNX devices or/and that they can control other KNX devices.
1.1.1. trivum Music Systems
Most of the time KNX will be used to control trivum Music Systems. Starting music or changing the volume are the most common requests. But the KNX support by trivum can do much more - it can control KNX devices (e.g. moving up/down a motorized TV) and has a wide range of actions which can be mapped to any KNX switch.
1.1.2. trivum TouchPads
The trivum TouchPads are very flexible and beautiful room controllers. They can switch lights, dimm lights, control RGBs, shutters, climates and even show information on any KNX display. The functions are shown using simple buttons on the display. And they even allow to control KNX by a web browser.
1.2. Function examples
| These are just few examples. Many other functions are possible. |
- Control Music in a Bathroom using a regular 4 button KNX switch
-
You just have to map Source change on button one, volume up on button two, Volume down on button three and Power off on button 4.
Thats it. Get in the bathroom in the morning and listen to music with a simple press on your KNX button. - Listen to music in areas when you walk through
-
Using a KNX motion sensor, this sensor can start a specific playlist in an area. After some time, the motion sensor will also switch off the music.
1.3. First steps
All you have to do is:
-
activate the KNX support in the trivum setup.
Please select the icon,
then "Setup KNX communication" and "Use KNX/IP".
icon,
then "Setup KNX communication" and "Use KNX/IP". -
make sure that your KNX IP router has been found in the network.
-
then go to the KNX zone setup (
 ) and select a zone
 -
enter the KNX group address to switch the zone on or off. This KNX group address should be the group address which is sent by a KNX button in your house.
-
for a first test, make sure the zone is playing some music. then press the KNX button to switch it on or off. (directly after a system restart, switching on may not work, as no recent selected music exists.)
2. Getting started
2.1. Bus access
The trivum devices talk KNX/IP. This means, that a KNX IP Router or interface is neccessary to establish a communication with the KNX bus.
2.2. ETS software
trivum devices are configured via web browsers, because they have a builtin web server. This means, that there is no need to use the ETS software.
But you should nevertheless take care of the following points:
-
Each trivum MusicCenter (master) has to have a unique device address. This is necessary, because each KNX bus device has to have a unique ID which identifies the hardware. Even if a KNX over IP device is not physically attached to the bus, it is nevertheless neccessary to have this unique ID.
-
If you use filter tables in your KNX IP router, then you need to have a KNX dummy application
-
Define the group addresses which are ONLY used by trivum (e.g. MusicCenter + TouchPad) in the ETS. So the installer can see that they are used and that he cannot use them in another context.
2.3. About KNX/IP router
2.3.1. Basic
|
Since software V9.60 trivum devices can communicate not only with KNX IP routers, but also with KNX interfaces, like Gira X1. An IP router is recommended, as there is no connection limit (supports any number of devices). If you have more than one KNX IP router in your network, then each of them need to have different IP addresses and different IP multicast addresses. |
2.3.2. Which KNX/IP router ?
Here is a list of KNX IP routers and the link to the internet description:
There are more IP routers available from other brands.
Read also: Gira X1 integration with trivum
2.3.3. KNX/IP router settings
It is important to configure the KNX/IP router. "Out of the box" most KNX/IP routers do not what they should. So make sure that it has the right network settings, and that it routes the KNX telegrams from the bus to the network. Also make sure that is does not block telegrams, so disable telegram filtering for a first test.
2.3.4. Unicast IP address
The unicast IP address of a KNX/IP router should be in the same network as the trivum components and the other components who uses the KNX/IP router to interface with the KNX bus. Please make sure that the ETS software can use the KNX/IP router also to access the bus. This is the first step to make sure everything is fine.
2.3.5. Multicast IP address
If you just have one KNX/IP router in the installation, then 224.0.23.12 should be the multicast address.
This is the default and wellknown KNX/IP router multicast address.
If you have more than one, the other IP routers have to have valid multicast addresses.
Locally available multicast addresses start with 239.x.x.x., e.g. 239.100.50.10, 239.100.50.11, …
|
Useful information about multicast IP addresses: |
|
Don’t forget to download the changes you make in the ETS to the IP router. |
2.3.6. Filter settings
Filter and routing configuration is also necessary for the KNX/IP router.
Please enable the router (using the ETS) that he routes the KNX telegrams to the IP network and from the IP network the KNX bus.
The easiest way is to use the "no filtering" option. This means, that all the telegrams are routed between KNX bus and IP network.
If you have to or want to use filtering, then you have to use for example the GIRA dummy application. You enter trivum group addresses in that application, then program the IP Router telegram filter to pass through telegrams for these addresses.
|
Filtering is more secure - but needs more configuration:
|
2.3.7. Test communication
If you’re not sure whether your KNX/IP router works, please start your ETS software and select the KNX/IP router as communication interface.
Make sure that you use "IP Routing" as communication mode. Open the group monitor and see if messages from your KNX devices appear.
If this works ok, open the web configuration of your trivum Music System, unter trivumip/setup.
Then make sure that the multicast IP address matches in the trivum setup and the KNX/IP router settings.
If the trivum setup does not recognize the KNX/IP router please goto to the section Solving KNX problems
If the KNX/IP router is recognized, but trivum does not receive any KNX message although filter settings are correct, read more about network problems under Solving KNX problems
3. trivum KNX Setup
3.1. Basic settings
-
In the web configuration of your trivum device, make sure that KNX support is enabled as described above under "First steps".
-
in the following, you may enter all your KNX group addresses manually, or you may upload a prepared list of group addresses exported from ETS, under:
Automation / KNX / Setup KNX communication / Import CSV / Manage imported group address list.
3.2. KNX Group Address format
trivum uses the ETS project default of 3-level group adresses with 5, 3 and 8 bits, with a range from 0/0/0 to 31/7/255.
When entering group addresses in the setup, the system accepts 3 formats:
-
type it with slashes: 1/2/3
-
type it with spaces: 1 2 3
-
type a 1-level GA value like: 2563
A 1-level value is converted to 3-level automatically. Trivum also provides an online converter under
3.3. Zone KNX configuration
See zoneKNX for all available datapoints per zone.
3.4. KNX Event Datapoints
The trivum KNX event objects are a very flexible instrument. They can be used to trigger functions with KNX telegrams.
See editKNXEvent about event configuration.
3.5. Actuator Datapoints
The trivum MusicCenter software can even control KNX actuators, like:
-
KNX binary actuators
-
KNX dimm actuators
-
KNX shutter actuators
This is done in the HomeControl and Automation Objects section of the setup.
For example, if you define a KNX shutter, then you can control this shutter
-
by placing it in the HomeControl page of the WebUI.
-
by adding actions in the WebUI (music page) to control some functions directly.
-
through actions in a trivum macro.
-
or on a trivum Touchpad, by defining it in the page editor, and use it by the touch scren.
Another example, if you define a light switch object, you can toggle that when a zone is switched on or off, by calling macros in the zone event handlers.
See editKNXActuator for details.
3.6. Datapoints of KNX Displays
See setupKNXDisplays about how to integrate KNX displays with trivum.
3.7. Datapoints of Paging
To run a paging controlled by KNX,
-
see editPaging about how to create paging entries
-
see pagingKNX about how to link these with KNX
3.8. KNX Datapoint types (DPT) used by trivum
trivum KNX Datapoints have one of five sizes:
1 bit, 4 bits, 1 byte, 2 bytes, 14 bytes.
the same size can be used for many different purposes.
if you have to specify DPT types in your external
KNX application select one of these:
-
1 bit:
DTP name |
Examples |
1.001 switch |
zone on/off |
1.003 enable |
pause, mute, alarm on/off |
1.002 boolean |
send zone status, mute, alarm on/off status |
1.007 step |
change volume level by one step |
1.010 start/stop |
play next source, tuner, streamer |
1.017 trigger |
key < or >, zone gets on, alarm starts |
-
4 bits:
3.007 dimming control |
volume up/down |
-
1 byte:
5.001 percentage100 |
absolute volume level with knx value 0-255 |
5.010 counter pulses |
play trivum playlist x, tuner preset x, save scene, call scene |
-
2 bytes:
7.001 pulses |
zone command 2 bytes |
9.001 temperat.celsius |
float value (with KNX touchpad) |
-
14 bytes:
16.001 character string iso-8859-1 |
with most KNX displays |
16.000 character string ASCII |
incl. UTF-8 with Tense OLED display |
4. KNX Examples
4.1. A 6-fold KNX control element (music controller)
In this example, a 6-fold KNX control element should control our trivum-multiroom system. The controller should be able to operate some basic functions:
-
previous source / next source
-
volume level +/-
-
mute / power off
-
a 6-fold KNX control element
-
the trivum multiroom system is integrated in your KNX installation via KNX/IP router
-
the KNX support of your trivum multiroom system is enabled and ready for use
4.1.1. Add KNX event
To control the music of your trivum multiroom system using a 6-fold KNX control element, the KNX telegrams of the KNX controller must be assigned to trivum actions. This is done via the trivum KNX events. Each trivum KNX event is the link between a certain type KNX telegram and his corresponding trivum action.
To create and configure an trivum KNX event, proceed as follows:
-
Open the WebConfig
-
Go to: Automation / KNX / Events
-
Click on: Add mapping.
An editor for a new KNX event is opened. -
Enter the following data:
Field |
Description |
Example |
Group Address |
KNX group address that triggers the action |
6/1/1 |
Description |
Name or description of the KNX event |
Bathroom_nextZone |
Change assigned zone |
trivum zone, in which the assigned trivum action is performed |
Bathroom |
Change data type |
Data type of the value that triggers the action |
1 bit |
Value for comparison |
Value that triggers the action when received |
1 |
Change assigned action |
trivum-action to be performed |
nextSource |
Repeat steps 3 and 4 for all other functions the 6-fold KNX controller should have.
HINT: You should make a backup before each change and archive this.
4.2. A simple wall button for next source, and to switch off
If you have a wall button that can only send 1 or 0 on the same group address it is still possible to achieve these two functions.
-
configure zone sources. This is done in the web configuration under:
zones / zone name / change the knx bindings / define the KNX/HTTP source list.
Here you can, for example, configure playback of different web radio stations.
-
configure KNX event to toggle forward through the zone sources:
knx / events / add mapping
set GA: for example 7/1/0 1-bit value 1
set action: activate a source / next source -
configure another KNX event to switch the zone off:
knx / events / add mapping
set GA: for example 7/1/0 1-bit value 0
set action: set volume or state of a zone / off
Result: if your wall button sends 7/1/0 1-bit value 1, it will toggle through
web radio stations.
If it sends 7/1/0 1-bit value 0, it will switch the zone off.
4.2.1. Parameterize KNX-controller
The next step is to parameterize the 6-fold KNX controller (e.g. in ETS) with the correct group addresses matching your KNX event.
5. Solving KNX problems
Most of the problems with KNX/IP is related to wrong or insufficient configuration of the KNX/IP router.
5.1. KNX/IP router
Please make sure that you set the correct unicast and multicast IP addresses. Please refer to KNX/IP router settings.
5.2. KNX/IP interface
These are limited to only a few parallel connections. Make sure that no other (or too many) devices are using the interface at the same time.
5.3. Filter settings
Please make sure that you set the correct filter and routing parameters. Please refer to Filter settings.
5.4. Checkout Aerne KNX Tester
This is an iPhone App which is very helpful to check if your IP router works.
5.5. Network problems
The communication is based on multicast communication.
That means one network participant is sending a message into the network,
and all other participants should receive it, in parallel.
This has to be allowed by the switches - and routers/gateways which might be part of your network.
Please check the following areas:
-
Use a single network switch, not multiple switches
If you have two or more network switches between the KNX IP router and the trivum device, then this may already cause a communication failure, that trivum does not get any KNX message.
Reduce the system. Connect both KNX IP router and the trivum-device to the same network switch. Ideally use a simple, unmanaged network switch like TP-Link 1008P or similar.
Read more details on that under Details of UDP Multicast Communication.
-
Managed network switches
-
Make sure that the switches are allowed to use multicast addresses.
-
Depending on network switch model and firmware, it can help to activate IGMP with Querier, or even to deactivate it.
-
Also check the spanning tree settings.
-
Check if the Switch has the latest Firmware. Run an update if necessary.
-
-
Cabling: double check that no network ring is created.
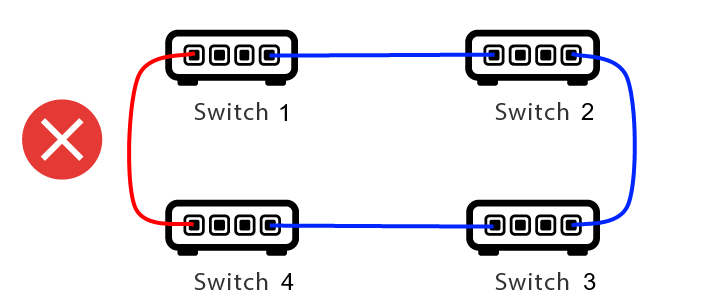
Here is one cable too much.
-
If Switch 1 sends a multicast UDP message, the message may be sent to Switch 2, and from that to Switch 3.
-
and in parallel, it is sent to Switch 4, and from that to Switch 3.
-
and what will Switch 3 do? send two packets to 2 and 4?
In the worst case, it may cause a packet storm: the same packet is repeated many times without intention. So carefully check if every cable is really needed.
5.6. Details of UDP Multicast Communication
KNX messages are sent by UDP multicast, normally on group 224.0.23.12.
5.6.1. Imagine this LAN topology 1:
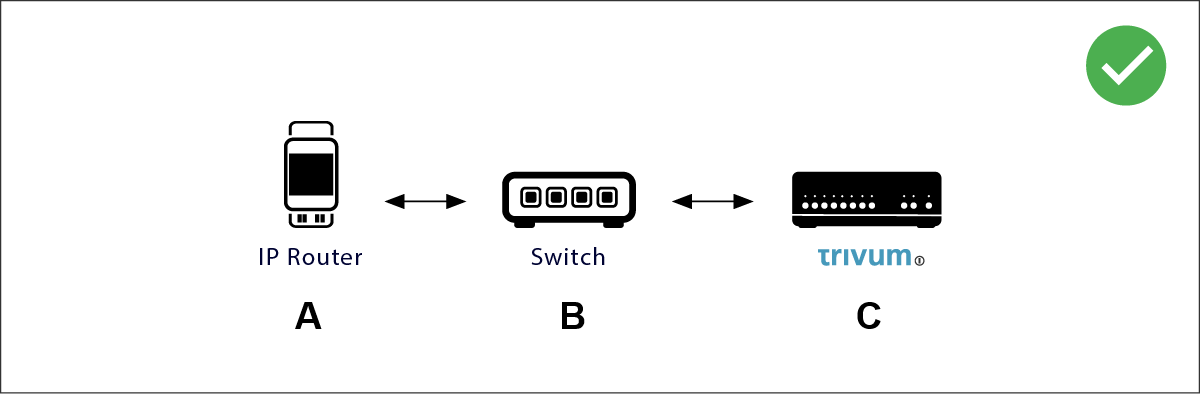
Multicast basically means: device (A) (IP router) gives a KNX message "1/2/3 1bit 1" to the network switch (B), and tells that switch to send this to all other devices in the network.
But switch (B) will not do this. It will not send the message to all devices. Instead, it will only send it to devices which have subscribed to receive messages on group 224.0.23.12. This is the case with device trivum ©, which is connected to the same switch. On startup it told the switch: I want messages for group 224.0.23.12. So normally it gets them.
5.6.2. Imagine this LAN topology 2:
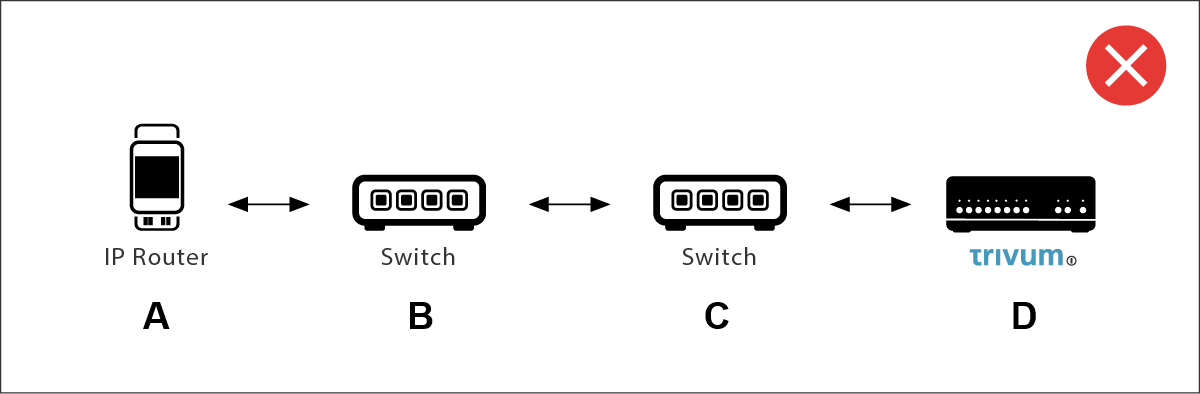
Here is a problem. On startup, trivum will tell Switch ©: I want messages for group 224.0.23.12.
Good. But will Switch© also tell Switch (B) that someone connected to him is interested in that group? Not sure. Depends on the Switch firmware, model, vendor, management settings, etc. etc.
If Switch © does not pass on a subscription request, then KNX messages from (A) will not be passed on by Switch (B).
Therefore, if trivum cannot receive KNX input, connect all to a single, simple network switch.
5.7. Group addresses
If you use filtering in your KNX/IP router, then really make sure that you use a dummy application or another tool to tell the KNX/IP router to not block the group addresses which are used by the trivum system.
5.8. Device addresses
Each bus device on the KNX bus has to have a unique device address. Make sure that you specified a valid KNX device address in the KNX setup of the trivum devices.
|
It is good practice to add the devices which rely on KNX/IP as communication interface also to the ETS configuration, although it is not really necessary.
So please use a simple dummy device, name it to identify that it represents the trivum device and assign a valid device address. |
5.9. KNX scene control
Scenes can be stored and recalled by objects
-
in the HomeControl interface of a trivum music server, under:
Extras / Setup HomeControl / Add KNX Object.
This requires software V9.62 or higher. -
in the HomeControl interface of a trivum Touchpad, under:
HomeControl / Definition / Add KNX Object
This requires software V3.01 or higher. -
on the KNX pages of a trivum Touchpad, under:
user interface / Page Editor
Up to 4 modes are available:
-
Mode 1 covers all objects of the HomeControl or Touchpad KNX area, no matter in which area, or on which screen. It remembers the state of objects within the trivum device. So far only lights and some shutters (with position feedback) are supported.
-
Mode 2 covers only objects in the same HomeControl area, or on the same Touchpad KNX page
-
Mode 3 is only available on a Touchpad KNX screen page. It asks interactively which objects should be saved as part of a scene.
-
Mode 4 does not remember anything in the trivum device, but sends a KNX command to KNX light and shutter actuators, that they should remember or recall their current state. You have to enter a KNX group address in this case, and a scene number, for example 1. Then a long press on the scene will send 129 (save scene 1) to actuators. A short press will send 1 (recall scene 1).
It is recommended to use Mode 4 by default, if your KNX actuators support it.
With modes 1 to 3, a trivum device stores up to 16 scenes.
5.10. KNX music server scenes
If you want to store the current trivum-device state in a KNX scene, perform these steps:
-
under Automation / KNX / Setup KNX communication / Group address for scene save/restore enter a group address, e.g. 1/5/99. for your convenience you may type this as "1 5 99".
to program a scene:
-
configure each zone that should take part in KNX scenes. for example enter: Zones / first zone / KNX bindings / special communication objects / GA scene to include in scene: 1 5 90
-
send by KNX: GA 1/5/90 1-bit value 1. this will tell the first zone that it takes part in the scene.
-
repeat this step with all further zones that should take part in the scene.
-
finally send by KNX: 1/5/99 1-byte value 128. this will save the current state of participating zones as scene 1. value 129 would store a scene 2, and so on.
use a programmed scene:
-
send by KNX: 1/5/99 1-byte value 0. this will call the first scene. value 1 would call the 2nd scene, and so on.
| only basic states of zones are stored, like the current selected source (FM tuner, Streaming, Line input). the system will not store complex informations like the current selected Audio Service Playlist. |
5.11. KNX music server scene examples
The following step by step example requires that you have the ETS software for Windows. In this software, you can open the group monitor, then send KNX messages by this group monitor for testing.
5.11.1. store a scene 1 with 2 zones
-
In a web visualization, do this manually:
Switch zone 1 on, selecting FM Tuner source.
Switch zone 2 off.
Now zone 1 is on, zone 2 is off.
We want to store this overall system state as a scene. -
configure in zone 1:
configuration / zones / zone 1 / knx bindings / GA to include in scene:1/2/3 -
configure in zone 2:
configuration / zones / zone 2 / knx bindings / GA to include in scene:1/2/4 -
tell zone 1 and zone 2 that they will take part in the next scene:
-
in the ETS group monitor, send a 1-bit value 1 to GA 1/2/3.
-
in the ETS group monitor, send a 1-bit value 1 to GA 1/2/4.
-
now zone 1 and zone 2 know that their current state should be saved when the next scene save command is received. no scene is saved yet. this was just a preparation.
-
configure globally:
automation / knx / setup / group address for scene save/restore:2/1/0 -
send command to trivum to save the current state of zone 1 and zone 2 as scene 1. to do so
-
in the ETS group monitor, send 1-byte value 128 to GA 2/1/0
because "128" means "save the first scene" (1-1+128).
(do not use a different data type then 'byte' for sending)
-
-
Now the system saves scene 1 with these informations:
-
zone 1 should be on, with FM tuner.
-
zone 2 should be off.
-
5.11.2. recall a scene 1 with 2 zones
-
switch all zones off
-
send a command to trivum to recall scene 1. to do so
-
in the ETS group monitor, send an 8-bit value 0 to GA 2/1/0
because "0" means "recall the first scene" (1-1+0).
-
-
Now the system should recall scene 1 with this state:
-
zone 1 is on, with FM tuner.
-
zone 2 stays off.
-
5.11.3. store a scene 2 with 3 zones
-
open the trivum app or WebUI, and put the system into this state:
-
switch zone 1 on with fm tuner.
-
switch zone 2 on with line input 1.
-
switch zone 3 on with streaming.
-
-
prepare the zones KNX configuration:
-
configuration / zones / zone 1 / knx bindings / GA to include in scene:
1/2/3 -
configuration / zones / zone 2 / knx bindings / GA to include in scene:
1/2/4 -
configuration / zones / zone 3 / knx bindings / GA to include in scene:
1/2/5
-
-
tell the zones that they will take part in the next scene:
-
in the ETS group monitor, send 1-bit value 1 to 1/2/3.
-
in the ETS group monitor, send 1-bit value 1 to 1/2/4.
-
in the ETS group monitor, send 1-bit value 1 to 1/2/5.
-
the scene is not saved yet!
-
configure globally:
-
automation / knx / setup / group address for scene save/restore:
2/1/0
-
-
tell the trivum-device to store scene 2:
-
in the ETS group monitor, send 8-bit value 129 to
2/1/0
because "129" means "save the second scene" (2-1+128).
-
5.11.4. recall scene 2 with 3 zones
-
set all zones off
-
tell trivum to restore scene 2:
-
in the ETS group monitor, send 8-bit value 1 to 2/1/0.
because "1" means "recall the second scene" (2-1+0).
-
-
now this sould happen:
-
zone 1 switches on with fm tuner.
-
zone 2 switches on with line input 1.
-
zone 3 starts streaming, and plays the streaming content last used in that zone. (selected content is not stored in scene!)
-
5.12. Tracing/Logs
If you want to check if the trivum device can receive KNX telegrams, you should
-
enable tracing of KNX messages under:
automation / knx / setup knx communication / trace bus communication -
then go to: automation / knx / knx monitor
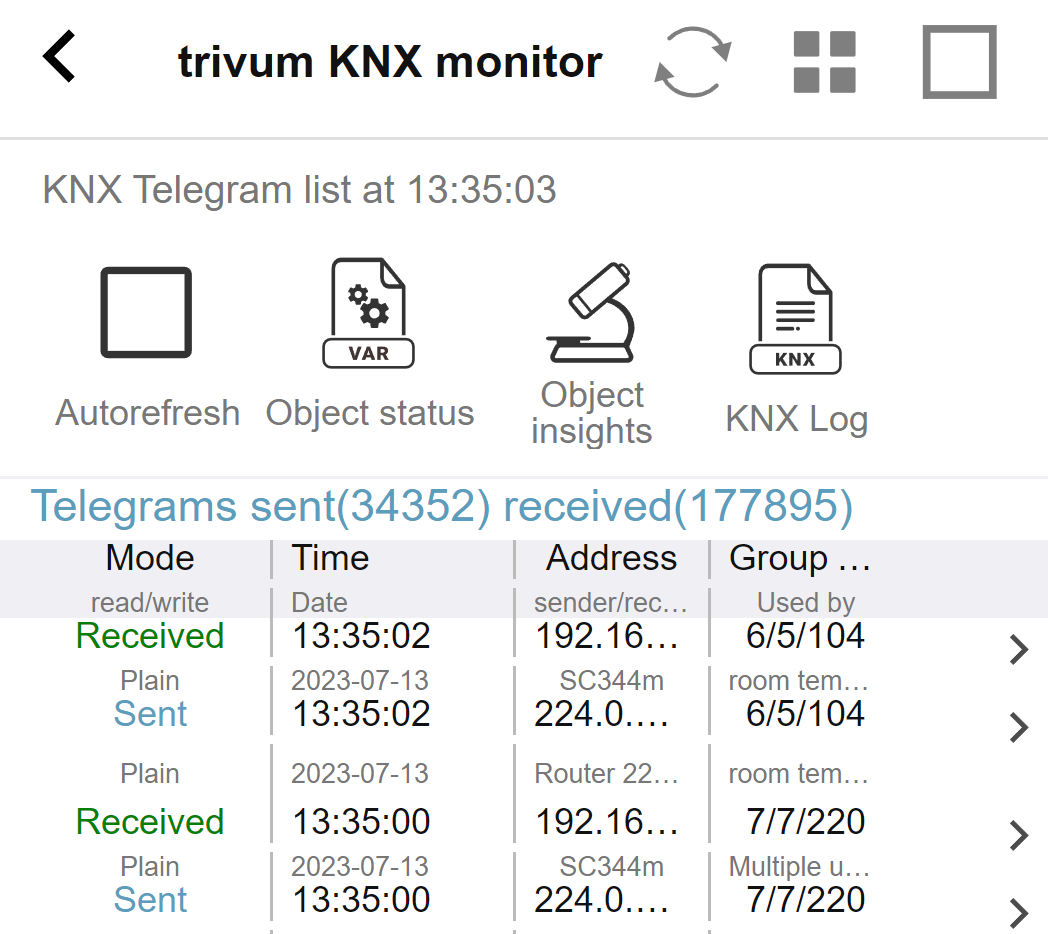
this is an interactive view which updates automatically,
which is helpful to see if anything comes in.
With much traffic, however, you may loose overview,
and informations are cut, especially in mobile view.
In that case better use the KNX Log under:
Automation / knx / knx monitor / KNX Log / Print
5.13. Gira X1 integration with trivum
Gira X1 can be used as IP interface
The Gira X1 contains an IP interface, and can be connected with trivum through KNX interface mode. This requires trivum software V9.60 or higher.
Please note that the X1 is not an IP router, but just an interface. It can handle up to 3 ip interface connections in parallel, for example with one trivum MusicServer, and 2 trivum Touchpads.
If you have more devices that need to communicate with the X1, an extra IP router is required, like the Siemens N146, which sends UDP multicast messages on group addresses like 224.0.23.12.
Integration steps with Gira G1
In a project for the Gira G1, or the Gira Smart Home app,
you create a web browser object. There you type an url like
http://trivumip
containing the IP address of your trivum MusicServer system.
Then you can use the full trivum music control within Gira.
Furthermore you can define in your Gira project some KNX switches to control trivum. They will send KNX messages which are sent via the X1 to the trivum device, for example to play a music favorite.
5.14. Gira HomeServer notes
Gira HomeServer requires an extra IP router
The Gira HomeServer itself contains no IP router or interface, so it can not pass through KNX messages from the KNX wire to LAN for trivum. So the Gira HomeServer requires an extra IP router for communication.
5.15. Gira QuadClient integration notes
5.15.1. WebTouch customization by parameters
By default it is sufficient to configure an URL in your QuadClient browser plugin,
like http://trivumip, and the WebTouch is shown.
But you can change the appearance and improve control by adding parameters, like for example
http://trivumip?parm1=value1&parm2=value2
Supported parameters are:
|
select white user interface. Default is black, which can also be changed in system setup. |
|
select black user interface. |
|
change content size to enforce display of n rows in menus and result lists. |
|
give the WebTouch a numeric or text ID to identify it in the trivum setup |
Example:
?skin=white&rows=10
Example:
?skin=black&rows=15
5.15.2. Gira QuadClient only shows a black screen
This happens if the firmware of your HomeServer differs from the HS+FS Experte software (and QuadClient therein).
For example, we had one report of a HomeServer with firmware 4.11.0 and HS+FS Experte 4.11.3. This only produced a black screen in QuadClient, not just with trivum, but with any website URL. The solution was to update the HomeServer to the same firmware, in that case 4.11.3.
You can find the installed HomeServer firmware version by logging into the HomeServer and looking in the debug area.
5.15.3. Gira QuadClient browser compatibility
Using the correct web browser: IE 10 or higher
Gira QuadClient is a software running on Touchpanel PC’s with Windows operating system.
Before trying to integrate the trivum web visualization
in a QuadClient project, make sure that the Windows system
contains at least Internet Explorer 10 or higher.
It will not work with older version of Internet Explorer.
To find out the browser version used on the PC,
you may configure a browser in the QuadClient with this url:
If this shows that your QuadClient uses IE 7 you must update the web browser and/or Windows system, or read the below article.
URL for integration
Just use http://trivumip, for example: http://192.168.1.200/
5.15.4. Gira QuadClient: how to fix IE7 mode with IE11
Even if you have IE11 on your Windows system, the Gira QuadClient may use Internet Explorer in IE7 mode, so all you get is an error message by trivum.
For best information about the browser mode used, we recommend to configure two browser plugins in the same Gira quadrant, with URL’s:
http://yourtrivumip/             - name: trivum
http://www.whatismybrowser.com/  - name: test
Now run the QuadClient, and you see:
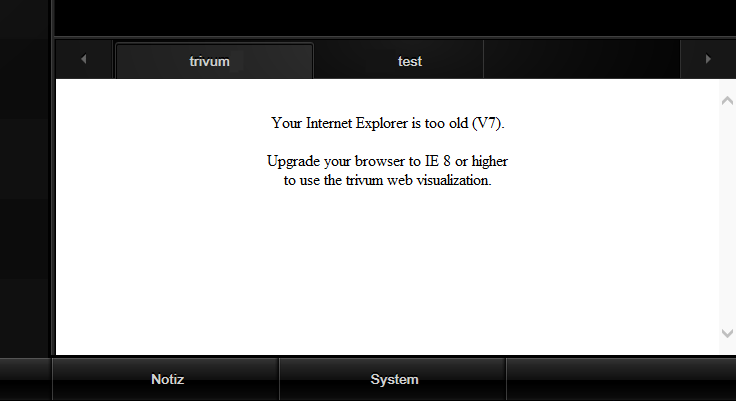
To fix this,
-
stop the QuadClient
-
download the file fix-gira-ie7-mode.zip
Extract the zip file, and run fix-gira-ie7-mode.reg.
This will enter a single value into the Windows registry:HKEY_CURRENT_USER\Software\Microsoft\Internet Explorer \Main\FeatureControl\FEATURE_BROWSER_EMULATION hs_client_net.exe = dword:00002af9 -
alternatively you may enter the value manually:
-
run the Windows Registry Editor,
regedit -
go to the
HKEY_CURRENT_USERlocation given above -
select "new DWORD value" with name: hs_client_net.exe and value 2af9 (hex)
-

-
run the QuadClient again. The error is gone.
On very first use, the IE may only show a blank area.
-
This can be fixed manually by a reload, e.g. via right mouse button, or in our example by switching to the second tab, and then back to trivum.
to automate this reload, go in the trivum-setup to
system / setup / advanced settings
the type the advanced option string "fixgrayie".
5.15.5. Gira QuadClient known issues on Touch PC
On touch panel PC’s any kind of long press may not work within the Gira QuadClient.
If this happens, go into the web configuration:
V9:
-
go to: system / setup / user interface details, and activate: use +/- buttons for volume control.
-
go to: devices / control units, therein select the control unit matching your touch PC. enable: Off on power short press.
V10:
-
go to: devices / apps and touchpads / general settings, and activate: use +/- buttons for volume control.
-
go to: devices / apps and touchpads, therein select the control unit matching your touch PC. enable: Off on power short press.
Diverse functions in the KNX area within the web visualisation will not work, for example any kind of popups on RGB, dimmer or climate controls. Do not use these, but instead use the KNX controls of your Gira installation.
5.16. Integration in visualizations of other vendors
If your wall panels contains an integrated web browser you can test trivum integration, even without trivum hardware, by configuring the web visu URL from our online demo:
This will require hardware with one of these web browsers:
-
Internet Explorer 10 or higher. (IE7 to 9 will not work!)
-
Firefox
-
Chrome
5.17. KNX Configuration
5.17.1. zoneKNX
Here many basic KNX settings can be configured per zone.
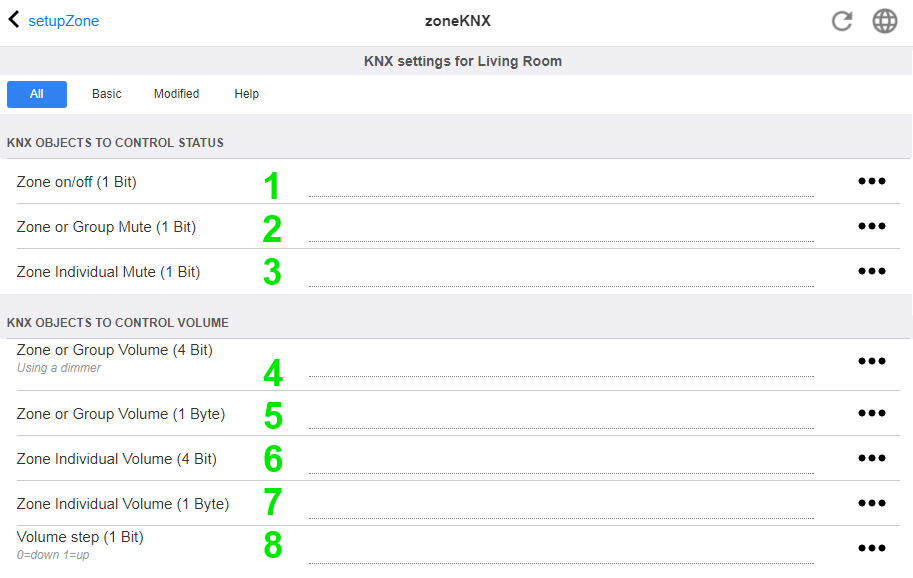
1 - enter a KNX group address (GA) here to switch the zone on or off by a 1-bit message with value 1 or 0. switching on means to play the most recent selected source again.
(After a system restart, no most recent source exists, therefore it will play the first defined KNX source, described further below.)
| KNX addresses can be entered like 1/2/3 or, much easier, like 1 2 3 |
2 - GA to toggle mute of the zone or, if the zone is part of a group, of the whole group.
3 - GA to toggle mute only of this zone, no matter if grouped or not.
4 - control zone or group volume by a 4-bit KNX message. for example, receiving value 1 starts dimm down, which runs until volume 0 is reached, or value 0 is received.
5 - control zone or group volume by a 1-byte KNX message. KNX values 0 to 255 are converted internally to trivum volume values from 0 to 100.
6 and 7 - this controls the volume level of just this zone, no matter if grouped or not.
8 - change the volume in one step, up or down, through 1-bit messages.
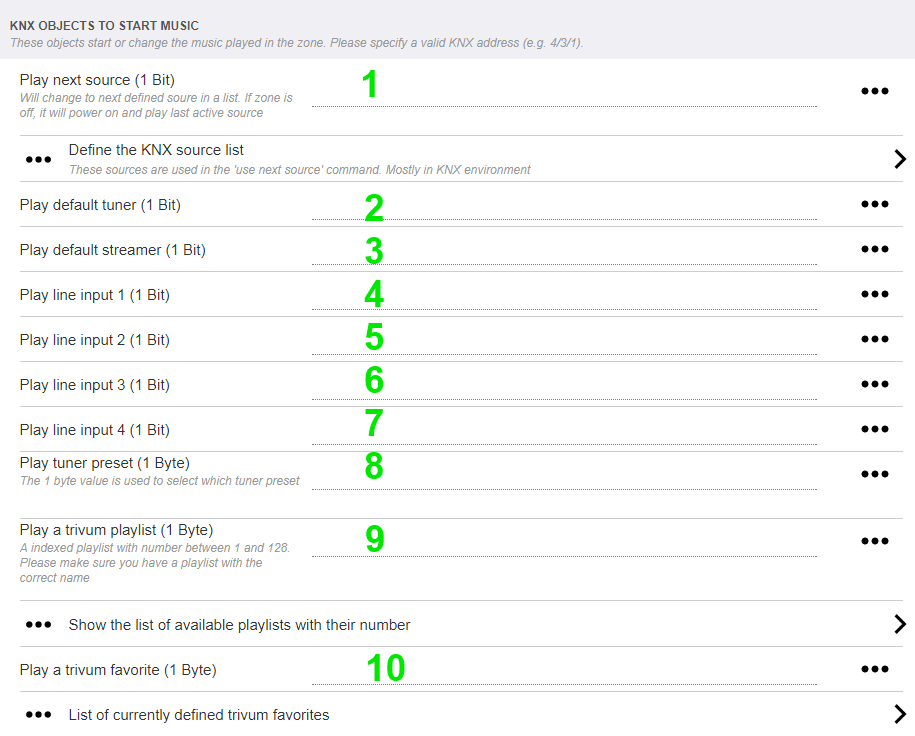
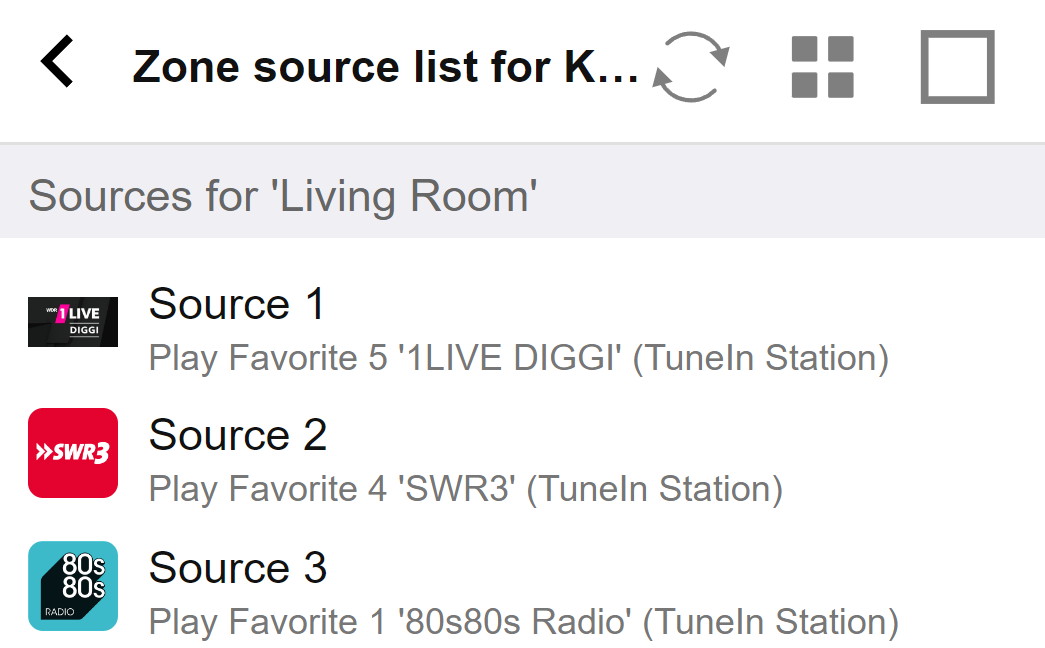
1 - the KNX sources are a set of actions to start a specific source, and/or to select a content within a source. by configuring a GA here the user may toggle between these actions by a 1-bit message.
2 - start FM tuner by a 1-bit message
3 - start streamer. this will play the most recent selected content within that streamer, if any.
4 to 7 - select line inputs.
8 - if you have defined FM tuner presets, start them here, with value 0 being the first preset.
9 - if you have NAS playlists with a name starting like "P1 mylist" or "P2 mylist" then a KNX 1-byte message value 0 will play "P1 mylist".
10 - if trivum favorites are defined play them directly here.
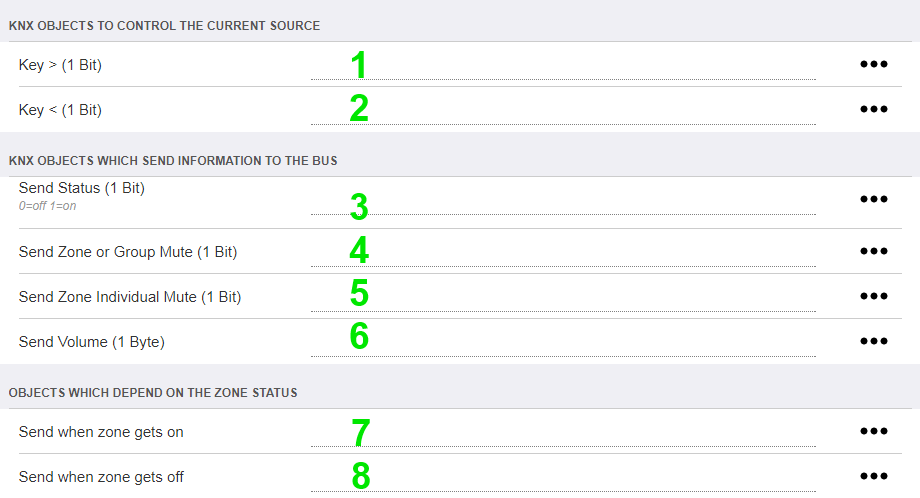
1 and 2 - skip to the next or previous thing in the current selected music. For example, while playing an album, this will skip to the next track.
3 - send the zone status to the KNX bus: 0=off 1=on (including mute)
4 and 5 - tell to the KNX bus if the group or zone is muted
6 - send current zone volume level as a KNX 1-byte message, with range 0 to 255
7 - use this to configure in detail what to send when the zone is switched on. may send a value "1" or "0".
8 - use this to configure in detail what to send when the zone is switched off. may send a value "1" or "0".
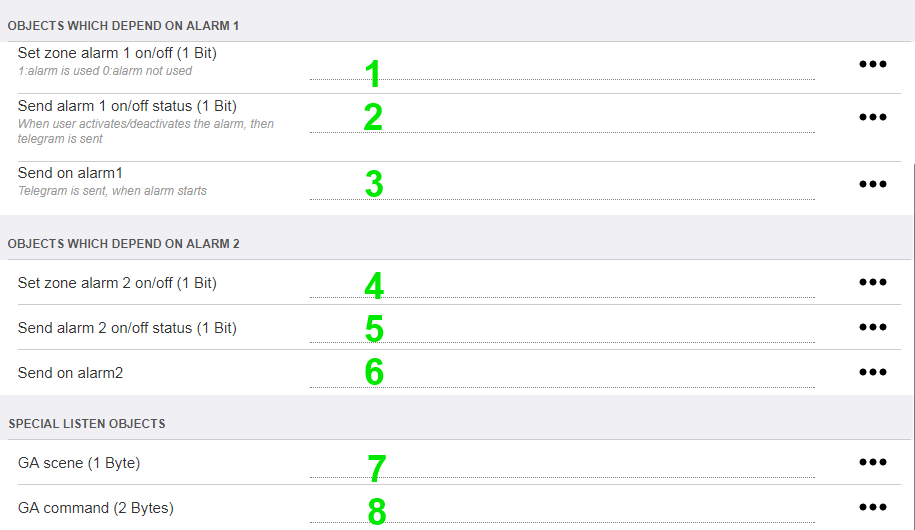
1 - set alarm clock to be active or inactive
2 - tells when alarm clock activity is toggled via UI
3 - sends 1-bit value "1" if alarm clock starts playing
4 to 6 - same settings for the 2nd alarm clock of this zone
7 - GA to tell this zone if it’s part in a current scene.
this is used in combination with:
Automation / KNX / Setup KNX communication / Group address for scene save/restore.
read details under: KNX music server scenes
8 - directly run a command in this zone through a 2-byte KNX value.
for the possible values see the list of zone commands in the
trivum API
documentation.
here is an excerpt of codes:
ZONECMD_POWER_OFF              001
ZONECMD_MUTE                   002
ZONECMD_VOLUME_INC             003
ZONECMD_VOLUME_DEC             004
ZONECMD_POWER_TOGGLE           006
ZONECMD_VOLUME_INC2            009
ZONECMD_VOLUME_DEC2            010
ZONECMD_VOLUME_INC5            011
ZONECMD_VOLUME_DEC5            012
ZONECMD_USE_PREV_SOURCE        029
ZONECMD_USE_NEXT_SOURCE        041
ZONECMD_USE_NEXT_ZONE          042
ZONECMD_DEFAULT_STREAMING      050
ZONECMD_DEFAULT_TUNER          051
ZONECMD_VOLUME_DEC_1           080
ZONECMD_VOLUME_DEC_10          089
ZONECMD_VOLUME_INC_1           090
ZONECMD_VOLUME_INC_10          099
MULTIKEY_BASIC_FORWARD         400
MULTIKEY_BASIC_BACKWARD        401
for example,
-
sending a value 1 will power the zone off
-
sending 400 (as 2 bytes value 1 144) will skip to the next track.
5.17.2. editKNXEvent
The screen to change a KNX event definition looks like this:
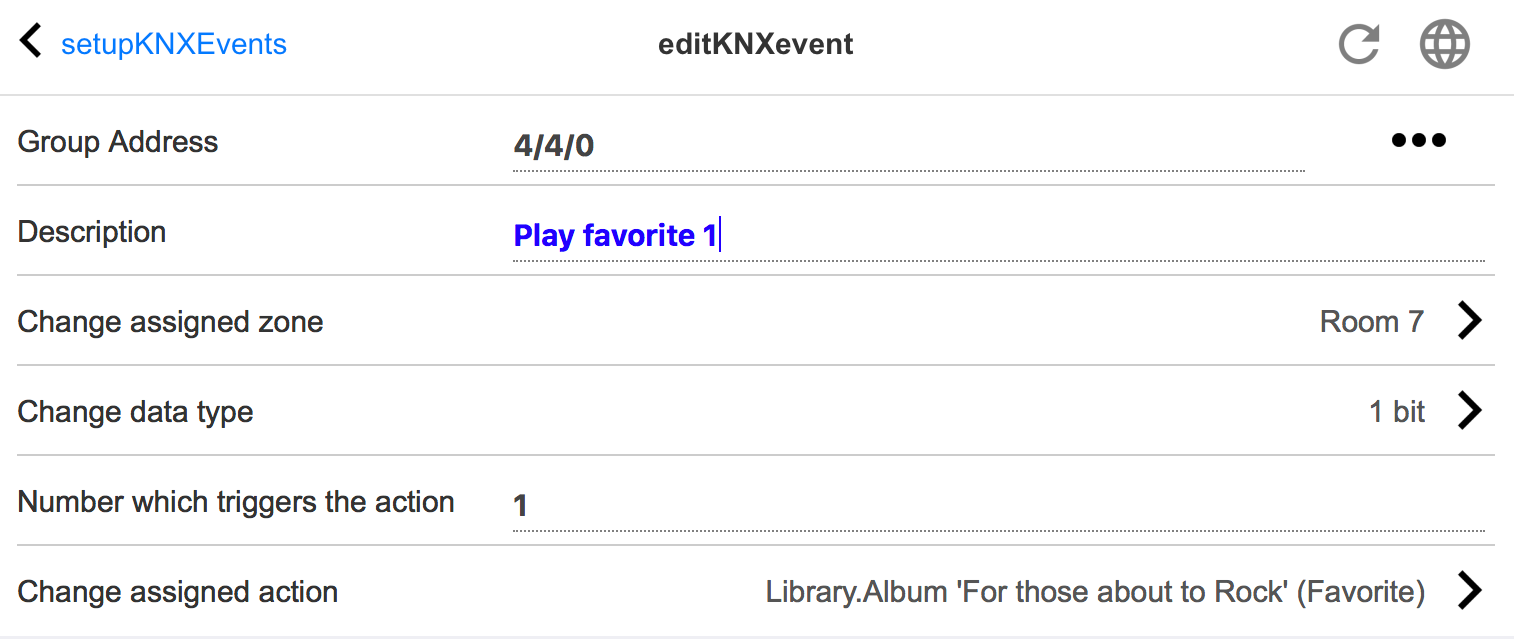
- Group Address
-
You can use the
 icon to select a KNX address from a list of imported KNX group addresses.
Or you can just enter a group address (e.g. 4/3/2).
icon to select a KNX address from a list of imported KNX group addresses.
Or you can just enter a group address (e.g. 4/3/2). - Description
-
This is helpfull to remember what the Event does
- Assigned zone
-
Many actions need the zone information. If the actions starts playing music, then this field specifies in which zone.
- Data type
-
The following values can be received:
datatype description binary value
1 bit - just 0 or 1
byte value
8 bits - values from 0-255
2byte value
16 bits - values from 0 65535
string value
string with up to 14 bytes
- Trigger filter value
-
When a KNX telegram with the specified group address is recognized, then the content of the telegram is compared with this filter value. Please be aware, that the data type has to match!
- Assigned trivum action
-
Many different actions are possible, like activating a Line Input, playing a favourite, or switching a zone off. Just click into "Change assigned action" and follow the interactive selection menus.
5.17.3. editKNXActuator
The screen to edit a KNX automation object looks like this:
1 - name
2 - on/off GA
3 - optional GA to read current status. relevant only if toggle actions are used.
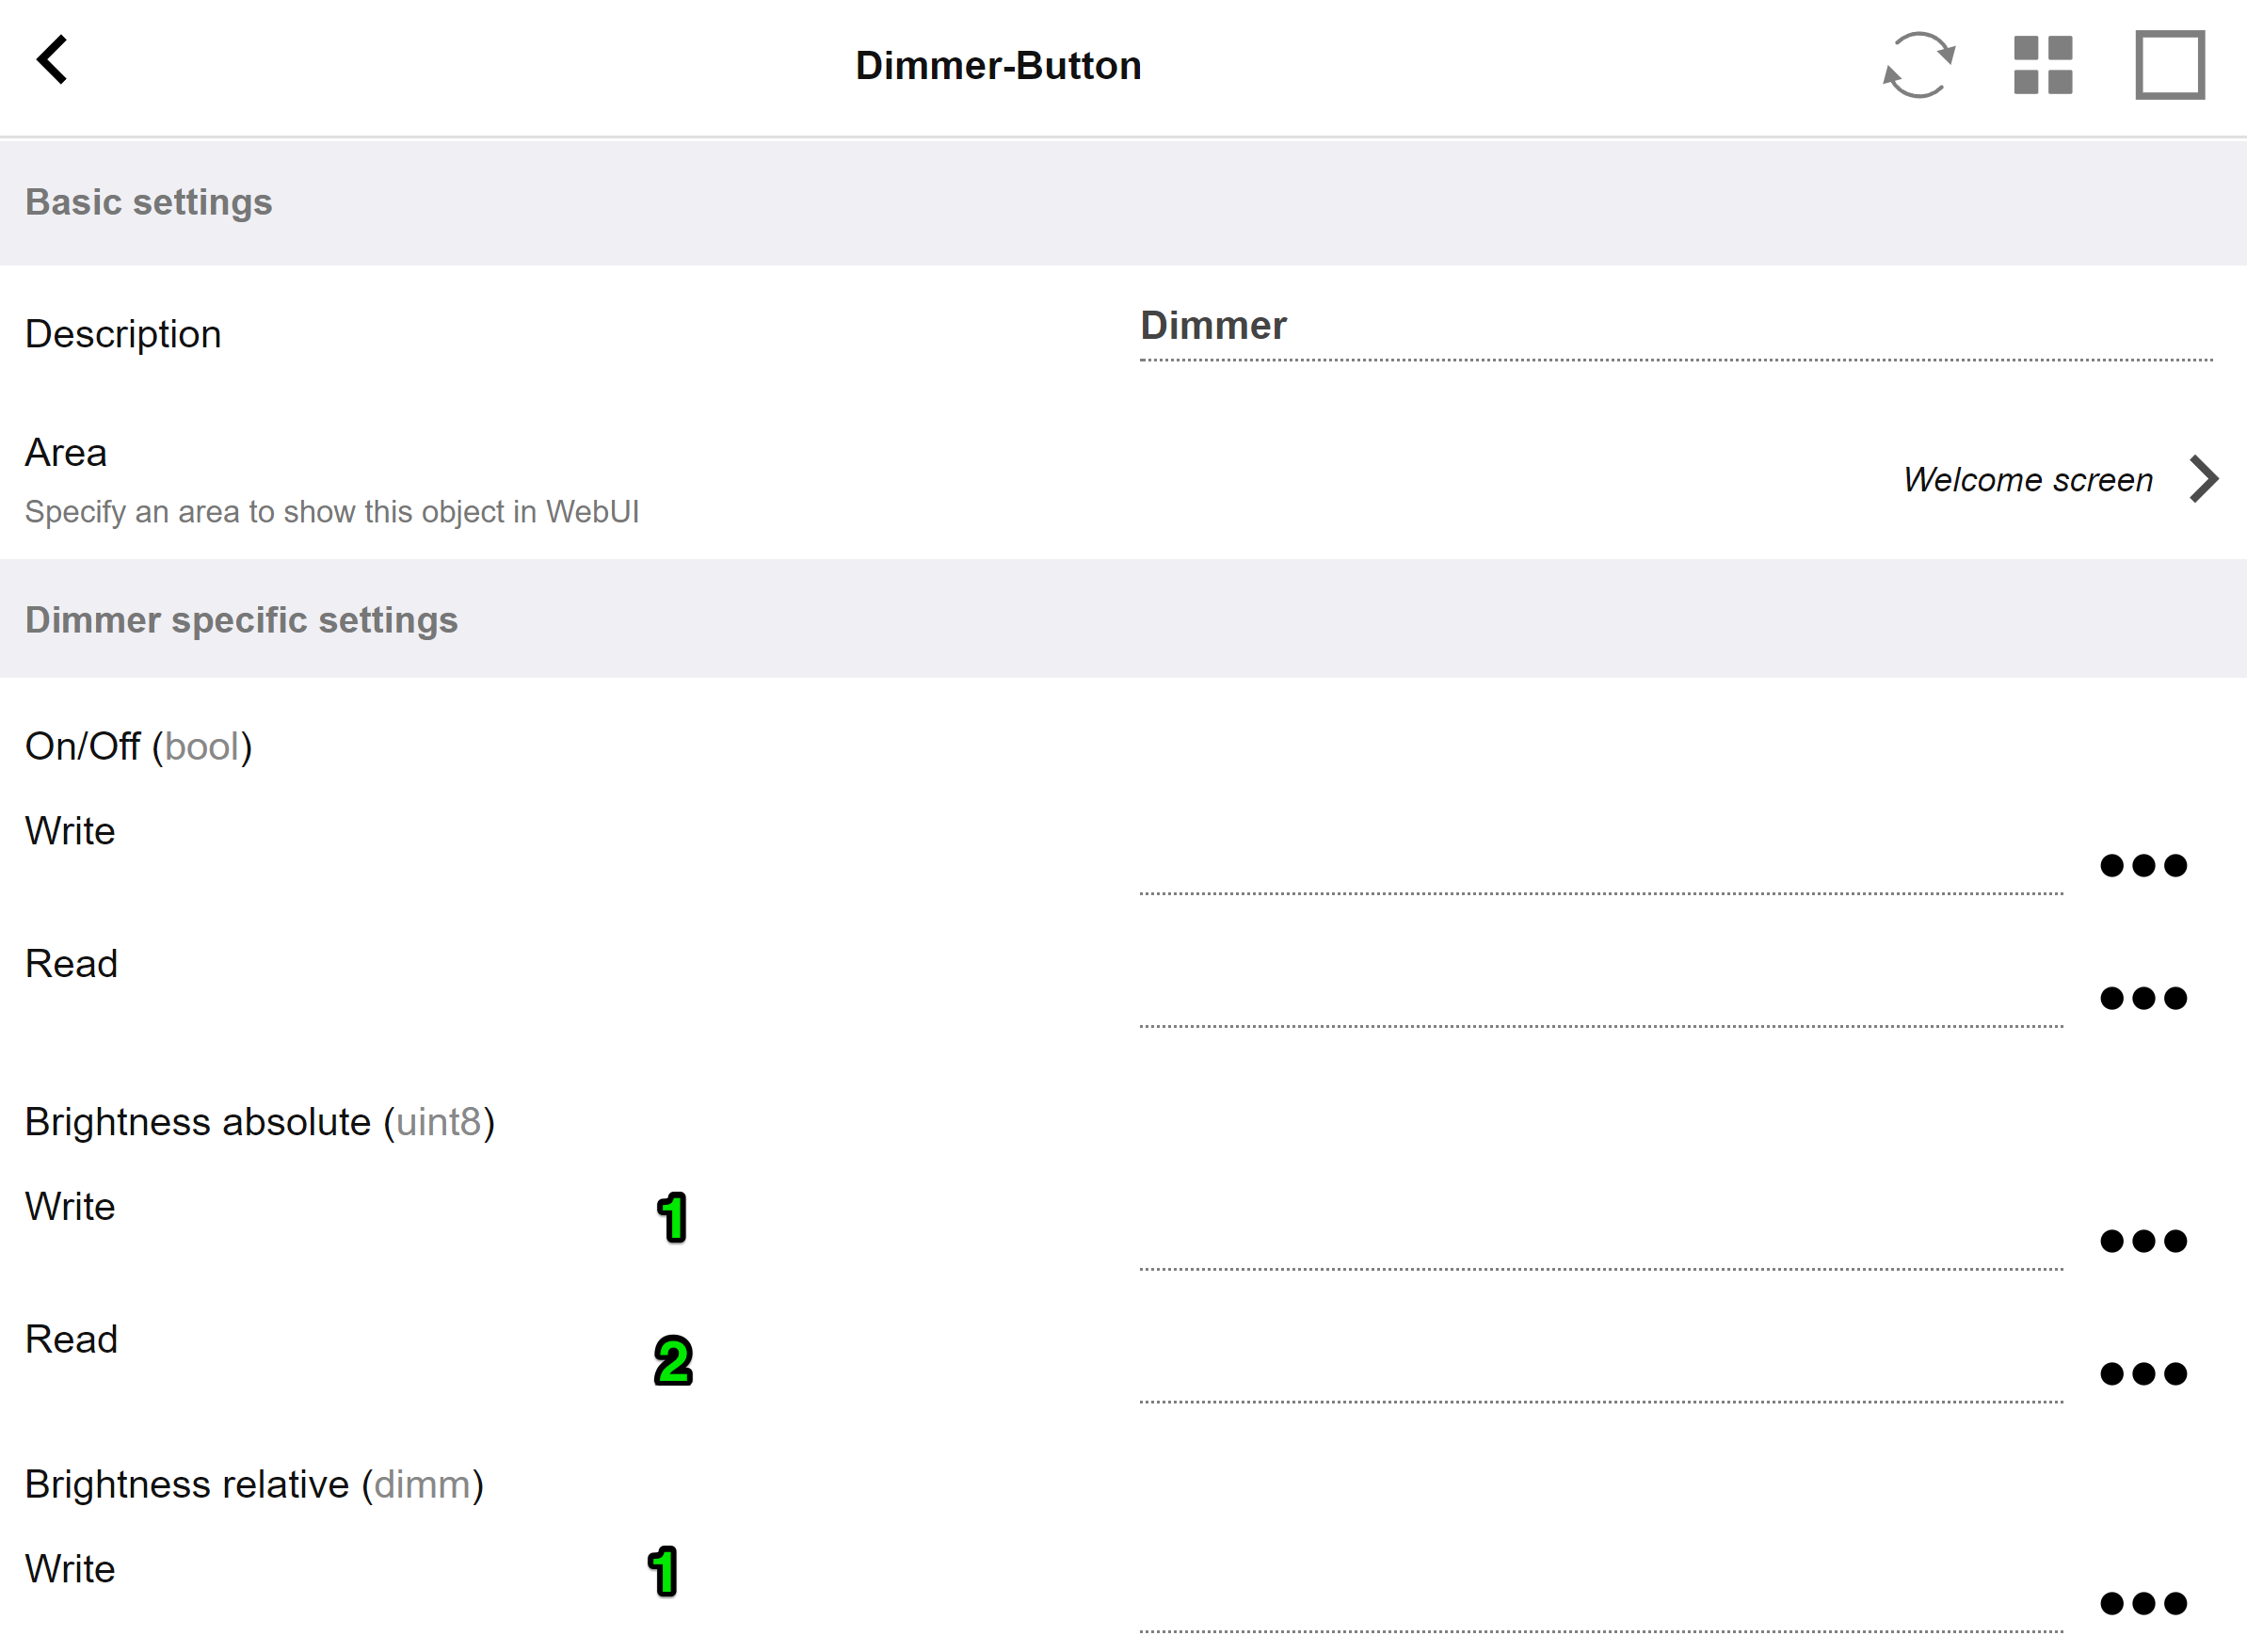
the dimmer is a binary actuator, extended by fields to set (1) or read (2) brightness.
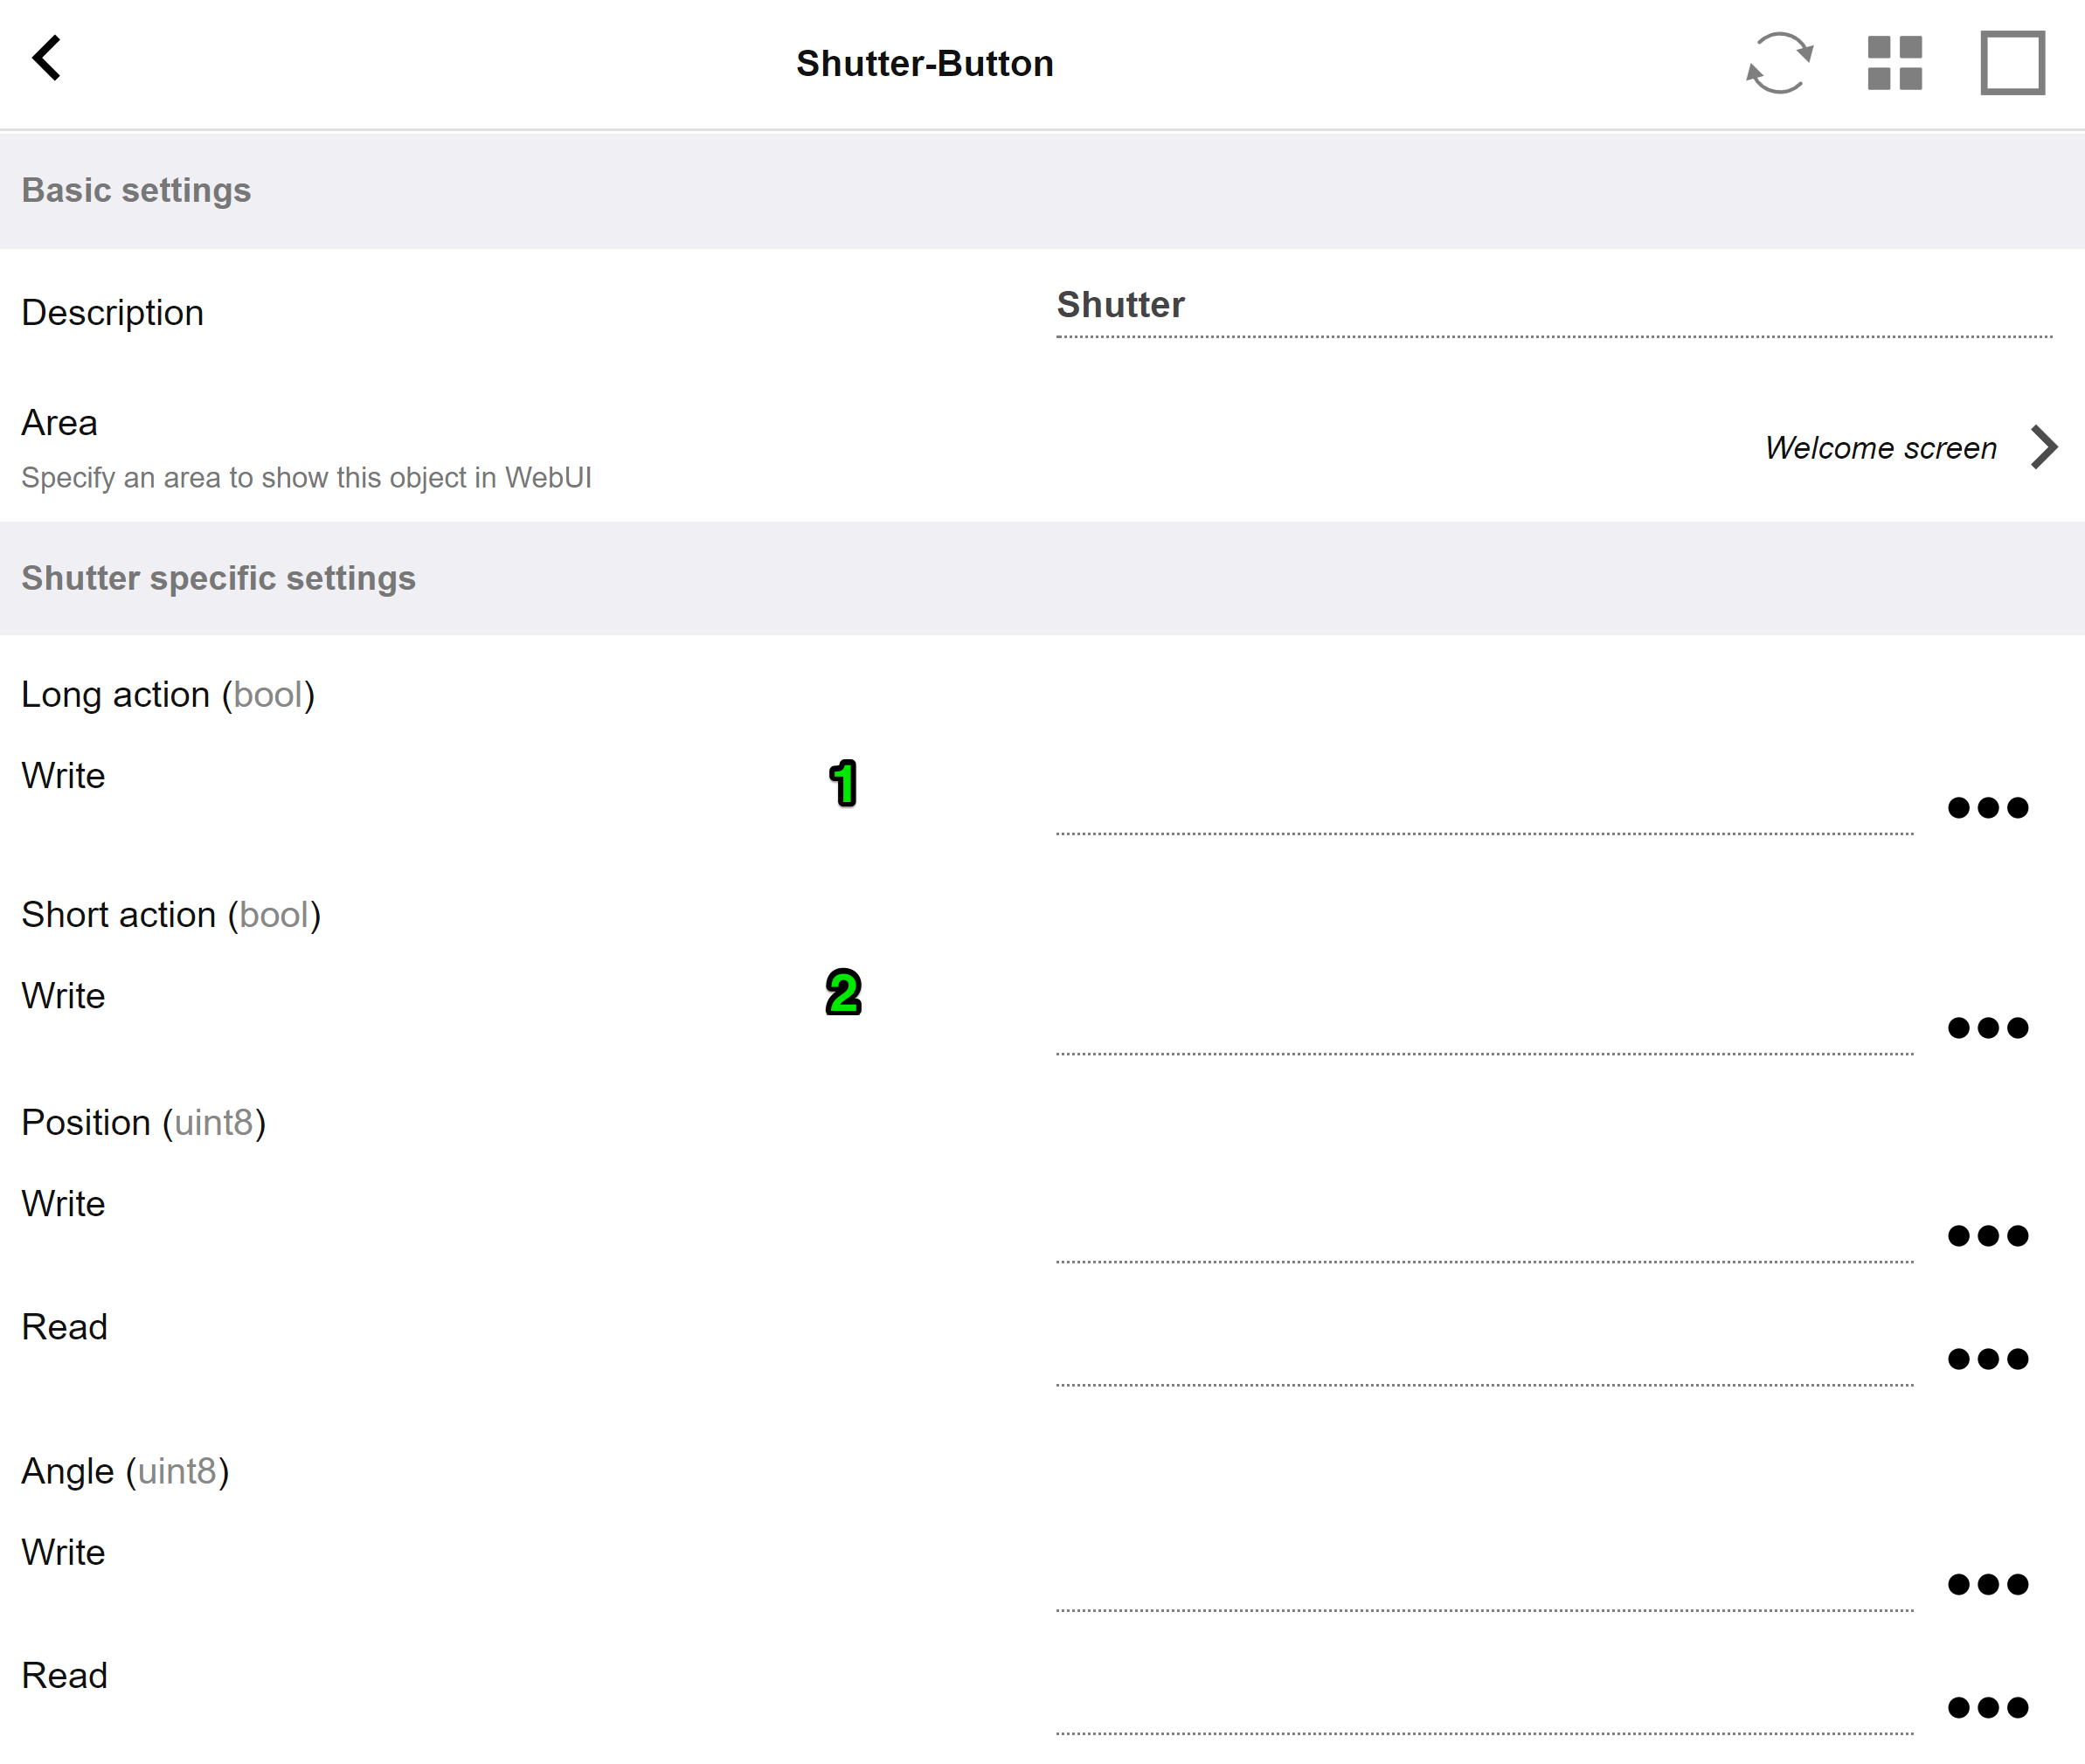
Most important with a KNX shutter actuator are the long action (1) to drive it fully up or down, and short actions (2) to change the slat angle. Direct writing of Position and Angle as an 8-bit value may be supported only by some KNX actuators.
5.17.4. Actuator example uses
Example 1: define them in the HomeControl area of the setup,
under Automation / Setup HomeControl
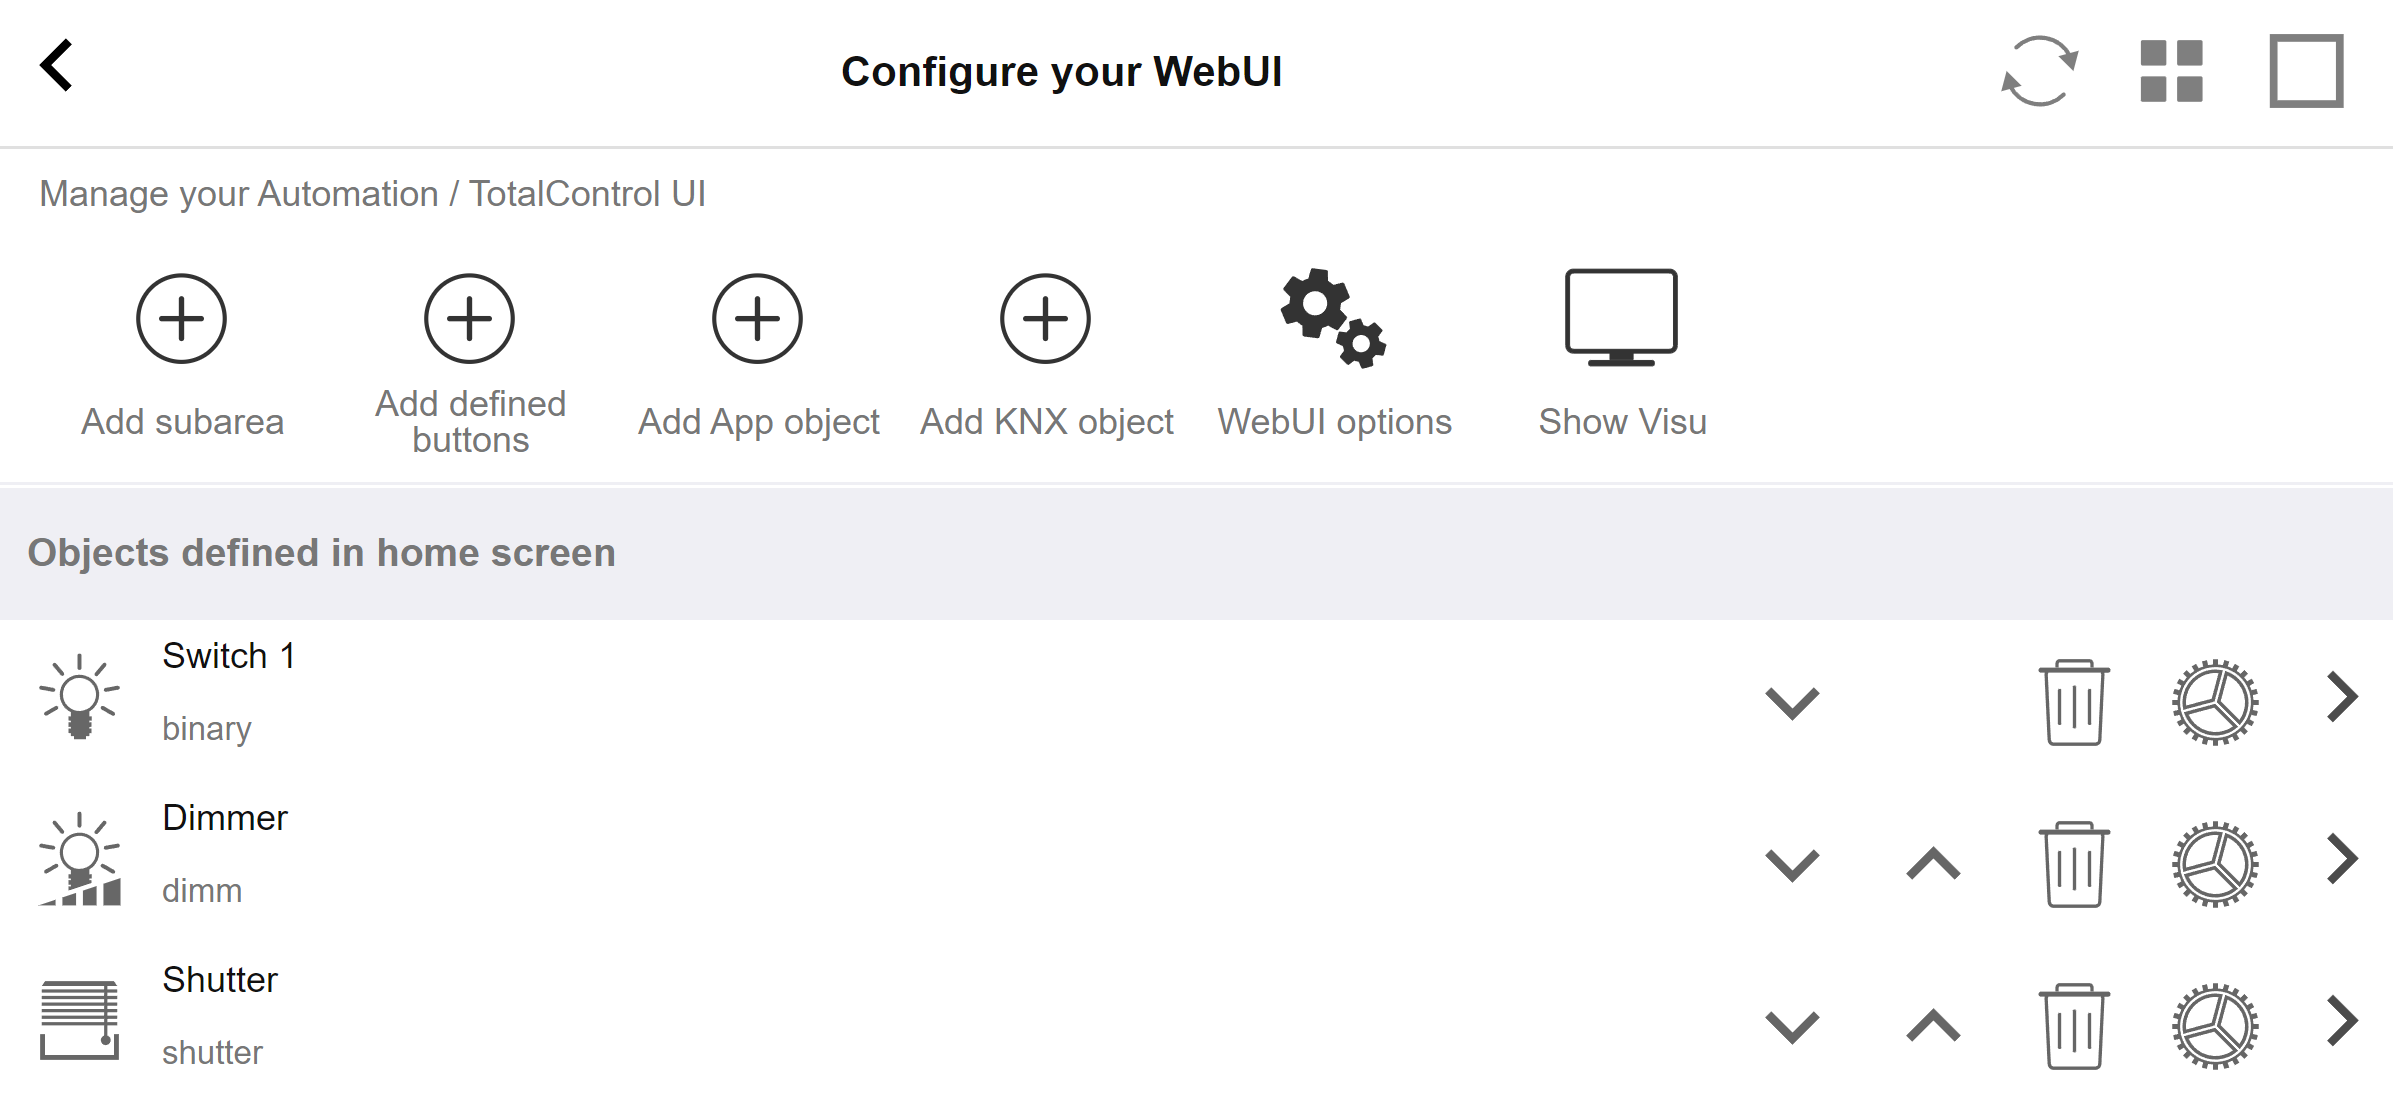
so they can be used in the HomeControl page of the WebUI.
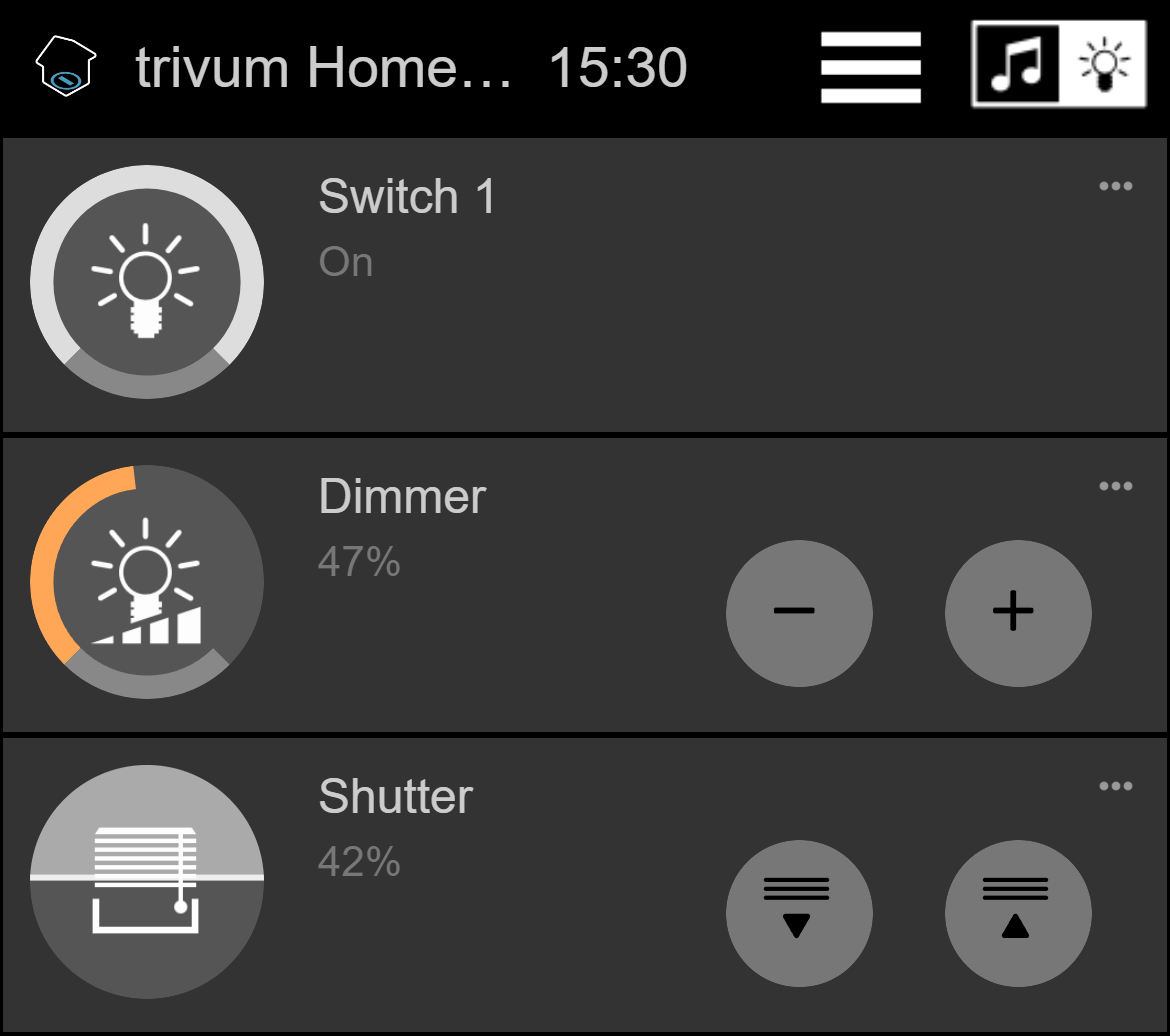
Therein, you can also mark it as a favorite
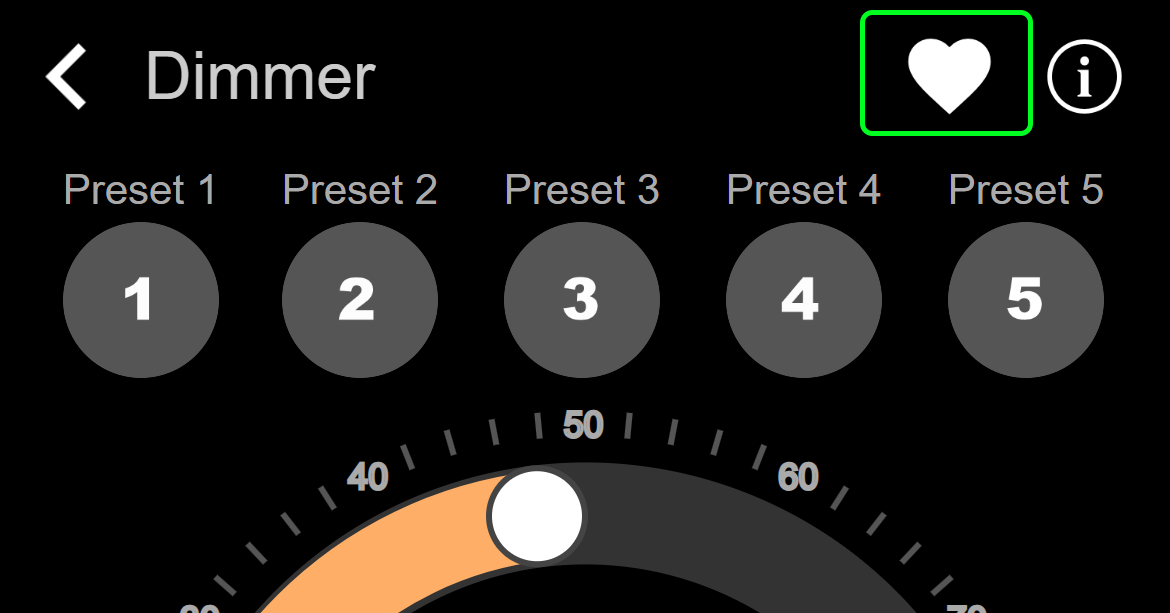
to make it appear in the music page of the WebUI, as a tile.
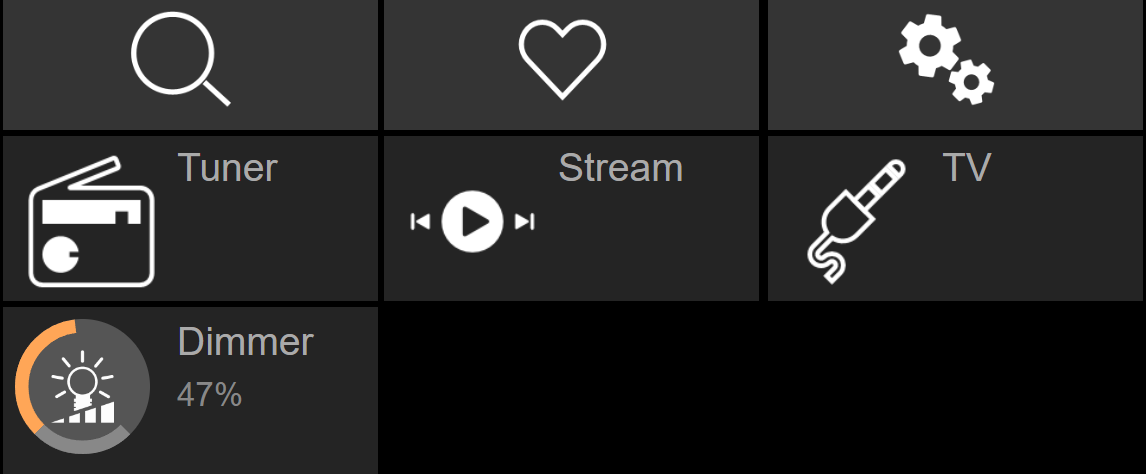
With this shortcut, the dimmer can just be be switched on or off. For full control, you still have to change to the HomeControl page as shown above.
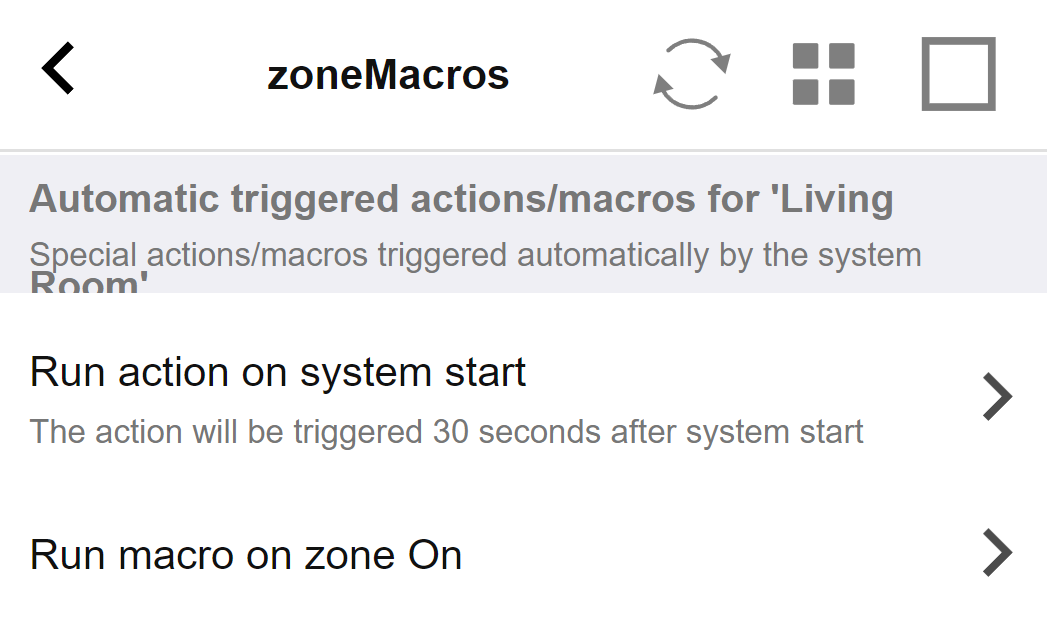
Example 2: create a macro which switches a light switch on,
in V9 under: Configuration / Macros / new / trivum Action / action in zone / Control Automation objects
in V10 under: Customize / Macros / new / trivum Action / action in zone / Control Automation objects
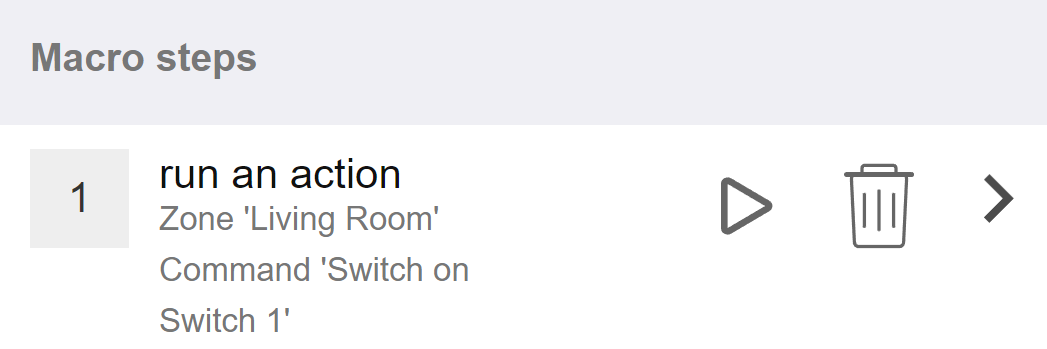
and call it when the zone gets switched on by a music selection.
in V9 under: zones / zone / zone related macros
in V10 under: zones / zone / event handlers for this zone
5.17.5. setupKNXDisplays
KNX displays are hardware units displaying 1 to 4 lines of text.
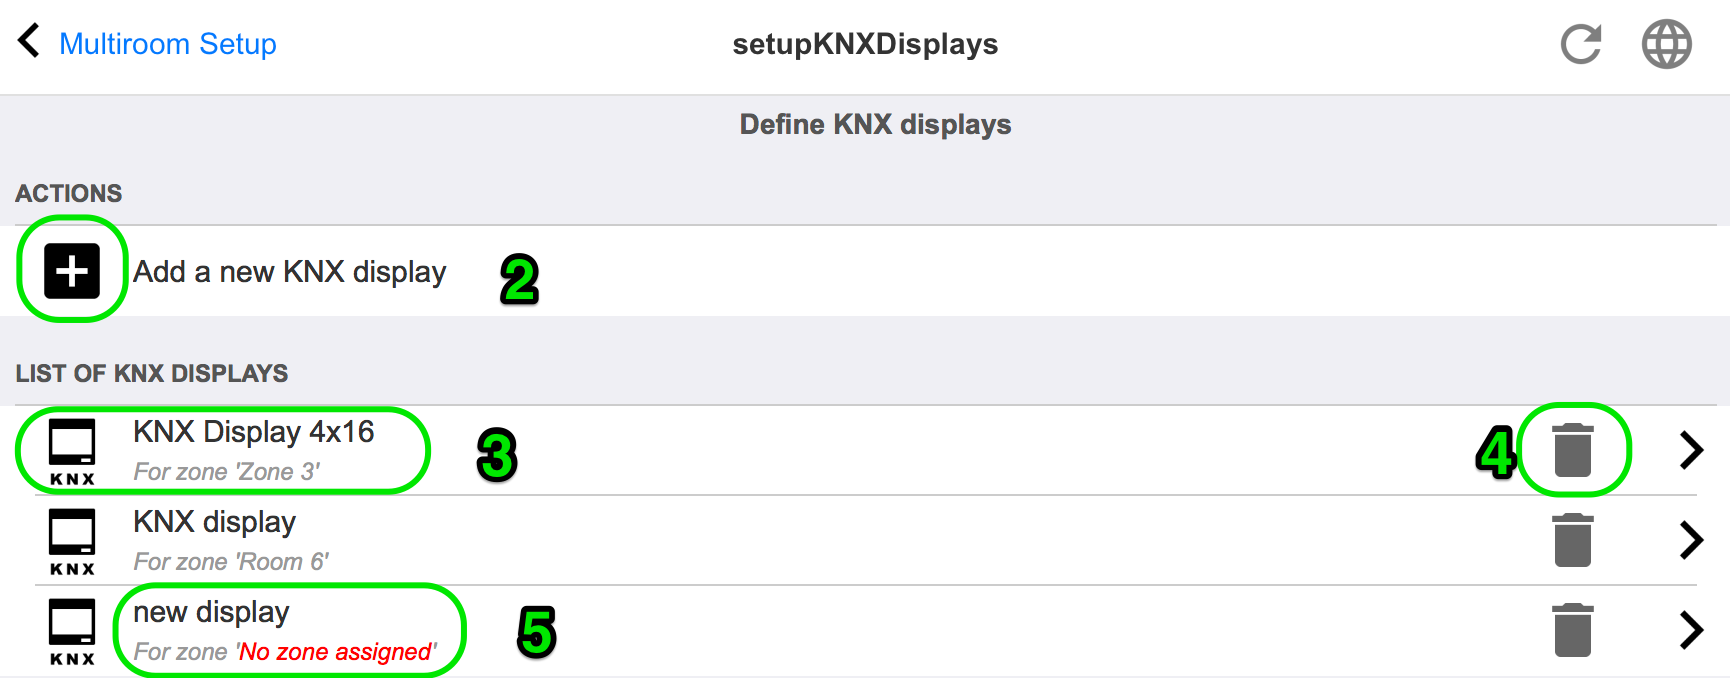
- 2 - Add a new KNX display
-
Click here and you get a new empty definition for a KNX display.
- 3 - Selection area
-
Click here to open the editor for one of the KNX displays. All the settings will be edited there.
- 4 - Icon for Delete
-
If you want to remove a display, just click on the
 icon.
icon. - 5 - Description and messages
-
If the KNX display is not fully or wrong configured, you will see a red message here.
5.17.6. editPaging
The screen to change a paging definition looks like this:
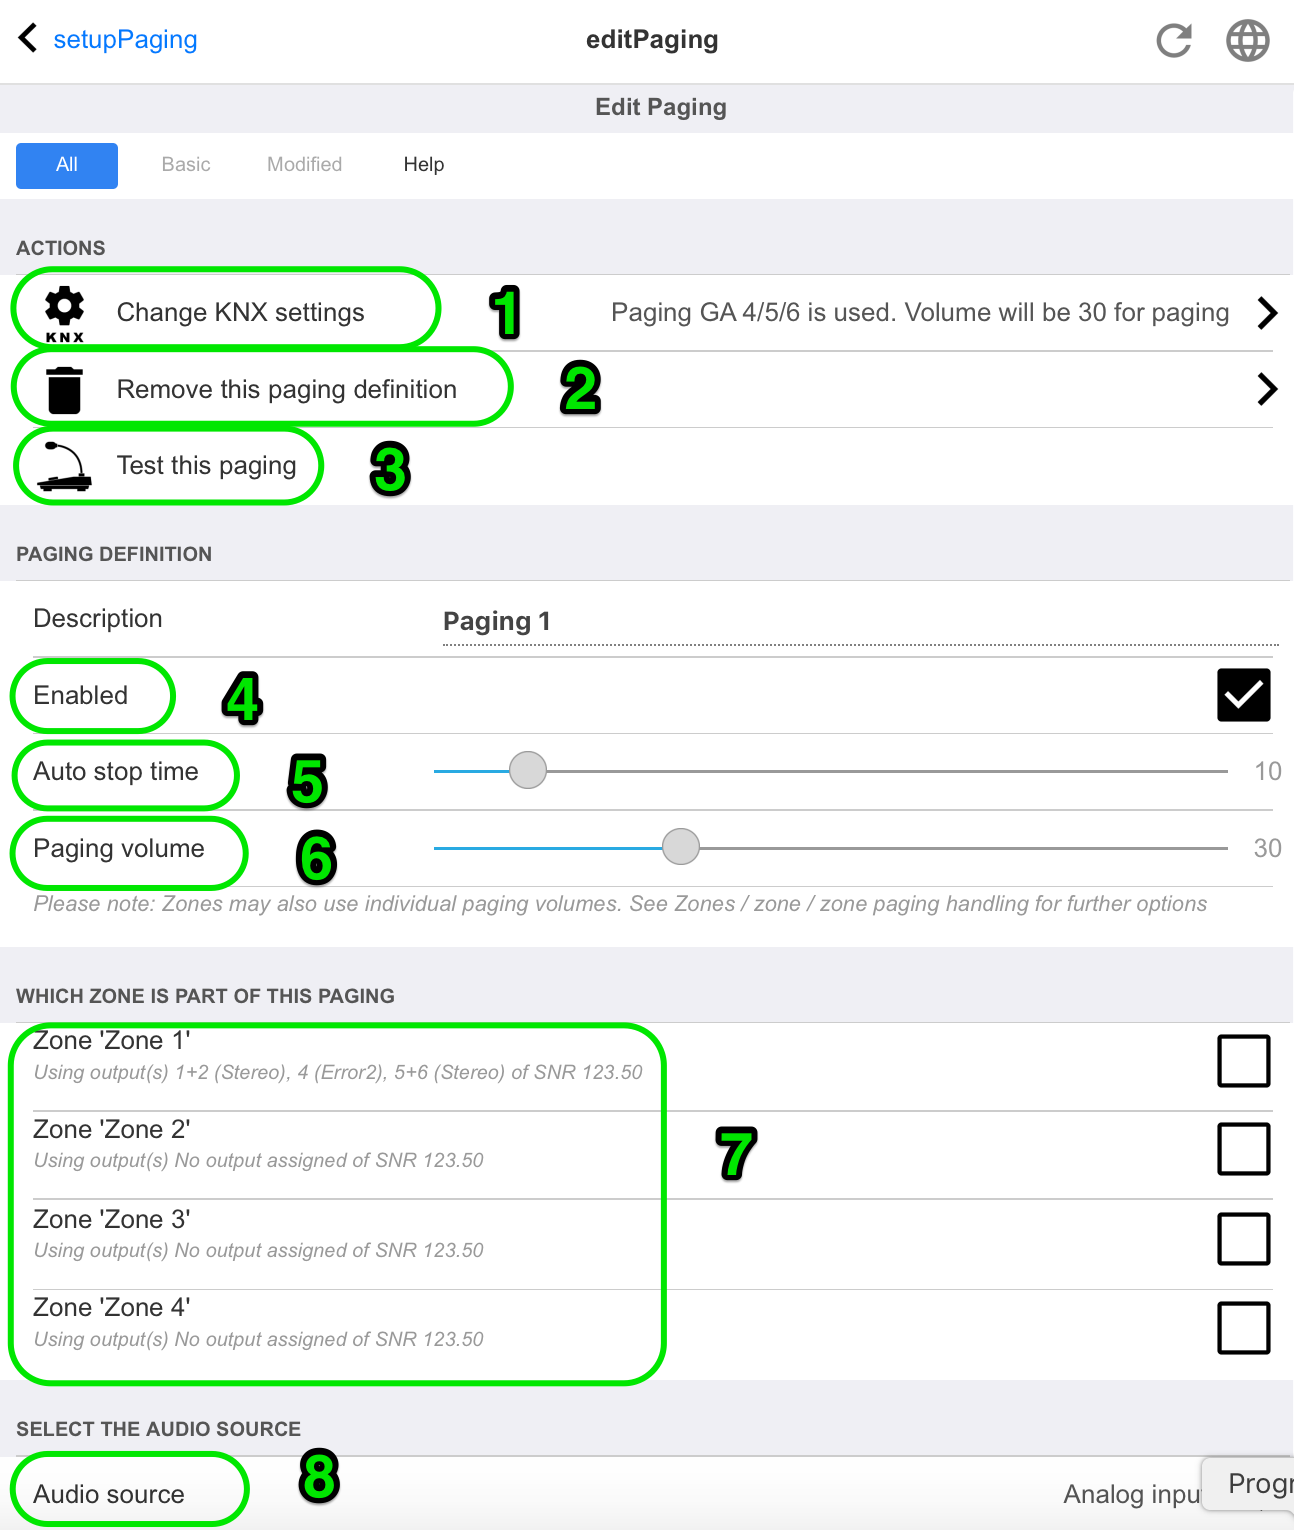
1 - to trigger the paging by KNX enter a group address here.
2 - remove the paging entry.
3 - run a quick test of the paging. As soon as started a stop button will appear.
4 - check this to have the paging enabled or disabled.
5 - how long should a paging play, in seconds, before it is stopped automatically. select 0 to play as long as the music or ringtone file is.
6 - the playback volume which is used by zones, by default. to set individual volumes per zone, look at the top of the setup page.
Read more under: How to configure a ringtone paging
5.17.7. pagingKNX
The screen to change the KNX paging definition looks like this:
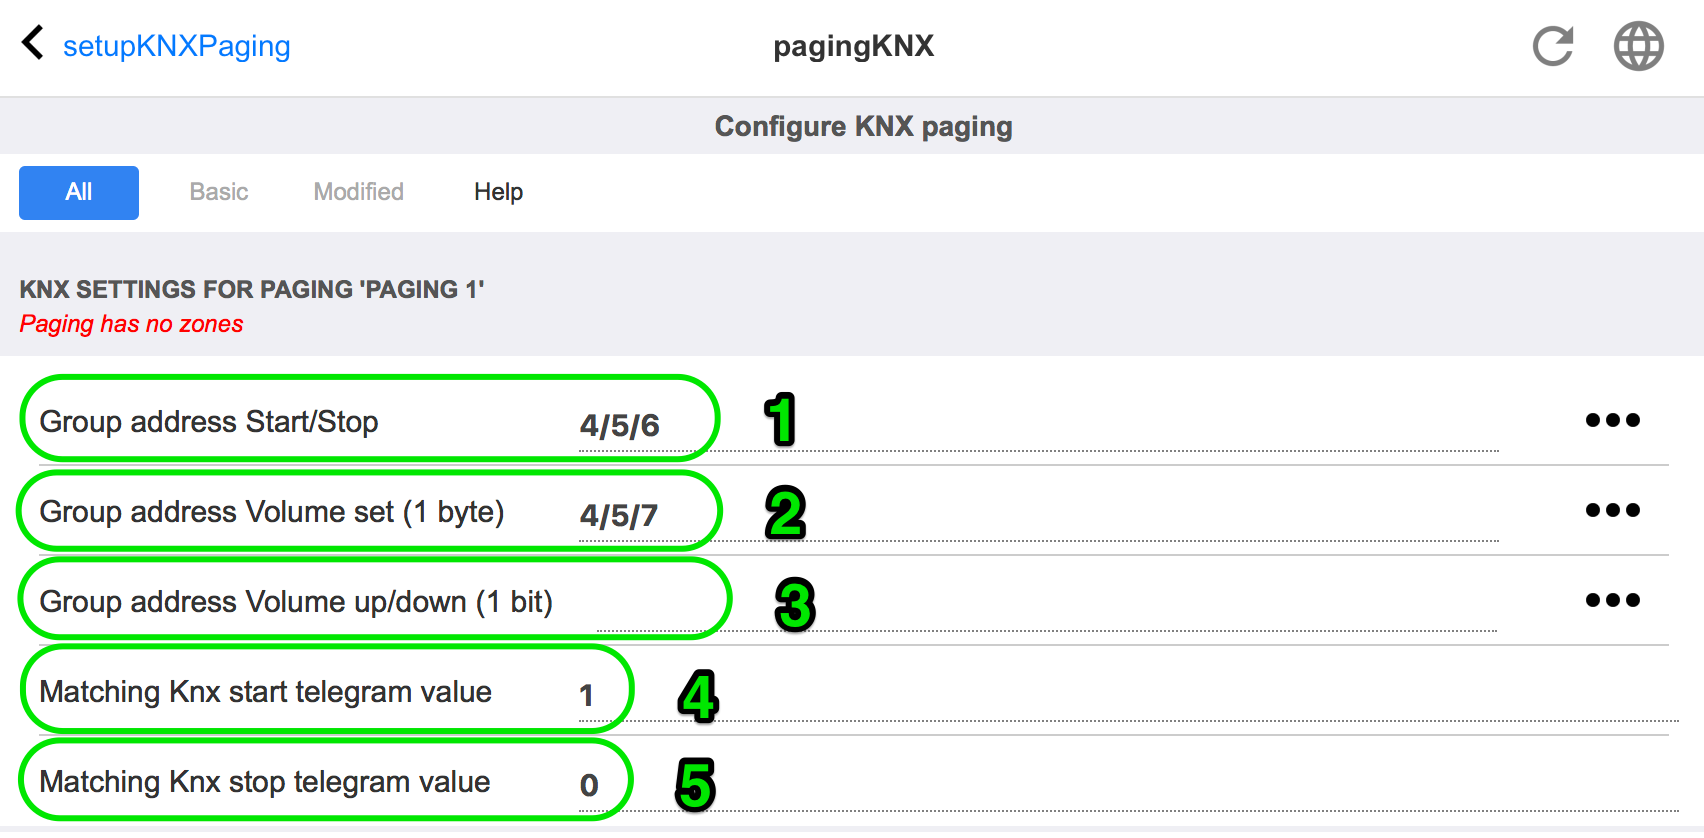
1 - the paging can be started by a KNX 1-bit message to this GA.
2 - instead of using the predefined paging volume, a different volume can be set by KNX through this GA.
3 - while a paging is playing it’s volume can be modified by this GA. for example, sending a 1-bit message "0" will decrease the volume. the minimum volume for active paging is 5.
4 - normally, sending "1" to (1) starts the paging, but this behaviour can be changed here.
5.17.8. setupKNX
trivum supports KNX as an active KNX member for many years. We continuously work on the optimization of the KNX function, to make it better, more flexible and even easier for the installer.
All trivum devices support KNX ex works, that means KNX is "built-in". Prerequisite for an trivum KNX operation is a KNX/IP router, or interface (a router is recommended for an unlimited number of connections). trivum devices communicate via KNX/IP using this IP router.
trivum multiroom systems can be fully integrated into a KNX environment. So you can control third party devices via the trivum TouchPads for example. Or leave the multiroom system react on outside commands.
An KNX/IP router enables the communication between the KNX environment and the trivum multiroom system.
To connect trivum devices useful with the KNX installation, the trivum devices must be parameterized.
Select "KNX / Setup KNX communication" for the global KNX setup:
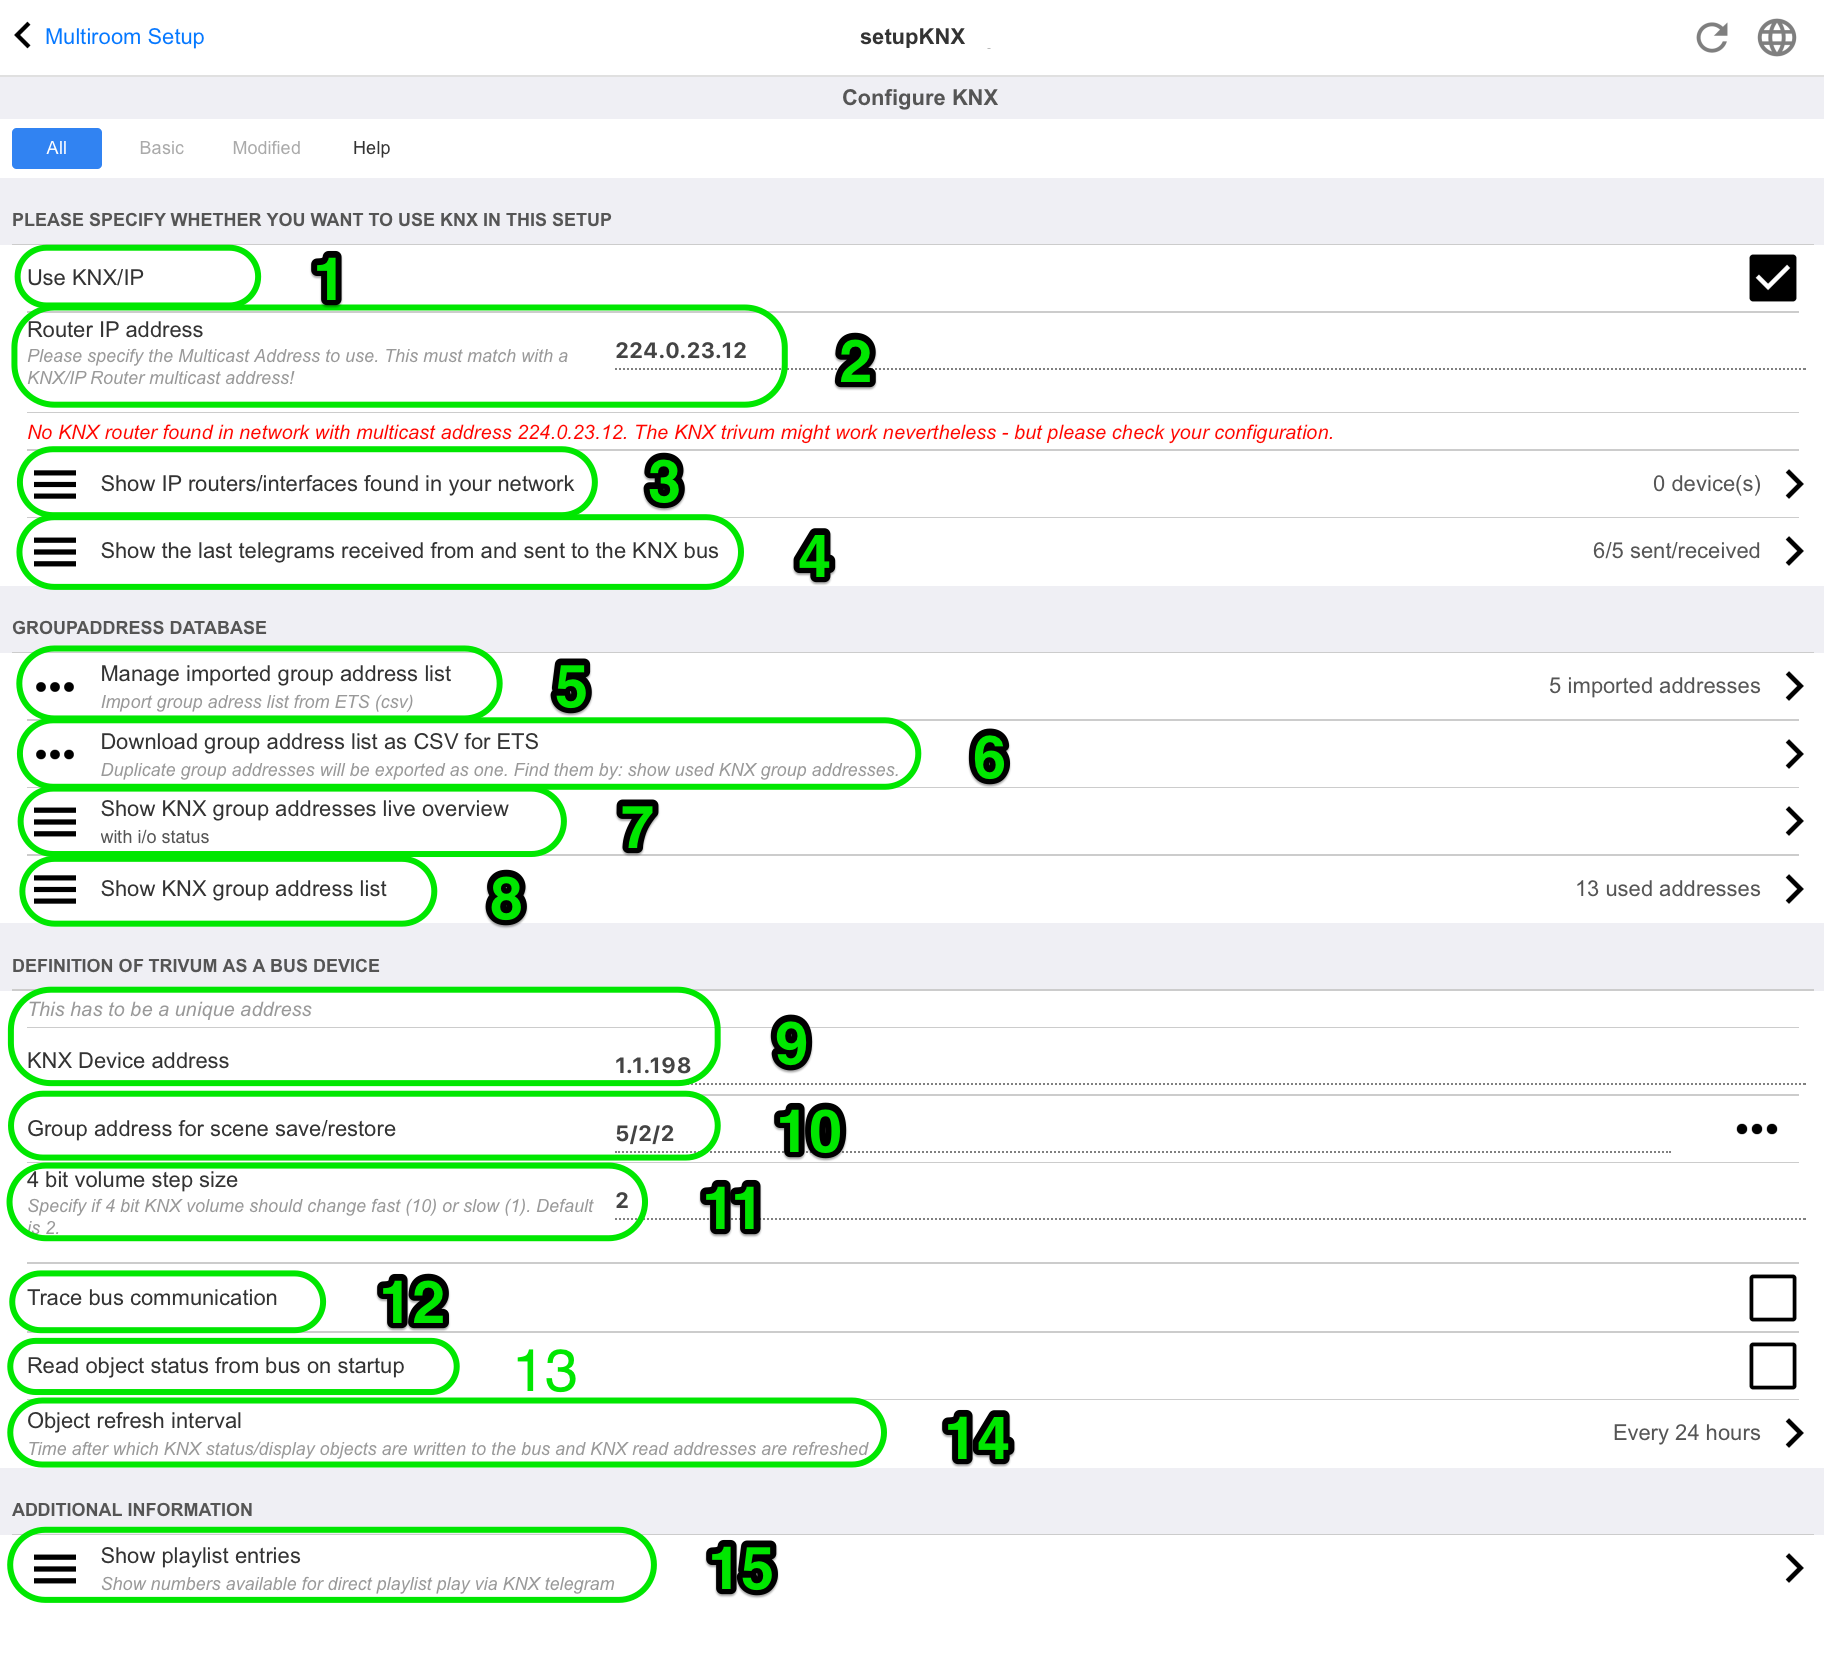
1 - enable receive and processing of KNX events from network, as well as sending of KNX status to the network, if configured.
2 - the multicast address where to listen or send to knx events. This is not the actual router device IP address (like 192.168.1.x) but always a multicast address starting with 224.
3 - if multiple KNX IP routers are detected in the network they can be listed here.
4 - link to the KNX trace where incoming messages with their time are listed.
5 - under "Import CSV" you may upload lists of group addresses exported by ETS.
6 - under "Export CSV" here you may download the list of already used group addresses.
7 - an alternative tracing page to check live if defined group addresses receive something
8 - interactive view of all defined addresses, allowing to jump to the configuration pages where they are used.
9 - the physical device address that the trivum device should use on the KNX bus. It’s just important that no other KNX device uses this address.
10 - if you want to store the current device state of trivum in a KNX scene, configure here the GA to program or recall the scene. read more details under "knx scenes" further below in the manual.
11 - for each zone a GA can be configured to control volume by 4-bit KNX messages. here you can configure the speed at which the volume changes. default is 2.
12 - to get a detailed log of incoming knx messages you have to enable this first. then go into: Information / Support / Logs&Warnings / Show KNX log
13 - select if the trivum device shall query configured group addresses for their status on startup
14 - normally, whenever knx data changes a message is sent immediately. but trivum may also re-send the current value inbetween, without any change, for example in case that a KNX display was taken off power temporarily. you may here configure an interval for such unrequested refreshs.
15 - NAS playlists with a special name starting like "P1 mylist" can be played directly, by configuring:
Configuration / Zones / zone name / KNX bindings / Play a NAS Index Playlist.
With "Show playlist entries" you get a list of all playlists, and the ones eligible for direct play being marked in green.