General
Where can I buy trivum products?
You can buy trivum products through the following distribution channels:
-
You can order our products directly from the trivum online shop.
-
Germany: Please visit our dealer area on our website. There are listed all companies that work with us in Germany.
-
Switzerland: Please visit our dealer area on our website. There are listed all companies that work with us in Switzerland. You can also visit the website of our sales partner INYX in Switzerland. There you will find all INYX partners under dealers. Alternatively, you can order a selection of our products directly from the INYX online shop.
-
Austria: Please visit our dealer area on our website. There are listed all companies that work with us in Austria.
-
International: Please visit our dealer section on our website. There, all sales partners are listed, who work together with us internationally. If you have any further questions regarding the distribution of the trivum products, you can send us an e-mail to sales@trivum.com. We look forward to every contact with you.
How do I receive information?
You will find information about our products and trivum itself
-
on our homepage, www.trivum.de
-
or on our service website, service.trivum.com
Our partners will be happy to help you with any questions you may have about existing installations, planning a new multiroom system, or just want to get a glimpse of our products and solutions.
If you are a dealer or an electrician and you want to work with our products, please send an e-mail to sales@trivum.com or use our inquiry form.
How can I report an error?
You have a problem or a question? We will help you quickly and easily.
Please try to find your problem in the FAQs. There are many articles like, for example, how to solve network problems. You can also search in more detail for your problem on our service website. For the full list of translated documents you may also look here.
The service website contains many documents, tips and tools. If you have not been able to solve your problem using the FAQs or the service website, you can report an error directly here. In the case of errors or questions concerning the configuration of a trivum device, you can also report an error directly in the setup of the trivum device under Information / Support.
Of course you can also directly send an e-mail to our support team (service@trivum.com)
Is there any new software?
Our trivum products are constantly being developed. That’s why new software updates are coming up that sometimes fix small bugs, sometimes including new features.
The software update happens manually in the web configuration, or with the TouchPad on the TouchPad itself. For this purpose, it is first checked if an update is available, and then installed on request.
The trivum system does not force you to make software updates. So if you are satisfied with your trivum system as it works, then there may be no reason for you to check or install any update at all.
For more information, please read the article "Software Update"
Latest Software Updates
Click any of the following links to see the list of latest changes:
There is also a separate list for V10 software
but so far V10 only differs by a handful of features from V9, and every change done in V9 is also done in V10.
To get the latest updates, make sure to select "release" and "latest" software in the web configuration.
Please note that V8 devices can not be combined with V9 devices, and V9 devices not with V10.
Unpack and get started
You need the following prerequisites to commission a trivum Multiroom system:
-
a local network with a DHCP-enabled router
-
a free network cable
-
at least one speaker with 4 or 8 ohm impedance
-
Music collection (on computer or NAS)
-
a web browser
For a comfortable use of all trivum possibilities we recommend furthermore:
-
the trivum TouchPad for comfortable operation
-
WLAN for the control via trivum App
-
Internet for online streaming, software updates and support
-
at least one account on one of the following online streaming services:
Deezer, qobuz, TIDAL -
TuneIn
-
FM antenna (only for trivum devices with built-in FM tuner)
trivum device installation
-
Mount the trivum device. Observe the installation instructions of the respective device.
-
Network, power, audio in/out, connect speakers
-
Connect your trivum device to your local network
-
Connect all external audio sources to the audio inputs using suitable audio cables
-
Connect all speakers to the speaker outputs
-
Connect your trivum device to the power supply
Find the trivum device in the network
-
download and install the trivum ServerAdmin tool to find the IP address of your trivum device.
-
For further configuration and operation, you must open the WebConfig of your trivum device in a browser.
Set up audio sources
-
If you have an account with one of the above online streaming services, you can set it up now.
-
If you have your own music library on a computer or NAS, you can set it up now
-
If you want to use external audio sources, you can set them up now
Set up trivum TouchPads
-
Connect your trivum TouchPad to the MusicCenter
-
Tip: After successfully initializing your trivum system, we recommend making a backup of your configuration settings.
For more information on configuration, MusicCenter V9, datasheets and QuickInstallationGuides, see our English Wiki.
For more information about the trivum devices, visit our website www.trivum.com or service.trivum.com
Of course you can also send an e-mail to our support team if you have any questions, problems or requests (service@trivum.com)
RP Actuator antenna cable connection
Take a normal antenna cable, cut it at one side. Take out the wire for the signal line. Braid the shielding around it into a wire.
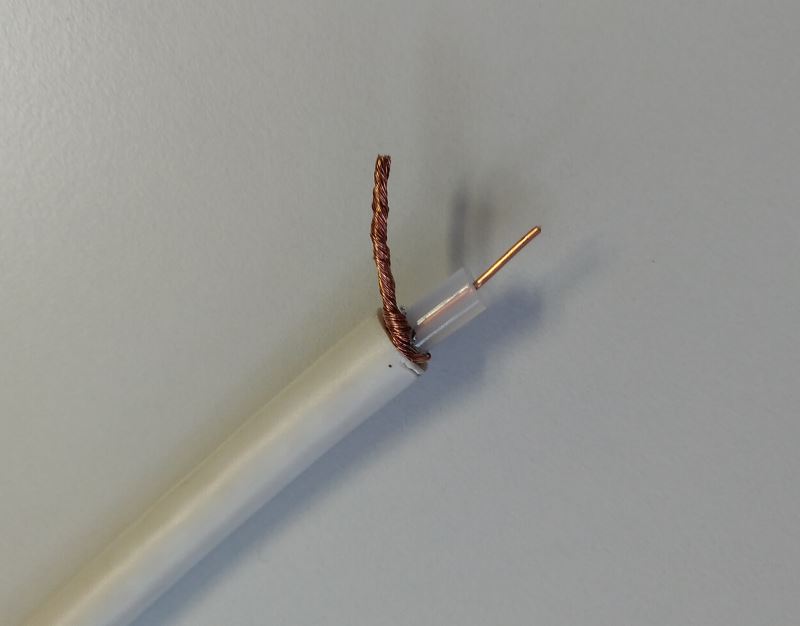
Then connect both wires at the RP actuator.
Speaker wiring
An overview how to connect speakers to trivum devices.
Default scheme
By default, the amplified outputs of an SC344 allow to connect 8 speakers, used as 4 stereo pairs.
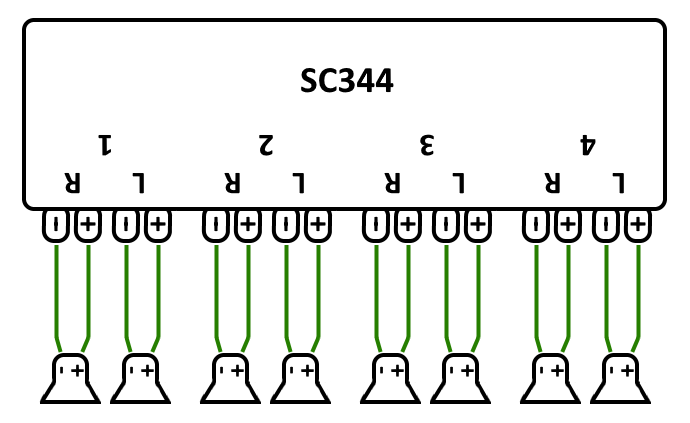
However the SC devices are very flexible, and the outputs can be fully reconfigured. For example, it is possible to use only one large zone with all 8 speakers running in mono mode.
It is also possible to connect more than one speaker per amplified output.
Two speakers serialized
The safest way to do this is serializing two speakers:
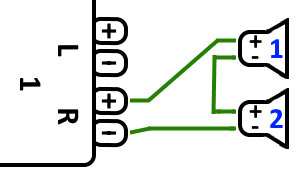
When doing this with 2x 8 Ohm speakers you get an overall impedance of 16 Ohms. The audible sound volume will be reduced then, so you may have to increase the volume settings a bit.
Attention: always connect in-phase, meaning Speaker1Minus to Speaker2Plus. If you connect Speaker1Minus to Speaker2Minus then sound will be wiped out.
Two speakers parallel (Careful!)
To get louder sound compared to serial connection, an alternative can be parallel connnection.
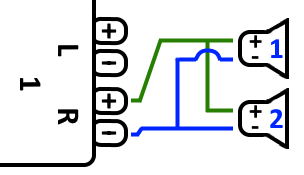
However these things must be strictly checked:
-
make sure that your speakers have 8 Ohms (and not just 4 Ohms). Connecting them parallel results in an overall impedance of 4 Ohms which can still be handled by the trivum device.
-
double check that the speakers are connected in-phase, with both SpeakerPlus connected to OutputPlus. Out-of-phase connection causes damage to the speakers!
-
if you are unsure if the speakers have 8 Ohms, use serial connection. An overall impedance below 4 Ohms will damage the trivum device!
Four speakers mixed
It is also possible to connect 4 speakers in a mixture of serial and parallel:
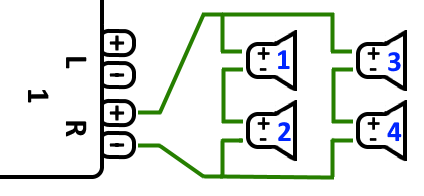
Assuming that all speakers have 8 Ohms impedance this means
-
the left column (speakers 1+2) has 16 Ohms
-
the right column (speakers 3+4) has 16 Ohms
-
connecting both columns in parallel brings back an overall impedance 8 Ohms.
Attention:
-
always connect in-phase, or sound will be wiped out, or it may even cause damage.
This way a theoretical maximum of 32 speakers can be connected to the amplified outputs of an SC device.
Further speakers can be connected by the cinch lineouts with an extra amplifier.
More wiring schemes and stereo speaker wiring
can be found in the speaker wiring manual, available here:
Are more then 30w at one speaker possible by combining two outputs?
No. Please do not try to parallel-connect multiple speaker outputs to the same speaker, it will not work. They are bridged internally already, the total output power cannot be increased this way.
If you need higher output power for a zone, buy instead an external amplifier and connect it by line output.
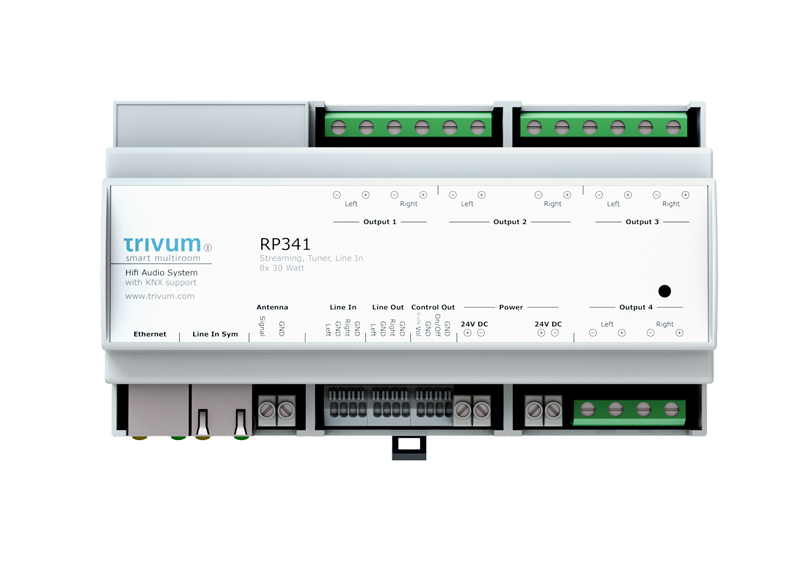
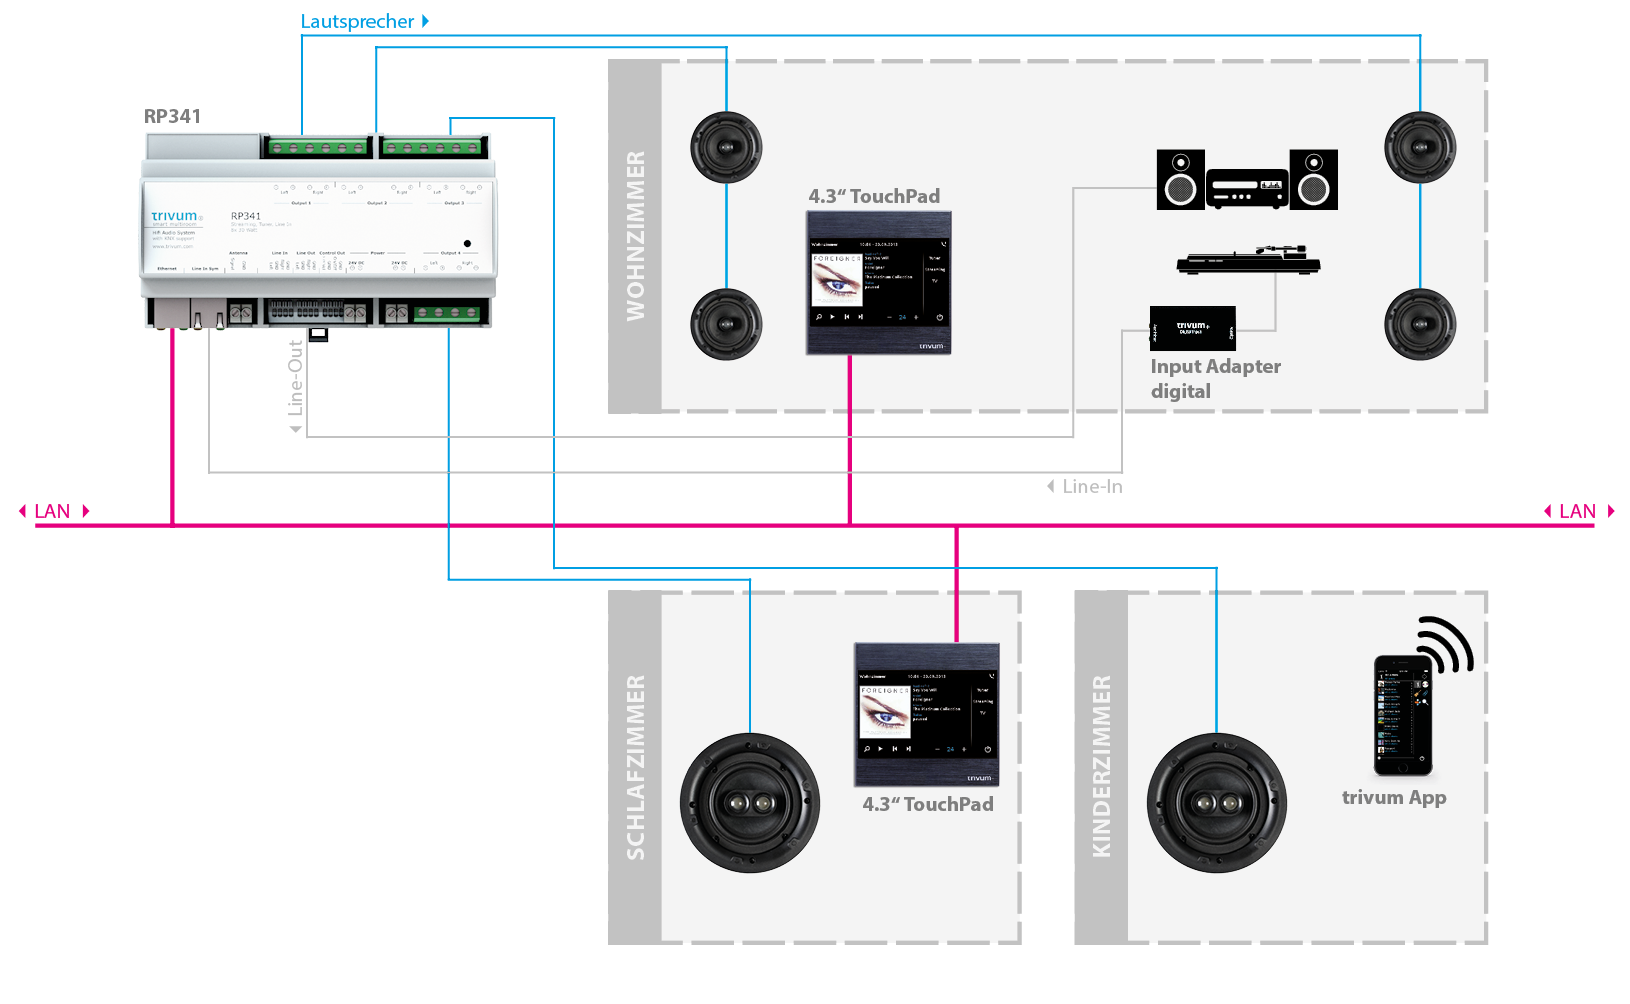
Speaker options with RP341v1
Compared to SC, the RP341v1 has just one stream, line input and fm tuner, but still the same number of amplified speaker outputs. So the same number of speakers can be connected.
It is possible to configure all speaker outputs to run in mono mode. It is not possible to configure a single large zone with all speakers attached, but by using group play (one group with all zones), or simply playing the same source in all zones, a similar result can be achieved.
First steps
Find the new device on the network
Before you follow the steps to find your device on the network, check the following:
-
Make sure your trivum device is turned on.
-
Check if the power indicator (LED) on your device is lit.
-
Make sure your trivum device is connected to the network.
-
Check that the status LEDs on the network jack are lit. Your device is connected to the network when one LED (Link OK) is permanently lit and the other LED (Data OK) is flashing.
Find by the trivum App for iOS
On your iOS mobile or tablet, go into the App Store, and search for:
trivum app - V8 and V9 Systems
Find by the trivum App for Android
On your Android mobile device, go into the Play Store, and search for:
trivum Control
Find by trivum ServerAdmin tool for Windows
-
Make sure you are using the latest version of the trivum ServerAdmin tool
-
Download the latest version of the trivum ServerAdmin tool.
-
If the connection to the network is established, determine the IP address as follows:
Start the trivum ServerAdmin tool
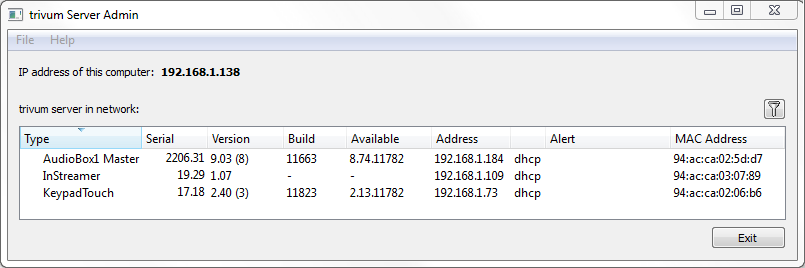
→ Your trivum system is listed as a device in the list. You can read the IP address there or start the WebConfig of the trivum device by double-clicking on the device.
| All trivum units are shipped with factory setting "use DHCP". This means the trivum device is automatically assigned a free IP address by your DHCP server. When changing the network settings to "static IP", be aware that your trivum device and your computer must be on the same network. |
For more information about IP network configuration, subnets, name servers, and gateways, please see Wikipedia.
If no devices are found in the network
If you get an empty list of devices in the trivum App, check these points:
Mobile Apps
-
make sure WLAN is active on your mobile or tablet.
-
make sure your mobile has access to the internal network, and is not isolated in a guest network.
-
connect the WLAN access point to the same network switch as the trivum device. Avoid multiple network switches between access point and the trivum device.
-
sometimes WLAN access points block UDP multicast messages. try a different access point.
-
if your access point is connected by a managed network switch, then UDP multicast may be filtered by that switch, and it may require configuration of IGMP snooping.
ServerAdmin tool for Windows
-
use the ServerAdmin tool V1.41 or higher.
-
make sure WLAN is disabled on your notebook, so everything is connected just by LAN cable.
-
make sure your notebook or PC is connected to the same network switch as the trivum device.
Manual IP search and usage
If you permanently get an empty device list, use this workaround:
-
go into the configuration of your network router. Somewhere there should be a list of devices with their IP, and you can find the trivum device IP this way.
-
in the trivum App for Android, go into Information and Settings, and enter this IP manually.
-
on any other device (iOS or PC), open a web browser, then type the IP manually.
Use existing music files
With trivum multiroom systems, you can also play music files from any computer or network-attached storage (NAS) device on your network.
Before playing music files from your computer/NAS, check the following:
-
Make sure your computer/NAS and the trivum device are on the same network.
-
Make sure that you have shared the music folder on the computer/NAS for your local network (Folder sharing on Windows 7)
To play your music from the computer/NAS via the trivum system, proceed as follows:
-
Open the WebConfig
-
Click Music Library → Edit Music Directories → Add Network Share
-
Enter the following data:
Network path |
Network path to the NAS or network share (PC), e.g. "smb: //192.168.1.7/music" |
Workgroup |
normally left empty. alternatively use WORKGROUP or however your network workgroup is named. |
User |
Username for network share (if necessary) |
Password |
Password for network share (if required) |
-
Click Add New Music Directory to confirm the entries
-
Click Catalog Music Directory to search for new music files
→ After the music index has been updated, the music can be played in all zones of your trivum system.
For more information on Music Database, NAS, Music Index, etc., visit service.trivum.com
Use existing audio devices
External audio devices
Some trivum devices have one or more audio inputs (analog and/or digital). You can connect external audio sources to these (for example, CD or MP3 players, TVs, etc.).
Connect external audio devices
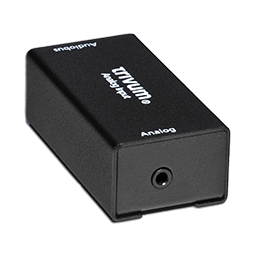
AudioBox
Use an audio cable with a 3.5mm stereo mini-jack plug on one end to connect your audio device to the Line-In input on the AudioBox. Use a TOSLINK optical cable to connect your audio device to the Optical-In input on the AudioBox.
FLEX devices
Use standard RCA (Cinch) cable to connect your audio device to a trivum FLEX device.
Play external audio devices
If an external audio source is connected to your trivum device, you can play its music in the entire trivum Multiroom device.
On the control unit (TouchPad or web visualization) select the appropriate Line Input action.
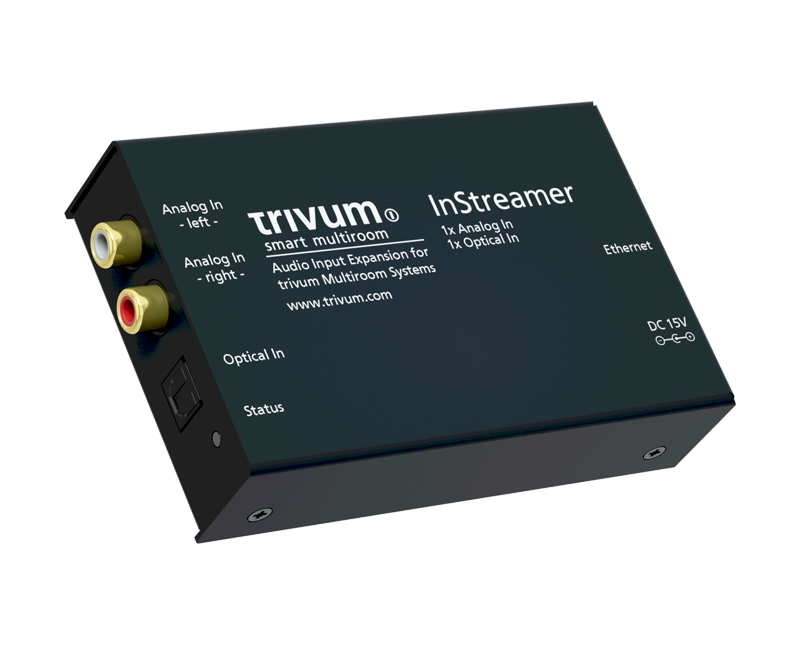
Another possibility to connect an external audio source is provided by the trivum InStreamer. If this is connected to the local network, it is recognized by all trivum master devices and provides them with the audio device connected to it as an additional source.
Set up inStreamer
Before setting up the InStreamer in MusicCenter V9, check the following:
-
Make sure the trivum InStreamer and the trivum master device are on the same network.
-
Make sure that an audio device is connected to the InStreamer.
-
Make sure that the InStreamer is connected to the power supply with the included power adapter.
-
Open the WebConfig
-
Click InStreamer → Add a new InStreamer to this system
-
Select your InStreamer from the list → the InStreamer now appears in the overview List of known InStreamers (Update the configuration view if "Not connected" is displayed)
-
Click on the InStreamer in the overview listing of known InStreamer
-
Activate the option Show as Action → After a short moment, the InStreamer is available as an additional audio source in your trivum system.
Start playback of an InStreamer audio source
On the control unit, select InStreamer to start playback of the external audio.
Use mobile app
With the trivum App you can also control your trivum system from your mobile device; just as comfortable as on the TouchPad itself.
Before using the trivum App, check the following:
-
Make sure your mobile/tablet and the trivum device are on the same network.
To control your trivum system via app, proceed as follows:
-
Download and install the app trivum (v8)Control from the Apple App Store or Google Play Store.
-
Start the app
-
Follow the instructions of the app
How to call the trivum App for iOS or Android from other Apps
iOS: open a web link: comtrivumcontrol://
Android: open a web link: trivum://control
How to create named device shortcuts on your mobile
The trivum App lists devices by model, serial number and IP address.
If you have multiple trivum master devices in your network,
and want to select them more intuitively by a self given name,
perform these steps:
-
open Google chrome browser on your mobile
-
type the IP address of the trivum device. the Web UI will appear.
-
at the right top of the google chrome window,
select three dots "…" and "Add to Home Screen".
You will be asked to type a name for the shortcut.
This way you create self-named shortcuts, which open a web browser when tapped on.
Please note: if the IP address of trivum devices change, these shortcuts will no longer work. To avoid this, you may take precaution on your router to let him give the same address to the device permanently, or configure your trivum device with static ip.
Music playback
AirPlay inputs in brackets cannot be used
This happens with group play. If you put several zones into a group,
-
There is a group master zone. It has the same name as the group, and it produces the sound. Only select that input.
-
All other zones of the group are called group slave zones. These are marked by () brakets. They are shown only for technical reasons, they cannot play Airplay input. Never select these Airplay inputs.
AirPlay has dropouts
AirPlay is used to play music from Apple devices (iPhone, iPod, iPad, Mac computers) on AirPlay compatible devices.
Unfortunately, dropouts during AirPlay playback can occasionally occur. These are mostly network problems that lead to the loss of data packets and thus the suspension of music.
AirPlay inputs cannot be found on iOS10
With iOS10, Apple has changed the user interface of iPhone/iPad when selecting the AirPlay inputs. There are now two selections, one for screen transfer and one for audio. First you see the left, wrong surface. There the trivum entrances do not appear. Swipe your finger from right to left. Then comes the right selection box with pure audio airplay inputs. There should appear trivum. Attention, when selecting an input this may seem to disappear. In fact, it slips to the top of the list, so scroll up.
With iOS11, Apple has changed the user interface agin. Now AirPlay inputs are located in the Control Center.
There may be other technical reasons why AirPlay inputs are not visible. Please read details in the troubleshooting guide
Airplay inputs are not visible with group play
Please read the following article about Spotify Connect inputs, which relates as well to Airplay.
Spotify Connect inputs are not visible with group play
If you miss a Spotify Connect input for a zone x, check if this zone is part of a group, and if it’s the group master. It it’s not the group master, it will be hidden from the network, as it cannot play.
For example, there is a group Kitchen+Living Room. It shows the name "Kitchen". That means that zone "Kitchen" is the group master, i.e. the zone which produces music.
If you want to play Spotify music by an input "Living Room", it will not work in that case. The input may not appear at all, or (with older software) it’s name is shown in brackets ().
In this case, you can do this:
-
search for an input "Kitchen" and play via this.
or
-
ungroup. make sure both zones are off (not playing music). If "Living Room" is a separate zone again, it’s Spotify input will appear again. select it, start playing music, then re-group. Now the group name should show as "Living room", and it will play.
Also check in the setup which activation zone is configured for Spotify Connect on your device, especially on C4 systems. Maybe you want to change this, if the group master is wrong too often.
If you cannot find inputs although no group play is involved, read also
My Apple device that provides the music is a WLAN device (iPhone, iPad, iPod)
The cause is usually in one of the following areas:
-
The radio connection is bad.
-
You are in an area in the room or in the apartment that has no good Wi-Fi coverage. This happens when you leave the room and the music then has dropouts.
-
The WLAN is overloaded.
-
If you use IP TV to stream movies on your TV, or if you have turned on group music playback on trivum devices, and you experience dropouts, this is an indication that your wireless router is set incorrectly.
-
Wireless routers must support IGMP and IGMP snooping must be turned on.
-
Too many wireless routers are active in your area and these influence each other
-
The more WLAN routers are used, especially on the same radio channel, the more likely data loss and thus music dropouts
To find out where the problem is, please follow these steps:
-
Install iTunes on a PC or Mac. (The program iTunes can be downloaded from Apple)
-
Please make sure that your PC/Mac is connected to the network only with the LAN cable and not via WLAN. Please disable the WLAN for this test on your PC/Mac!
-
Open iTunes and select a trivum device as an AirPlay playback device
-
Start music playback on iTunes.
-
Play on .mp3 music file
-
If the playback works without dropouts, then it is a WLAN problem.
-
If the playback has also without WLAN misfire, then please continue reading below.
My Apple device that provides the music is connected to a switch with a network cable (Mac computer or Windows PC with iTunes)
It is very rare for AirPlay to lose music in a network without a WLAN.
The causes can be:
-
Broken switch or hub + Please make sure your switches/routers are working properly. Plug in and unplug your switches and try again. You may want to test another switch.
-
Defective or bad network cables + Please make sure the cables are ok
-
One " loop" in the switches/hubs + If you use multiple switches/hubs, you can only use one cable at a time between these devices. Even a loop is not allowed, so switch A → in switch B → in Swich C → in switch A. It is best to use only one switch to test. Only your Internet connection from your DSL router, the trivum device or the trivum devices, and also your Windows/Mac computer will be plugged in there. Then please repeat the iTunes test from the beginning of the document.
-
Dual use of IP addresses on different devices + Please make sure that all network participants have different IP addresses. Please refer to the manuals of the other network devices to find out how their IP addresses can be determined.
-
Massive data usage on the network + Please check if any of your other network devices is sending multicast data. To do this, disconnect all other network devices at the same time or in succession from the network and watch whether the music playback now works without dropouts.
Please also read here for more information on AirPlay issues and possible solutions.
Music stops in group playback
If there are occasional dropouts in group playback of music then these are normally network problems that lead to the loss of data packets and thus the suspension of music.
Look for the following option:
V9: System / Setup / Advanced / Use Unicast Audio For Group Play
V10: Devices / Players / General / Use Unicast Audio For Group Play
If your system has up to 4 devices, this will be on by default.
If your system has 5 to 7 devices, you may experiment by setting this manually to on.
It will force audio packets to be sent by unicast instead of multicast,
which however requires more processing power at the sender zone.
Correctly functioning and configured networks practically never have these problems. Therefore, one of the following points may be the cause of the dropouts:
-
Broken switch or hub + Please make sure your switches/routers are working properly. Plug in and unplug your switches and try again. You may want to test another switch.
-
Using a non-intelligent switch + The network switches have to be intelligent in order not to send all data packets to all network devices, but only to those who are interested. The switches must support IGMP. Devices that support this are e.g. HP 1920G, HP E2620-24 PoEP, Cisco SG300-10. Please read <link> here continue …
-
Defective or bad network cables + Please make sure the cables are ok
-
One " loop" in the switches/hubs + If you use multiple switches/hubs, you can only use one cable at a time between these devices. Even a loop is not allowed, so switch A → in switch B → in Swich C → in switch A. It is best to use only one switch to test. There, only your Internet connection from your DSL router, the trivum devices, and also your NAS (network storage) will be plugged in. Then please repeat the playback of music in the group.
-
Dual use of IP addresses on different devices + Please make sure that all network participants have different IP addresses. Please refer to the manuals of the other network devices to find out how their IP addresses can be determined.
-
Massive data usage on the network + Please check if any of your other network devices is sending multicast data. To do this, disconnect all other network devices at the same time or in succession from the network and watch whether the music playback now works without dropouts.
Line Input connection of external audio devices (CD player, turntable, etc)
Almost all trivum multiroom devices offer the possibility of external audio sources, e.g. CD player to connect. Depending on the trivum device, there are various ways to connect the source device.
In addition, some trivum devices (AudioBox, SC044) support "Input Sensing": the automatic activation of the trivum device as soon as a signal is detected at the audio input. This is especially useful for TV sound: when the TV turns on, the trivum zone turns on and you hear the TV sound through the trivum Multiroom system.
Please note the following when using external audio sources:
-
Turntables require another phono preamplifier.
A phono preamp equalizes the signal, depending on the turntable type, and amplifies it to such an extent that normal amplifiers and trivum devices can deliver the music signal. Please check with your local dealer or on the Internet which phono preamp is right for you. -
When connecting both digital and analog signals to the same InStreamer then a digital signal has priority.
-
Distortions on playback may be caused by settings like Line Input Level Adjust or DSP.
-
Low humming sounds can be ground loops. In this case use a ground loop isolator to connect the audio cable.
The connection possibilities of the individual trivum devices are explained below:
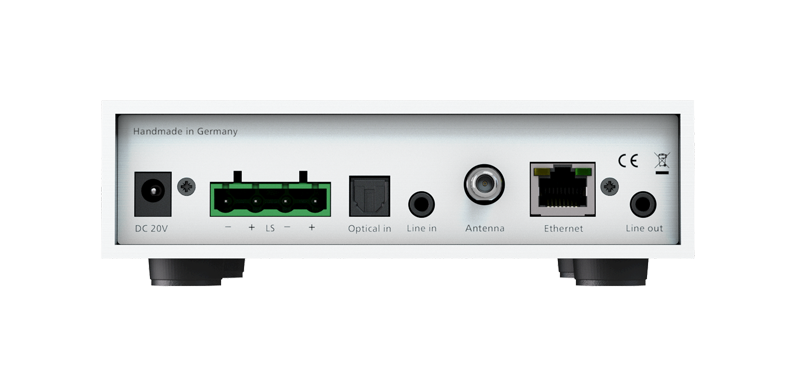
AudioBox
The AudioBox has an analog and a digital audio input. The digital source is connected via optical TOSLINK cable. The analogue source is connected via 3.5 mm stereo jack plug.
REG RP311v1, RP341v1
The REG devices RP311v1 and RP341v1 have an analog line-in input.
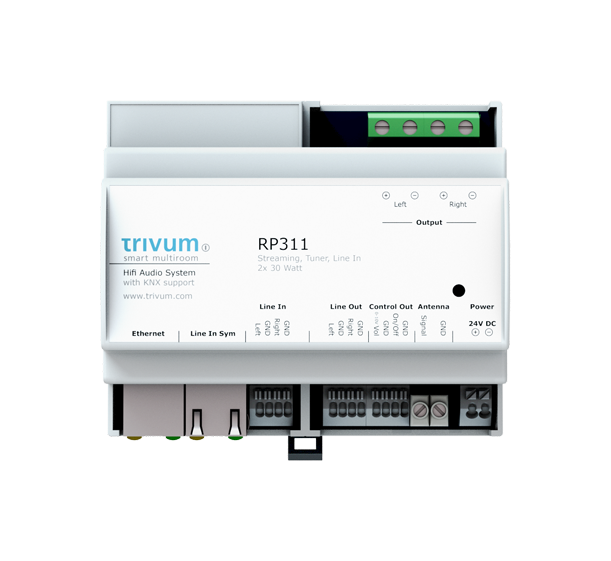
We recommend using the optional trivum InputAdapter to connect an external audio source. Using the InputAdapter has the advantage that the external audio source can be far away.
Since the connection between the REG device and the input adapter is made via a shielded network cable that is protected against interference, transmissions over long distances can take place easily.
Example: The trivum REG device is in the basement, while your record player is in the living room on the first floor. To play a record on your trivum system, you need a network cable (CAT5/6/7) from the REG device to the record player. The cable end in the cellar is connected directly to the line-in input of the REG device. In the living room, plug the network cable into the trivum input adapter and connect it to the audio output of the turntable.
How to configure RP311v1 to use two zones
By default the RP311v1 is a single zone device, with the line output linked to the the speakers. The same sound is playing by loudspeakers and the line output.
This can be changed in the web configuration under:
Devices / Setup (or Players) / Line out settings for output 2
If you select one of the "Independent lineout" options, you will get a second zone, whose audio is played by line out only.
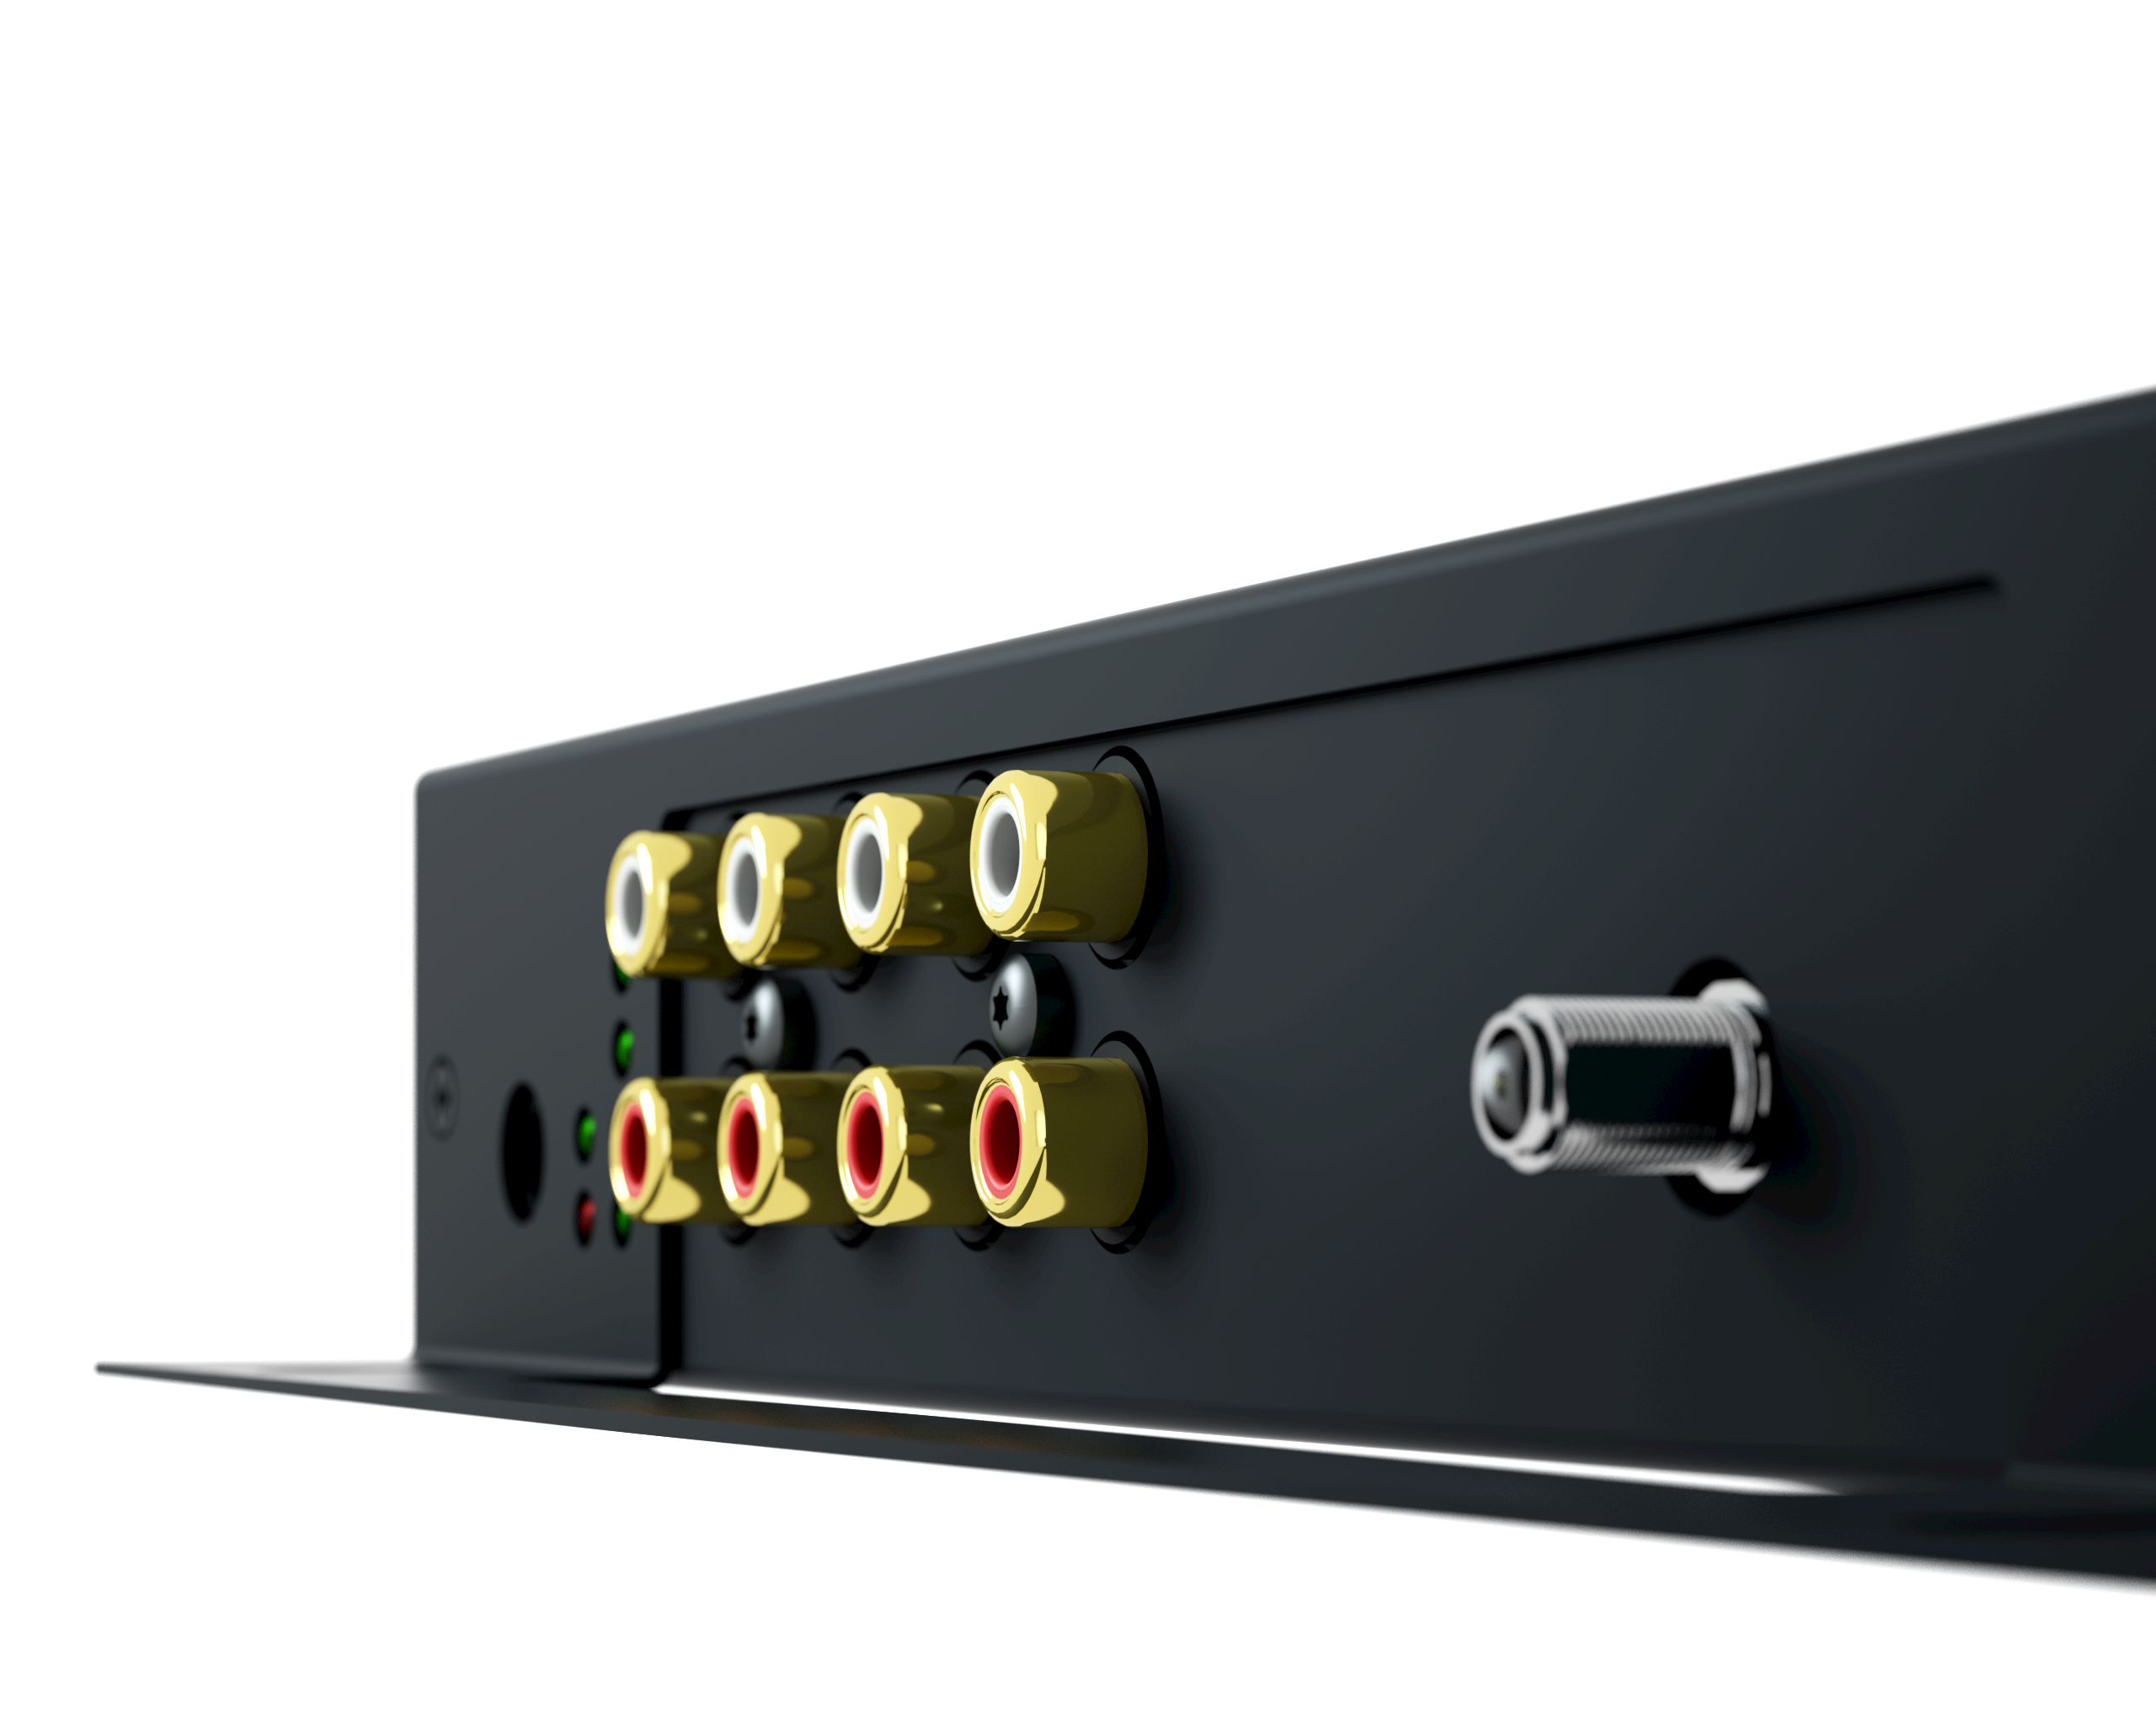
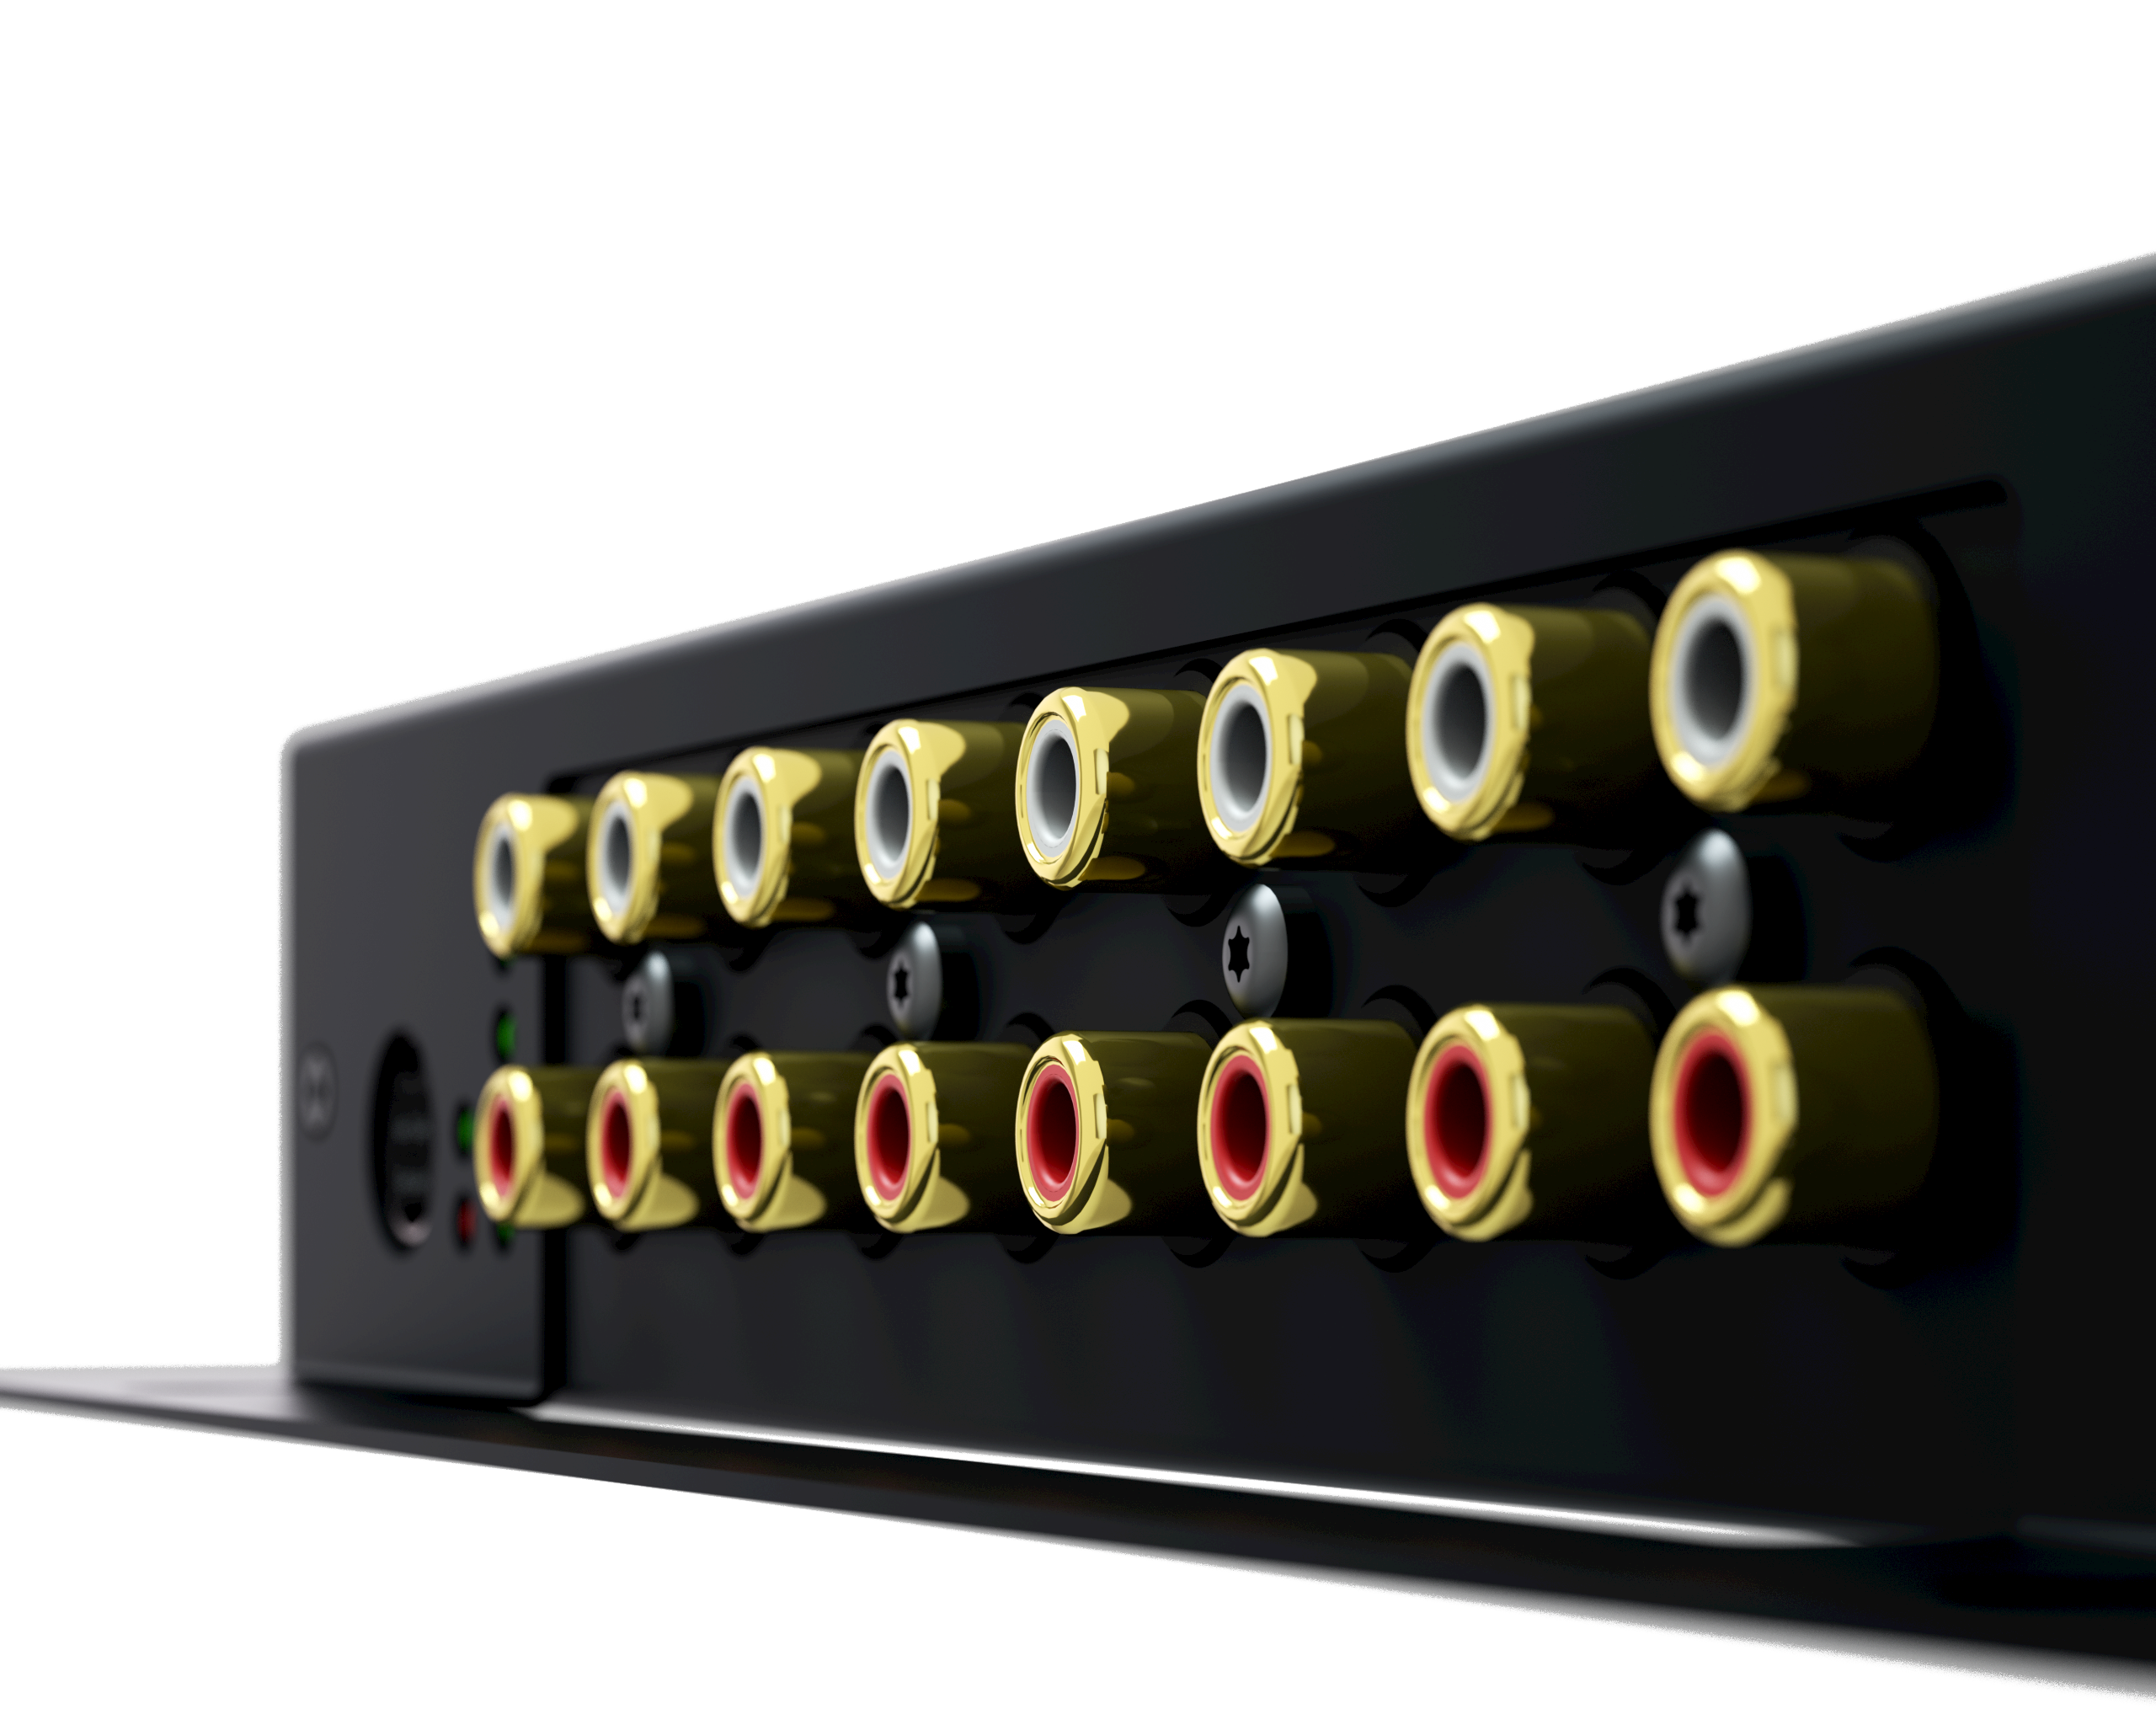
FLEX SC344, SC348, SC044
The FLEX SC044, SC344 and SC348 have analog line-in inputs to which you can connect your external audio sources with a standard RCA cable. The SC044 and SC344 have 4 stereo inputs. The SC348 has 8 stereo inputs.
C4 System InputConnect plug-in card
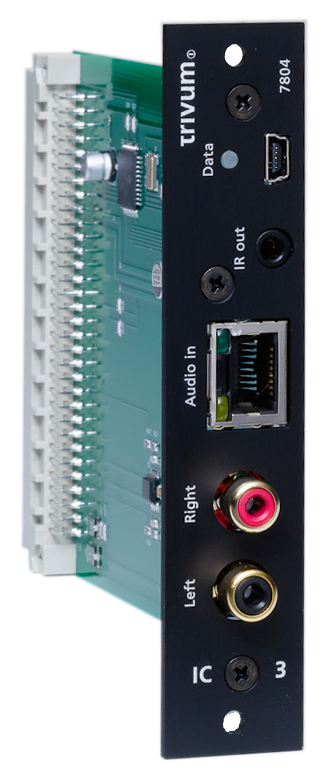
The C4 InputConnect board has both a line-in (stereo) input to connect your external audio source with a standard RCA cable, and a trivum AudioBus input to connect your external audio source using the trivum InputAdapter can (see example for the REG devices)
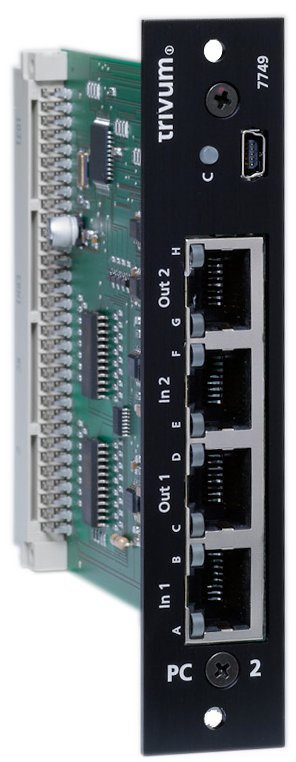
C4 System PowerAmpConnect plug-in card
See C4 InputConnect card
Instreamers
The trivum InStreamer is a very flexible product. It allows you to feed an audio signal (any external audio source) into your trivum Multiroom system - over your local area network. There is no direct connection to the trivum Multiroom devices necessary as the audio signal of the external audio source is digitized and "streamed". The connected audio device is available to all trivum devices as an audio source. You can also use multiple InStreamer in your trivum Multiroom system and access it from different rooms. The trivum InStreamer must be registered in the trivum Multiroom System and configured for you to access. The trivum InStreamer has both a line-in input (stereo), to which you can connect your external audio source with a standard RCA cable, as well as an optical digital-in input, where you can connect your external audio source via optical TOSLINK connect cables.
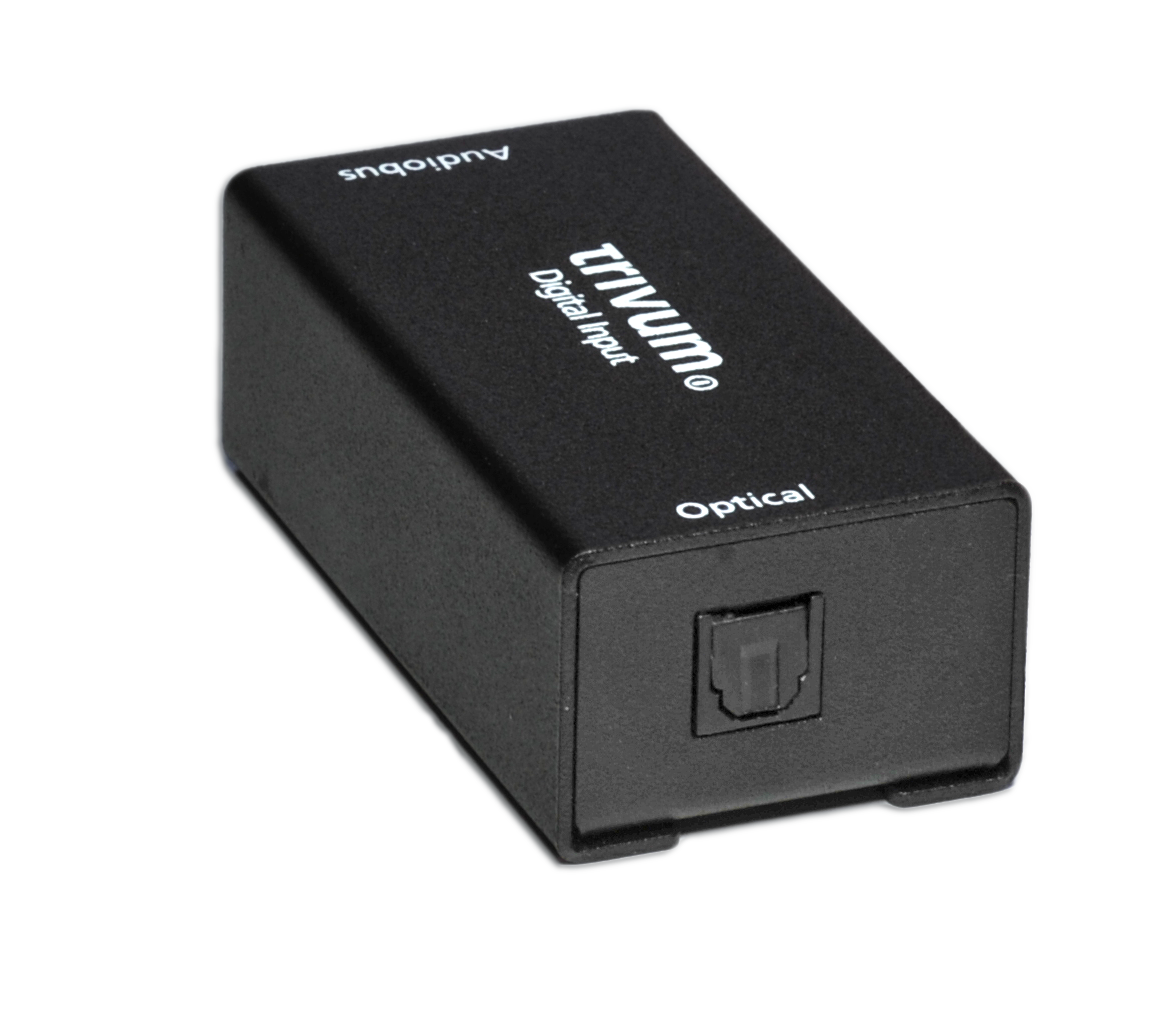
DigitalInputAdapter (for InputConnect, PowerAmpConnect, RP311v1, RP341v1)
The DigitalInputAdapter has an optical digital input to which you can connect your external audio source using the TOSLINK optical cable. For using an input adapter, see the example for the REG devices.
AnalogInputAdapter (for InputConnect, PowerAmpConnect, RP311v1, RP341v1)
The AnalogInputAdapter has a line-in input (stereo) to which you can connect your external audio source with a standard RCA cable. For using an input adapter, see the example for the REG devices.
Family Account support with Deezer
You can only configure multiple streaming service users at trivum if each user has his own username and password.
By default, the Deezer family plan does not provide separate user names and passwords per family member. This makes it impossible for the trivum system to decide which family member to select.
However, Deezer allows to change family member accounts into independent account, with own password. This is done through the admin account. Read more about it here:
Music streaming services stop playing
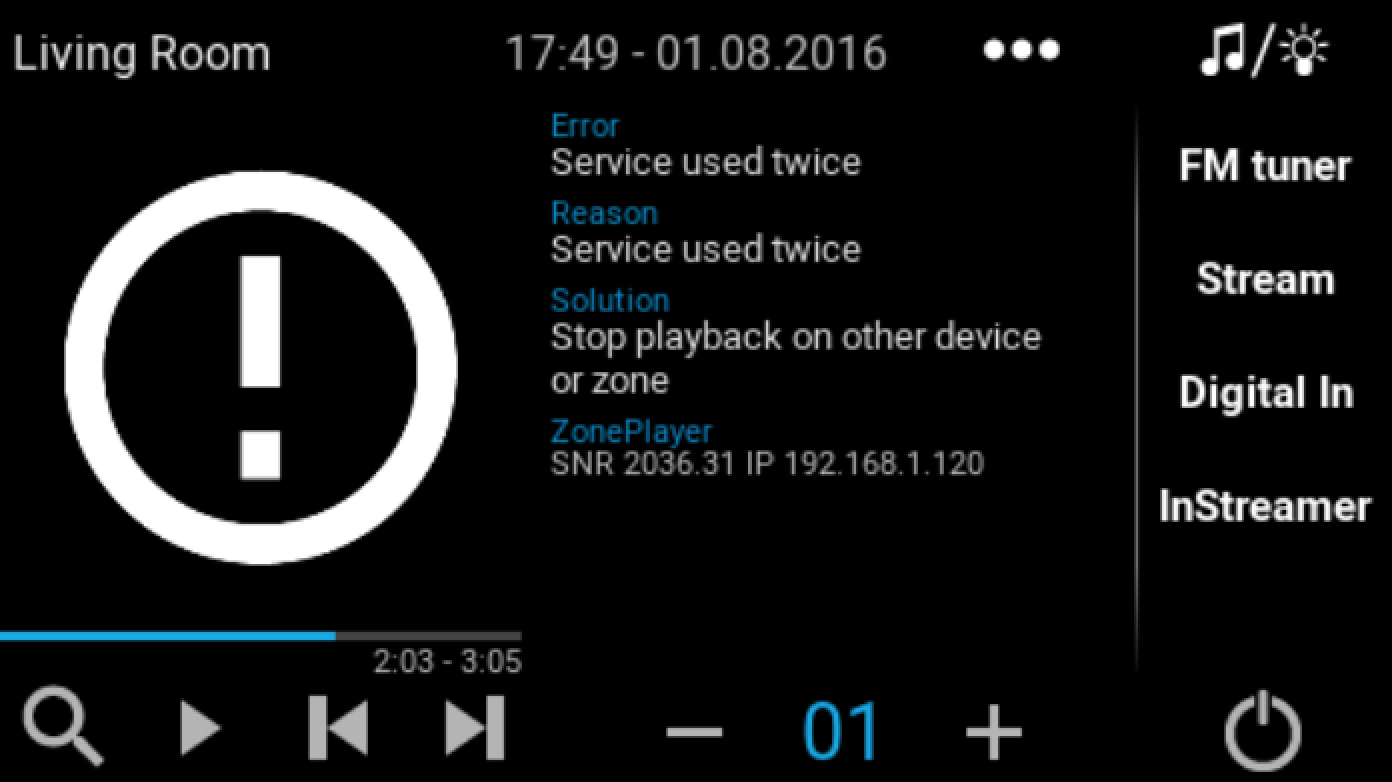
trivum supports various music streaming services. For this, the trivum customer usually has to have a premium account for the supported service there. The music services are chargeable and then make it possible to play music for a user. However, this user can not listen to music on two devices at one time.
So if, for example, If a qobuz customer enters his account on several iPhones, he can also use the qobuz application there. However, if he listens to music on iPhone "A" and then starts qobuz with the same account on iPhone "B", then the music stops on iPhone "A" and music playback on iPhone "B" is active.
The same applies to the trivum devices: It is not possible to listen to music multiple times at the same time with one account. This is a limitation of all music streaming services!
As soon as this situation occurs, the trivum display shows a message similar to the following:
How to use Spotify Connect presets
If you want to play your favorite Spotify content by a single touch, or KNX automation, you need Spotify Connect presets. These are stored as favorites in the trivum favorite list. Spotify Connect presets are available from trivum software version 9.77 or 10.02.
Creating a Spotify Connect preset
-
On your mobile phone, open the Spotify app. Select a trivum network input. For example, with an SC344m, select the first input for Room 1. Select a Spotify playlist, and start playing it.
-
Then go into the trivum app, into the same zone. You see Spotify is playing the playlist. Select "…" and "Add Spotify preset to favorites".
Playing a preset in the original zone
In the trivum app, go into the zone where you stored the Spotify preset before, then select "Favorites". The preset will be selectable for playback.
Playing a preset in a different zone
If you have a new trivum system, and use Spotify Connect for the first time, it will happen that you can play a preset only in the zone where it was recorded.
The technical reason is that authentication data for your user was stored only for a specific streamer module, e.g. for the streamer of the first zone. This data cannot be used anywhere else.
You will then see this:
-
in the Favorite list: "… Spotify presets cannot be played here"
-
or sometimes, if you try to play a preset, an error "No Authentication".
To make a preset play in other zones, you have to do one extra step:
-
in the Spotify app on your mobile phone, select the other trivum zone input.
For example on an SC344m, select the input for Room 2.
That’s it. You don’t have to play anything in the Spotify App. Just switch to the trivum app, and try playing the preset again. It will work now, and it will work in the future, even after a restart of the trivum system.
That means you can go in the Spotify App once through all zones of the trivum system, just selecting them one after one, and then it will be possible to play your current and future presets in any zone.
Playing a Spotify Connect preset by KNX
As with every other trivum favorite, you can for example create KNX Events, under
automation / KNX / events
which play the preset directly, e.g. by a touch of a switch in the wall.
Playing an audio service playlist by one touch, or by KNX, is also possible with Deezer, TIDAL and Qobuz. It is easier with these services, as you do not have to do the initial zone authentication. Read more on that below:
About multiple Spotify users
A preset also stores an info which Spotify user it uses for playback.
Possible playback failure after password change
Should you ever change the password of your Spotify account,
it may happen that the preset playback authentications on trivum are no longer valid.
You may then have to repeat the above procedure once for the zones you want to use.
Before doing so, you may delete the (outdated) stored authentication data
in the trivum web configuration, under
music / streaming / Spotify Connect / Manage user authentication data
How to play TIDAL, Deezer or Qobuz playlists by KNX
In the trivum WebUI, select for example
music services / tidal / my music / own playlists
and then look at the right for "…". touch that, and select
Add playlist 'tidalplaylistname' to favorites
Repeat this for all TIDAL, Deezer or Qobuz playlists you want be able to start by KNX.
Then go into the trivum web configuration (/setup) under
configuration / zones / zone / change the knx bindings /
   play a favorite
and configure a KNX address to play. alternatively, you may
-
define the KNX/HTTP source list, and enter actions to play the playlist favorites
-
define global KNX events to play the playlist favorites
Network
Information about Routers and Switches - Multicast & IGMP and KNX Router List
There are numerous sources of errors in a home network.
Often a home network grows bit by bit. Whenever a new network device is added, be it a computer, a WLAN access point, an IP camera or the new TV, this device is simply plugged into the next hub/switch or router. If there is no slot left, a next small mini-switch is used to get a few new slots. Networks grown in this way often have many problems.
Therefore, it pays to think about the purchase of larger and a little more expensive switch.
These switches have the following advantages:
-
The many slots make it easier to have a single switch than a stack of "Mini" switches
-
The coordination of the data packets through the network is significantly optimized by a professional switch, as data packets are only passed on to the network devices for which the data is intended.
-
Especially with multicast data packets (one source - many customers) that are also used in group playback of music, modern and larger switches have the advantage. They support the protocol IGMP and thereby make it possible to significantly reduce the network load and thereby relieve network devices.
-
"Managed switches" have a web interface with which they can be configured and thus optimally adjusted.
Read more here about how to configure a managed switch. The article describes the configuration of recommended switches HP 1920G, HP E2620-24-PoEP and Cisco SG300-10. There are many other comparable switches, it is not possible to name them all.
KNX
Use KNX
trivum has been supporting KNX as an active KNX member for many years. We are constantly developing our KNX functions and are trying to make the KNX connection more flexible and at the same time even easier for the installer.
All trivum devices support KNX from the start. KNX is thus " built-in". In order for trivum devices to be able to work together with other KNX devices, a KNX/IP router or interface must be available in the KNX installation. trivum devices communicate via this IP router via KNX/IP.
In order to connect trivum devices sensibly with the KNX house installation, the trivum devices must be configured/parameterized accordingly.
activate KNX support
Note: The KNX/IP router must be configured so that EIB telegrams are allowed to pass from the KNX bus to the IP network. See KNX/IP router configuration
-
Open the WebConfig
-
Click KNX
-
Activate Activate KNX/IP
-
Check if a KNX/IP router is detected
By default, the IP address 224.0.23.12 is set as the Multicast address. If your KNX installation uses a different multicast address, enter it in the Router IP Address input box. Alternatively, you can display a list of the KNX interfaces found in your network. To do this, click Show found interfaces in the network.
If you want to use Secure KNX, you need to enter a backbone key.
You find this in your ETS project, under Reports / Project Security.
Use RTI
You can find the current documentation of the latest driver V9.2x
<link> here </ link> as German version
and
<link> here </ link> as English version
Coverart
(Album) cover art is artwork created for a music album. Iconic album cover art includes Pink Floyd’s "The Dark Side of the Moon", King Crimson’s "In the Court of the Crimson King", The Beatles' "Sgt. Pepper’s Lonely Hearts Club Band", "Abbey Road" and their "White Album" among others.[1]
How to use cover art with trivum MusicCenter
-
With .MP3 and .M4A-files, the cover art can be included directly in the music files.
-
Otherwise you may provide a file folder.jpg within an album folder.
Cover art contained in music file
-
Copy all music files onto a NAS
-
Create a database within iTunes
-
Import all music files from the NAS into the new iTunes database
-
Let iTunes search for coverart
→ Now, cover art might be visible within iTunes, however in many cases it will not be contained within the music files themselves.
To achieve this, follow these steps:-
Macintosh:
-
Download from ftp://service.trivum.com/Installer/iTunesScripts/ the EmbediTunesArtwork-Mac.zip and copy it into {username}/Library/iTunes
-
Extract the .zip file.
→ A .dmg is created. -
Double-click the .dmg
→ A window appears. -
Within the Finder, create a folder {username}/Library/iTunes/Scripts and from the new window, drag the icon Embed Artwork into Scripts
→ Now there should be a file{username}/Library/iTunes/Scripts/Embed Artwork -
Restart iTunes
→ Now there should be a new menu entry at the right top nearby help (a small black symbol). When opening it you see Embed Artwork -
Now you can:
-
select files that display cover art
-
then select Embed Artwork and the cover arts will be integrated into the music files.
-
-
-
Windows:
-
Download from ftp://service.trivum.com/Installer/iTunesScripts/ the EmbediTunesArtwork-Windows.zip
-
Run the tool within EmbediTunesArtwork-Windows.zip from the windows command line (cmd.exe)
-
-
-
Open the MusicCenter web surface
-
Click Streaming → Library
-
Enter the path to the NAS
smb://192.168.1.10/mymusic -
Click Shares → Rescan all files. Scanning may take a while.
→ The Status tab shows you if scanning is still ongoing
→ The Info tab shows some further statistics.
Coverart container in album folder
If you place image files with a name folder.jpg into every album folder on the NAS, then this will be used as cover art, if none is contained in the music files.
How to check cover art with further tools
Under Windows you may use {http://www.mp3tag.de/ MP3Tag} to check if your music files contain cover art, or to manually add cover art to (some) music files.
Playlists
Index Playlist
An Index Playlist is a normal playlist with a special name scheme. It must contain P1, P2, P3 … etc somewhere in the name (with blank spaces before and after).
P1 my playlist
My P1 playlist
My playlist P3
Example: Index Playlist
How to create a Playlist
There are multiple options to do so:
-
via iTunes Create a playlist in iTunes and export them as .M3U-file
-
via Editor Create a plain text with a format like you can see in the example below and save them as .M3U-file. .WebRadio-Playlist:
 #EXTM3U
#EXTINF:-1,Deutschlandfunk - MP3
http://www.dradio.de/streaming/dlf.m3u
#EXTINF:-1,KlassikRadio
http://players.creacast.com/creacast/klassik/playlist.m3u
#EXTINF:-1,KlassikRadio
http://str31.creacast.com:80/klassik1.m3u
#EXTINF:-1,MDR Sputnik Livestream
http://www.sputnik.de/m3u/live.hi.m3u
 #EXTM3U
#EXTINF:232,La Grange - ZZ TOP
smb://RackStation/T-Drive/Musik/trivumDemo/ZZ Top/Greatest Hits/La Grange.mp3
#EXTINF:239,Gimme All Your Lovin' - ZZ TOP
smb://RackStation/T-Drive/Musik/trivumDemo/ZZ Top/Greatest Hits/Gimme All Your Lovin'.mp3
#EXTINF:254,Sharp Dressed Man - ZZ TOP
smb://RackStation/T-Drive/Musik/trivumDemo/ZZ Top/Greatest Hits/Sharp Dressed Man.mp3
You can also find examples under ftp://service.trivum.com/WebRadios/
How and where to store
The trivum system may import .M3U playlist files from a NAS in a folder called Playlist, Playlists or Playlisten at the top level of the NAS share. The folder name is case insensitive.
MusicCenter V8: The .M3U files may also reside in any folder within a given NAS share.
Example
For example, music is stored on a NAS syndisk under a share named music, and the share registered in trivum reads like:
smb://syndisk/music/
-
Create a Playlist folder directly under music
smb://syndisk/music/Playlist -
Store your playlist file (.M3U) onto the NAS
smb://syndisk/music/Playlist/mylist01.m3u -
Rescan the NAS share with trivum.
Export a playlist in iTunes
Within iTunes, right click on a playlist and select export as .M3U.
How to store music files for best matches
Make sure to store your music in a folder structure like
Then, when exporting Playlists as .M3U files, they will contain path informations like
C:\Musik\Mike Oldfield\The Very Best Of\Shadow On The Wall.mp3
The trivum system will ignore C:\Musik and try to match music files on the NAS by the last three path components, e. g.
Mike Oldfield/The Very Best Of/Shadow On The Wall.mp3
So make sure that on both, the NAS and on your PC, all music is stored in the same folder structure.
If music files cannot be matched by the path name, the system tries to match them by artist and track name, however this is not reliable as special characters in those names may cause mismatches.
IP Device Integration
It is possible to send UDP IP Messages to devices integrated with Pro Line.
To do so, enter: 'Devices / your device / Commands' and then edit one of the "Command data" fields.
-
type into the command data: udp * hello\r\n
-
go into Advanced
-
enter at IP address: 192.168.1.100:5000 (this will be inserted for * in the udp commands)
-
make sure that "enableSlashPatterns" below it active otherwise \r\n will not work
Furthermore you may send bytes with speficic hex values by a pattern \xnn, for example \xff sends a byte with a decimal value 255.
How to restrict access on trivum devices
Restrict access to the web configuration
Enter the web configuration, then enable
-
System / Setup / Web configuration site protection
-
and enter a password.
Restrict Webtouch access
You can limit a Webtouch, or a Touchpad like:
-
restrict accessible zones for a webtouch
-
Hardware / Control units / select a web visu
-
check: Specify zones which can be controlled
-
then specify or limit the possible zones.
-
-
disable system setup in the webtouch
-
system / setup / advanced / hide system setup in webtouch clients
-
Make a zone completely unselectable
-
Configuration / Zones / zone / Basic Settings / Other Settings
-
disable: Zone is available in ZoneSelect menu
Hide audio sources like tuner or line input
-
disable fm tuner: system / setup / user interface details / disable: show fm tuner as source
-
disable line inputs per zone: Configuration / Zones / zone / Basic Settings / default line input: select "no default"
The SFK command line tool
sfk.exe (Swiss File Knife) is a command line tools collection combining many functions in a single, portable executable. It can search and convert text files, instant simple FTP/HTTP server, find duplicate files, compare folders, treesize, run own commands on all files of a folder.
trivum uses sfk.exe for a lot of tasks like
-
Analyzing KNX connections
-
Analyzing AirPlay connections etc.
Download & Installation
-
Download sfk.exe from http://service.trivum-shop.de/share/Tools/sfk.exe
-
Store it in a folder like
C:\trivum
Using sfk.exe
To use sfk.exe:
-
Windows:
Open a command line (CMD.EXE) -
Enter:
C:
cd \trivum
sfk
A list of all functions is displayed.
Analyzing KNX Connection
Ideally, connect your notebook to the same network switch as your KNX IP router and the trivum device. Then you can do these tests:
sfk knxdump
will show any incoming KNX message from the network, for example
192.168.1.100  reply 7/7/232  byte  : 033 (0x21)
192.168.1.100  write 7/7/101  bit(s): b0000 0x0
192.168.1.100  write 7/7/102  bit(s): b0010 0x2 d050
so you see, in this example, that a device 192.168.1.100 is successfully sending KNX telegrams into the network.
sfk knxdump -from 192.168.1.100
will only show messages from device 192.168.1.100.
sfk knxsend 1/2/3 1 1
sends a KNX telegram for group address 1/2/3 with a 1-bit value "1". For example, if you have a trivum KNX event configured to play a web radio on such a message, you can test this quickly by sending it.
sfk knxsend "1 2 3 8 200"
sends a KNX telegram for group address 1/2/3 with an 8-bit value "200". notice that 1/2/3 can be typed as "1 2 3" for more convenience.
Analyzing AirPlay Connection
Example:
sfk udpdump -bonjour
You should see messages like:
     [#001 received 295 bytes from 192.168.1.119]
      >00008400 ... 6976756D< ............ 94ACCA02B026@trivum 00000000
      >3A202331 ... 616C0000< : #119 Room 4._raop._tcp.local.. 00000020
      >21800100 ... 4F001C80< !.....x.........twister-8.8.O... 00000040
      >01000000 ... 01000000< ....x................. .O....... 00000060
      >780004C0 ... 20233131< x.....w 94ACCA02B023@trivum: #11 00000080
      >3920526F ... 1F393441< 9 Room 2.-.!.....x.........O.94A 000000A0
      >43434130 ... C02D0021< CCA02B021@trivum: #119 Kuche.-.! 000000C0
      >80010000 ... 30407472< .....x.........O"94ACCA02B020@tr 000000E0
      >6976756D ... 78000800< ivum: #119 Schlafen.-.!.....x... 00000100
These messages contain a binary data dump, also shown as text from.
If you see messages containing @trivum then these are AirPlay input announcements by a trivum server.
Filtering messages
If you see for example far too many AirPlay messages, you may filter the messages with the following possibilities:
-
by IP
sfk udpdump -bonjour -from=192.168.1.119
→ only messages from IP address 192.168.1.119 are shown -
by text
sfk udpdump -bonjour -data "@trivum"
→ only messages containing the text "@trivum" are shown.
No messages in sfk.exe
If you see no messages at all, but there must be some devices in the network:
-
Open CMD.EXE as administrator
-
Check your Windows Firewall settings
-
Connect your notebook by LAN cable to a network switch
-
Disable WLAN at the notebook
Hardware compatibility list
NAS
-
Synology
-
WD My Book
-
D-Link DNS-320L
Known incompatible NAS systems
-
Freecom Network Drive XS (of 2011, does not reply to SMB seek command)
Recommended Network Switches
Please read more in this article: [groupplay]
-
Netgear ProSafe GS108
-
D-Link DGS-1100
-
TP-LINK 2008 managed switch (although it has IGMP it blocked trivum messages) and similar switches. May cause StreamSource cards to stop playback until a restart of the switch.
-
D-Link DGS 1210-24P fails to work with newer trivum touchpads (A13 architecture).
-
Ubiquiti US-24-250W: this POE switch seems to provide insufficent or non persistent power for 7 inch touchpads. it causes a black screen after several hours of running time.
-
Netgear GS728TP-100EUS
-
Netgear GS728TPP
deliver a too high POE voltage, which may cause network failures with a trivum Touchpad, so the Touchpad may not allow connections to a music server.
Also check the Sonos list of known incompatible hardware:
As network switches listed as problematic for Sonos may cause problems with trivum devices as well.
IR Adapter programming by the Infrared Tool
To program the trivum IR Adapter with commands of an IR remote control follow these steps:
-
download the trivum IR Tool (Install-IrTool-*.exe) from https://www.trivum-shop.de/support/docs/de/tools-overview.html
-
install and run the tool.
-
if the IR adapter is connected to the network, it should appear automatically at the left under "Serial".
-
select the adapter by it’s serial number. click on the flash symbol to connect to the adapter. wait until it shows "Connected".
-
hold your IR remote control in front of the adapter, in a distance no longer than 40 cm.
-
then, for each command to program:
-
look for the "IR command" button. it shows a rectangle curve, and on startup, there should be a zero right to it, meaning zero commands have been received yet.
-
press a button on your IR remote control.
-
if the adapter receives the command, the IR command button should increment it’s counter.
-
now drag+drop the IR command button to a slot above it. you will see a popup. enter a command name and optionally select a multikey. For example, if you pressed Power Off, select M: Power off. repeat this step for all further commands.
-
finally in the Page column select "Use" for page 1.
-
close the connection.
Store commands into a database file:
After all commands have been programmed, also look at the "File" area at the left bottom. Click on the "new file" button and enter a filename to store the current database. Make sure to select a writeable folder (NOT within "Program Files"). Then drag+drop the commands to store from the top area into the file area. On every drag+drop the database file is written automatically. You may also drag+drop whole Pages from the top Page area to the bottom, taking over all commands of a page in one step.
Load commands from a database:
In the File area at the left bottom, click on "S" and select a folder containing database files.
How to use coverart with trivum MusicCenter
-
copy all music files onto a NAS
-
create a database within iTunes
-
import all music files from the NAS into the new iTunes database
-
let iTunes search for cover art
-
now, cover art might be visible within iTunes, however in many cases it will not be contained within the music files themselves.
To achieve this, follow these steps:-
under Macintosh:
-
download from
ftp://service.trivum.com/Installer/iTunesScripts/theEmbediTunesArtwork-Mac.zipand copy it into{username}/Library/iTunes -
extract the .zip file. A .dmg is created.
-
double click the .dmg. → A window opens.
-
within the Finder, create a folder
{username}/Library/iTunes/Scriptsand from the new window, drag the icon"Embed Artwork"into"Scripts".
Now there should be a file:{username}/Library/iTunes/Scripts/Embed Artwork -
restart iTunes.
Now there should be a new menu entry at the right top nearby help (a small black symbol). When opening it you see "Embed Artwork" -
Now you can
-
select files that display coverart
-
then select "Embed Artwork"
and the cover arts will be integratedinto the music files.
-
-
-
under Windows:
there is a tool available for download fromftp://service.trivum.com/Installer/iTunesScripts/
withinEmbediTunesArtwork-Windows.zipwhich must be ran from the windows command line (cmd.exe).
-
-
in the MusicCenter web surface, under Streaming / Library, enter the path to the NAS.
It must start with "smb://", e.g.smb://192.168.1.10/mymusic -
click on Shares / Rescan all files. Scanning may take a while.
In the Status tab, you may see if scanning is still ongoing.
In the Info tab, you may see some statistics.
Alternative method: the Folder Image
If you place image files with a name "folder.jpg" into every album folder on the NAS, then this will be used as cover art, if none is contained in the music files.
How to check cover art with further tools:
Under Windows you may use MP3Tag to check if your music files contain cover art, or to manually add cover art to (some) music files.
EIB/KNX ETS Group Address List import
Requires a plain ASCII text file like:
""
""   "light whatever one"   "1/2/3"
""   "light whatever two"   "1/2/4"
(remove blanks at line starts in this example, whitespace between " " should be Tab characters)
which can be exported by ETS by using:
Output format          : CSV
CSV format             : 3/1 - three columns, Main/Middle/Sub group separated
Export with header line: yes
CSV separator          : Tabulator
it can be imported at the server
-
V9/V10: under Automation / KNX / Setup communication / Import CSV
-
V8: under System / KNX Setup
-
V7: under KNX / Businterface / choose file
| you must use a Firefox or Safari browser for upload. Chrome may or may not work. Internet Explorer will never work. |
Up to 500 group addresses are supported, but it is recommended to import only up to 250 to avoid a slow down of the server’s web configuration GUI.
Since trivum V 8.54 build 7649 the following format is also supported which is mainly created by ETS 4:
"Main"  "Middle"        "Sub"   "Address"
"new main group"                      "5/-/-"
     "new middle group"             "5/1/-"
             "Ausgang1Toggle"        "5/1/0"
             "Ausgang1Dimmen"        "5/1/1"
             "Ausgang1Brightness"    "5/1/2"
it does not require a header line. All entries with an incomplete group address like "5/-/-" are ignored.
To reduce a large list of group addresses, you may use
-
a plain text editor like Notepad for Windows
-
or import the list into Excel, edit it, then re-export as .CSV data
-
or use the Windows command line tool sfk from
https://www.trivum-shop.de/support/docs/de/tools-overview.html
and then, to keep only group addresses in the range1/7/*:
sfk filter input.csv -+\"1/7/*\" +tofile out.csv
Streamcard Error 3 (Finding Server)
Problem
Communication between a Streamsource card and the MusicCenter is not possible.
Solution:
A Streamsource card checks every 2 seconds if it’s communication partner (software process) is still running. If it has no infos so far about that partner, or the partner is not answering, then this error appears.
-
disrupted network communication
-
a bug in the Cardhost communication (MCenter V7 or V8 Pro Line) if many (PowerAmp) cards are used. (Fixed from V7.77)
In most cases it’s a network problem. This can be checked by the trace.exe tool. Identify the Streamsource IP address, then type in the commandline:
trace.exe streamSourceIP
Then press 'i' for Informations.
If the card does not react or shows "Repeating request" permanently then there is a communication problem with the MusicCenter, e.g. from IP conflicts with other devices, or a router problem. It’s also possible that the Streamsource itself is defect.
You may also try:
ping streamSourceIP
in the commandline. If there is no reply, check cabling to the Streamsource card.
An update to MusicCenter 7.80 or 8.25 may also help as the Streamsource card handling was improved.
Actuator: No Internet or Nameserver - cannot Update
The Actuator needs configuration data from a DHCP server. A DHCP server gives the Actuator an IP address, and it tells about which Name Server to use. A Name Server is required to connect to the internet to allow
-
web radio playback
-
software updates
-
NTP automatic time setting.
Therefore make sure that your Router/Switch/Modem that connects your local network to the internet provides a DHCP service which also gives correct Name server informations.
Follow these steps:
-
open your Router’s web configuration GUI in a web browser.
-
search for settings like: DHCP and Name Server.
-
make sure that DHCP is active.
-
make sure that Name Server informations are sent into your network. If you see some Nameserver address like n.n.n.n then verify that this server actually exists, on the command line with a command like
"ping n.n.n.n".
And if you have no idea what Name Server IP address to use for configuration, try 8.8.8.8 which is the Google Nameserver. -
after changes to the network configuration, first check with a PC or Notebook if Internet access is still working, by opening some internet website.
Then restart the Actuator.
AudioBox P150 volume is limited before 100 percent
If you turn up the volume to the maximum, you may experience a drop of volume near the maximum.
This is the automated limiting feature, to protect the hardware. There is a clipping detection in the hardware, and when it is triggered there is an automated limiting of the output power, to avoid an overload of electric current.
This effect is dependent on the music content played. If you play quiet music, like classic compositions, you may be able to reach 100 percent.
How to pre-select streaming content after a system restart
If the trivum system is restarted, and you select action Stream, nothing is played immediately, as no music is selected.
This can be changed by combining a macro with the function "run action on system start":
-
under configuration / macros, create a macro with two steps:
-
select and play streaming content in a zone
-
then power the zone off immediately
-
-
under configuration / zones / zone / actions / run action on system start
create an action: run a macro, then select the above macro.
Then this will happen:
-
30 seconds after system restart, the zone is switched on, selects some streaming content, and switches off immediately.
-
if you press "Stream" later in the day, it will play the preselected content immediately.
Can you stream Airplay audio from Android devices to trivum?
Not by default, but with the commerical AirMusic app it might be possible, at least with audio from the Youtube app.
KNX Scene Configuration example
Example: a trivum actuator should be controlled by KNX scenes.
By selecting two different scenes through GA 1/5/99 the first zone should either be off, or it should play a station of the FM tuner.
-
Automation / KNX / Setup communication:
-
enable: Use KNX/IP
-
Group address for scene save/restore: enter '1 5 99'
-
-
Zones / first zone / KNX settings:
-
GA to include/exclude in scene: enter '1 5 90'
-
-
Scene programming:
-
scene 1: off state
-
make sure the zone is off.
-
tell first zone it is part of a scene:
send through KNX1 Bit, Value 1, to 1/5/90
→ to verify if this KNX command was accepted, look under Developer/Traces/KNX Trace where it should say:"Zone 'first zone' will handle scene part '1' telegram" -
store the current (off) state as scene number one:
calculate the scene index
-
-
index = scene number - 1
calculate the command code
         Store   = 128 plus scene index
         Restore =   0 plus scene index
send through KNX: 1 Byte, Value 128, to 1/5/99
→ verify if the KNX trace says: "will save scene 1. scene 1 save included 1 zones."
-
scene 2: FM tuner station
-
activate FM tuner in the zone, select station 3.
-
store the current (on) state as scene number two:
send through KNX:1 Byte, Value 129, to 1/5/99
→ verify if the KNX trace says:"will save scene 2. scene 2 save included 1 zones."-
Use the scenes:
-
-
-
use the "off" scene:
send through KNX:1 Byte, Value 0, to 1/5/99
→ the zone should switch off.
→ verify if the KNX trace says:"will restore scene 1. included 1 zones." -
use the FM tuner scene:
send through KNX:1 Byte, Value 1, to 1/5/99
→ the zone should play FM tuner station 3.
→ verify if the KNX trace says:"will restore scene 2. included 2 zones."
|
It is not required to have "trace bus communication" active to see the KNX trace messages shown above. The important action messages for scene handling are always traced. |